
I am working on a personal Chrome Extension project where I need a way to convert a video file – like your standard mp4 – into a media stream, all within the browser. Adding a file as a src to a Video Element is easy enough. How hard could it be to convert a video file to a proper MediaStream for use with WebRTC? Well, after experimenting with a few ideas I realized this was not going to be a quick and easy task for my needs. I was also curious see what WebCodecs could do here, which I knew would be more involved. Then, during this experimentation I had a project pop-up where we needed to evaluate playback approaches in larger scale WebRTC calling applications, so I let the scope creep further to include server-side approaches.
This post is the culmination of my research. Here I:
- Describe and compare higher-level architectural approaches
- CDN oriented approaches
- Using a media server as part of or as an add-on to your WebRTC infrastructure
- Pure client-side web approaches with no servers required
- Evaluate client-side JavaScript approaches, including:
getDisplayMediacaptureStream- WebCodecs
- Experiment with lesser known features like Web Audio sinks the
suppressLocalAudioPlaybackconstraint - Include demos of all the client-side examples you can try
See the Table of Contents below for more details if you’re not sure where to dive in.
Many thanks to Gustavo Garcia, Elad Alon, and Philipp Hancke for their review and comments.
Contents
- Background
- Video network approaches
- Media Server Approach
- Client-side approaches
Background
There are a lot of reasons users may want to share a video with others during a WebRTC session:
- Sharing a pre-recorded segment during an online event
- Collaboration on editing or critiquing the video’s content
- Social gatherings with shared experiences, like watching a movie or video clips together
This post looks at the different ways to share a video file during your real time call. I review server-side approaches, but much of the post and all of the code examples are dedicated to client-side options.
Approaches
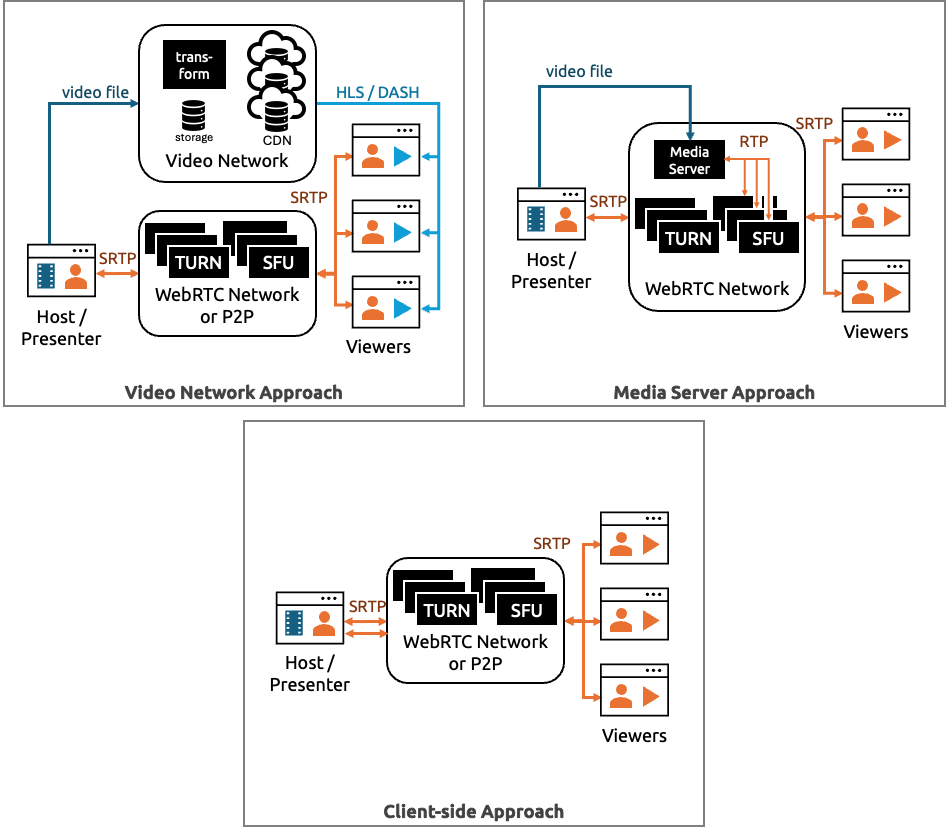
There are three main approaches to sharing a video sourced from a file during a WebRTC session:
- Video network approach – use/build a parallel network with its own player
- Media server approach – upload the file to a media server that converts it to RTC where it is handled like your other streams
- Client-side approach – RTC conversion happens in the browser and the stream is treated like your other user streams
Example architectures of each of these approaches are shown below:
No p2p CDN’s?
I should also mention WebRTC can also be used in peer-to-peer CDN networks (see here for some Kranky Geek coverage of that). These CDN’s are often used for video distribution, but that is not what I am covering here. Those could be an option within the video network approach, but the WebRTC data channel mechanisms used there are effectively independent of the user’s other RTC streams.
Considerations
As with most things, the best solution depends on your situation and user needs. Here are some considerations:
- Cost – unless you are leveraging a free video hosting service, someone needs to pay for the costs of video storage, bandwidth, and processing; client-side approaches offload the processing and storage (if you use a SFU, you’ll still have some bandwidth costs for the extra stream)
- Quality – whenever you stream in real-time over the Internet you risk some quality loss, but with the client-side approach you risk quality degradation on the uplink side from the user streaming the video which would limit the quality anyone would get on the downlink
- CPU / power – most of the client-side approaches involve encoding, which will add to the load on your end-users devices
- Time to initial playback – the server-side approaches usually require that you upload the video in full before it can be played back to other, meaning you cannot start streaming the video immediately like is possible with the client-side solutions
- Storage – do you need the video to be available for playback at a later date or for others not on the real time call? If yes, then you will likely need to store the video in some form server-side anyway
- Privacy – opposite from the above, perhaps you do not want the video playback available at a later date or want to take advantage of features like end-to-end encryption to ensure no intermediaries have access to the content
- Browser support – as will be explained in the client-side approach section, each approach has limits and variations between browsers that are generally avoided with the server-side approach
- Native client support – the client side solutions I present all utilize standard WebRTC
MediaStreams on the client-side, so should work with an existing WebRTC app as would the media server approach. The server-side does this meaning other approaches need different video player logic could have their own challenges in your native client
The table below gives my assessment of how each approach rates on a relative scale for each consideration. 🔴 means bad relative to the other approaches, 🟡is neutral, and 🟢 is good.
| Consideration | Video Network | Media Server | Client-side |
|---|---|---|---|
| Service Cost | 🔴 | 🔴 | 🟢 |
| Quality | 🟢 | 🟢 | 🔴 |
| Client CPU / Power | 🟢 | 🟡 | 🔴 |
| Storage for later reuse | 🟢 | 🟡 | 🔴 |
| Time to Initial Playback | 🔴 | 🔴 | 🟢 |
| Privacy | 🔴 | 🔴 | 🟢 |
| Browser Support | 🟢 | 🟢 | 🔴 |
| Native Client Support | 🟡 | 🟢 | 🟢 |
We’ll explore alternatives within these architectures and examine the relative advantages and disadvantages in more detail in the sections below.
Video network approaches
Humans watch many trillions of minutes streaming video over the internet. Video streaming technology is very mature and widely supported. Think Netflix, YouTube, Twitch, etc. This technology includes the video player in your browser and Content Delivery Networks (CDNs).
The video content delivery ecosystem is large and healthy. It has many options and competitive pressures that help keep prices low. However, as we will review, file processing, storage, and bandwidth does ultimately have a cost that someone needs to pay.
Also remember any server-side approaches require uploading the video ahead of time – or at least parts of it. The amount of time between the upload finishing and playback can vary from seconds to many hours.
YouTube or other video hosting service
Perhaps the least effortful way of doing this is to just ask users to upload their video to a public video service like YouTube, Vimeo, or one of their competitors. YouTube playback of other people’s videos might be something you want to support anyway.
In this approach, each user loads the video from YouTube independently using the embedded YouTube player. Then you can use whatever signaling channel is available to relay commands to control the playback – pause, seek, load a new video, etc. YouTube has a vast CDN, but it may be subject to certain regional restrictions.
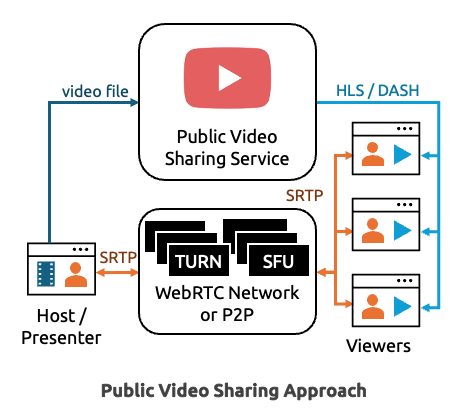
The YouTube embed player also allows you to click on elements and open YouTube in a new tab, which you might not want. You can control much of the functionality via URL parameters or use clever overlays to intercept clicks. You can see how Jitsi Meet uses the YouTube iFrame API via react-youtube on their repo here.
Some other file server or CDN
You could also upload the file to some other server – like an AWS S3 bucket and have your users download the file from there when it’s time to view the video. In that case, using a segmented mp4 is best. Rather than having to download the entire mp4 before playback can begin, the segmented format allows playback to begin when one segment is downloaded, and you can skip to specific segments without having to download the entire video. I cover some of those concepts in more detail in the WebCodecs section toward the end of this post.
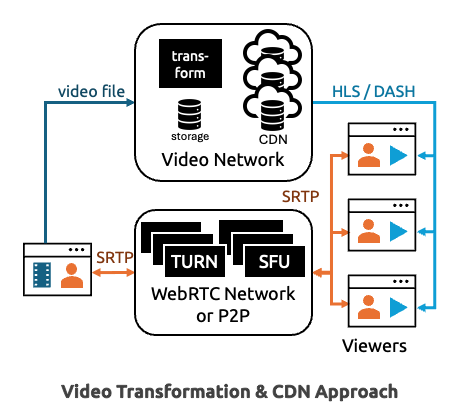
HLS & DASH
For even better playback quality in variable conditions, it is best to convert the file to HTTP Live Streaming (HLS) or Dynamic Adaptive Streaming over HTTP (DASH). Those formats convert the file into smaller chunks of various resolutions / qualities. Devices with poor connections or small screens can progressively download the smaller files and can adapt as conditions change. A client-side video player, such as video.js, will help monitor the stream and manage playback.
LL-HLS & Drift
Formats like Low Latency HTTPS Live Streaming (LL-HLS) use smaller file segment sizes to keep playback latencies down to a few seconds. That also helps avoid drift – where your users experience different latencies and therefore see different parts of the video at different times. Drift is particularly bad in WebRTC scenarios since you can have users reacting to the video at different times while the rest of the experience is real time – i.e. you don’t want someone laughing at a joke 4 seconds too early.
CDNs
If you have a large audience or want to make sure you have the lowest download latency you can get, the next step is to load the file onto a Content Delivery Network (CDN). CDN’s distribute the files around the world, or whatever regions you choose. It takes time to distribute the files around the different CDN regions. Once they are there then they should be served from edge locations that are closer to your users for lower network latency.
Processing the files
Most source files will not be segmented and if you want to convert a video file to a HLS or DASH format, you will need to use something like ffmpeg. As I show in the WebCodecs demuxing section further ahead, you can use mp4box.js or ffmpeg.wasm to format your files client-side, but I have always seen these procedures done server-side in practice. That means you’ll need to set yourself up a server. Or you can use a commercial service to do this for you. Either way there is a larger cost to that infrastructure.
Media Server Approach
The server-side approaches discussed in the previous section don’t use WebRTC. If you have the appropriate infrastructure, you could convert the video file to WebRTC and stream directly from your existing WebRTC servers- be that a Selective Forwarding Unit (SFU) or a Multipoint Control Unit (MCU) (some background on those here).
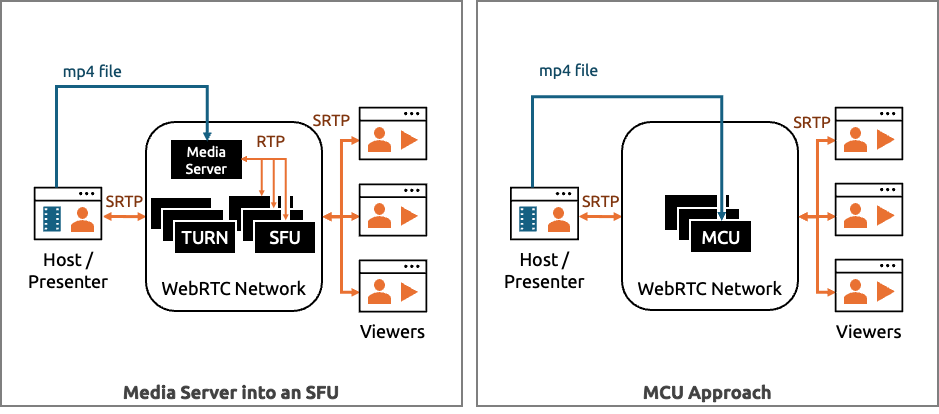
The advantage of this is that you can treat the video like any of your other webcam streams. Your front-end doesn’t need any separate video player logic. The streams reuse all your existing Selective Forwarding Unit and TURN infrastructure. If you have a SFU that supports Simulcast or Scalable Video Coding (SVC), then your users will also benefit from those enhanced video quality mechanisms (beyond those that are built into standard WebRTC).
Also, unlike the other approaches, you don’t need to worry about drift / synchronization with this approach. The video file is converted to a RTC stream and kept in (near) perfect sync with your other users’ streams.
Unless you are using a CPaaS or media server platform with this capability, you will need to implement the media server and the associated signaling logic. If you are building this yourself or using an open source media server (/SFU), then odds are you’ll end up using ffmpeg or GStreamer somewhere in your pipeline.
Not all WebRTC systems support video playback, but many do. See here for some examples of how some popular WebRTC servers do this:
- Pion – play-from-disk-h264
- Janus – streaming plugin & demo
- Intel OWT – immersive video sample
- Kurento – Java Player
There are plenty of others. Make sure to check if your existing platform already has the capability.
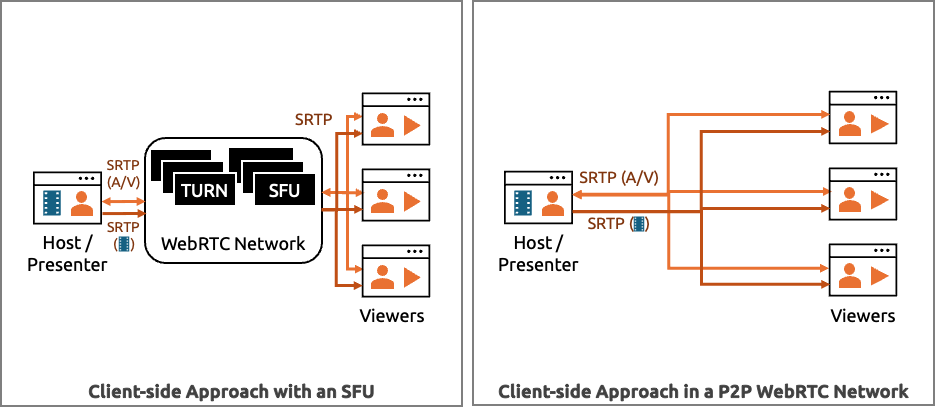
Client-side approaches
Many services rely on client-side approaches for sharing videos. Services without a dedicated “share a video” function often recommend screen sharing. Other services like Zoom’s desktop app, pop-out a video player that is used for a window capture. I tried to replicate this in the screen sharing a video file section. There is also a dedicated captureStream API for converting DOM elements into MediaStreams. WebCodecs is a new mechanism for doing this.
Client-side pros and cons
Some benefits of the client-side approach include:
- Instant playback – there are no upload and file conversion delays, you can stream the video right away
- No new infrastructure required – no new servers needed
- No storage or processing costs – cut your bill by having your users handle storage and encoding
- Works with peer-to-peer (p2p) architectures – even if you have no SFU or media server infrastructure outside of your web server
- Works with end-to-end encryption (e2ee) – techniques like e2ee with insertable streams also work here
As I will highlight in the following sections, some of the general downsides are:
- Inconsistent client support – there are big differences across browsers and even across operating systems
- Quality – you are sending a stream over the network instead of the original file, so if the sending user has uplink issues it will reduce the quality for all viewers, even if they have plenty of bandwidth
- Client-side overhead – will be decoding the video and re-encoding, adding to the CPU/GPU processing your client devices need to handle and requiring more power consumption
Notes on the Examples
I include code excerpts in many of the sections below, but if you want to follow-along with the source then please see the links below. I’ll link to the specific sub-projects in each sub-section too.
Also note most of the examples don’t actually include a RTCPeerConnection. Conversion of the video into a MediaStream is generally good enough since the RTCPeerConnection just transmits the MediaStream as-is. Given that, I didn’t include the peer connection logic in most cases to keep the code easier to follow. See the screen sharing a video file for an example that does include the peer connection.
Screen Sharing a video file
You can capture a video with getDisplayMedia as shown in the official sample. This works, but it is clunky user experience – especially if you want to broadcast the audio.
getDisplayMedia outputs a MediaStream, just like the one you send over a RTCPeerConnection with getUserMedia. If you have a network based on a Selective Forwarding Unit (SFU), then you can handle the screen capture just the same as any other stream. Just keep a few things in mind as you set up your service. Many WebRTC services often optimize getDisplayMedia for sharing static documents in high fidelity – that usually means a high resolution, low frame-rate, and the use of detail contentHint on the MediaStreamTrack. Most screenshared-video files need a higher framerate with high resolution. You may also need to consider available bandwidth if you want to prioritize the shared video file.
Chrome allows selection of a tab, window, or entire screen. Safari and Firefox only support sharing a window or the whole screen – no individual tabs. Those browsers also require that the shared window stay in the foreground for the capture to work. (Note: this is a bit dated, but I covered some of the getDisplayMedia differences here)
getDisplayMedia and audio
Today, only Chromium browsers support sharing audio and the experience varies depending if you are on Windows or macOS. Both allow you to share audio from a tab. Windows also lets you share the system audio if you select the entire screen, but not Mac. You need to make sure the user clicks on the “share audio” which should be on by default if you include audio in the getDisplayMedia options – i.e. navigator.mediaDevices.getDisplayMedia({video: true, audio: true}).
There is no audio capture support at all on Safari or Firefox. In fact, getDisplayMedia did some strange things for me on Safari with the video:
suppressLocalAudioPlayback
I struggled for a while controlling the local audio volume / mute state while maintaining the volume output. This ability is nice/required in cases where you want to play the video for your audience but mute it for yourself, so you could for example listen for a specific spot in the next video you want to queue up. In collaborative production environments, you may also want mute the broadcasted audio for just the producers so you can speak among yourselves without impacting the audience’s stream(s). Muting or lowering the volume of the source video lowers the volume on the output stream.
Then I came across a track constraint I forgot about – suppressLocalAudioPlayback. This mutes the audio output of the sharing tab while maintaining the full volume in the source track. That still doesn’t let the sharer hear that video, but you can get around that by adding the stream / audioTrack to another local media element and controlling the local audio volume and mute status there.
suppressLocalAudioPlayback is only supported on Chromium browsers today.
Element Capture
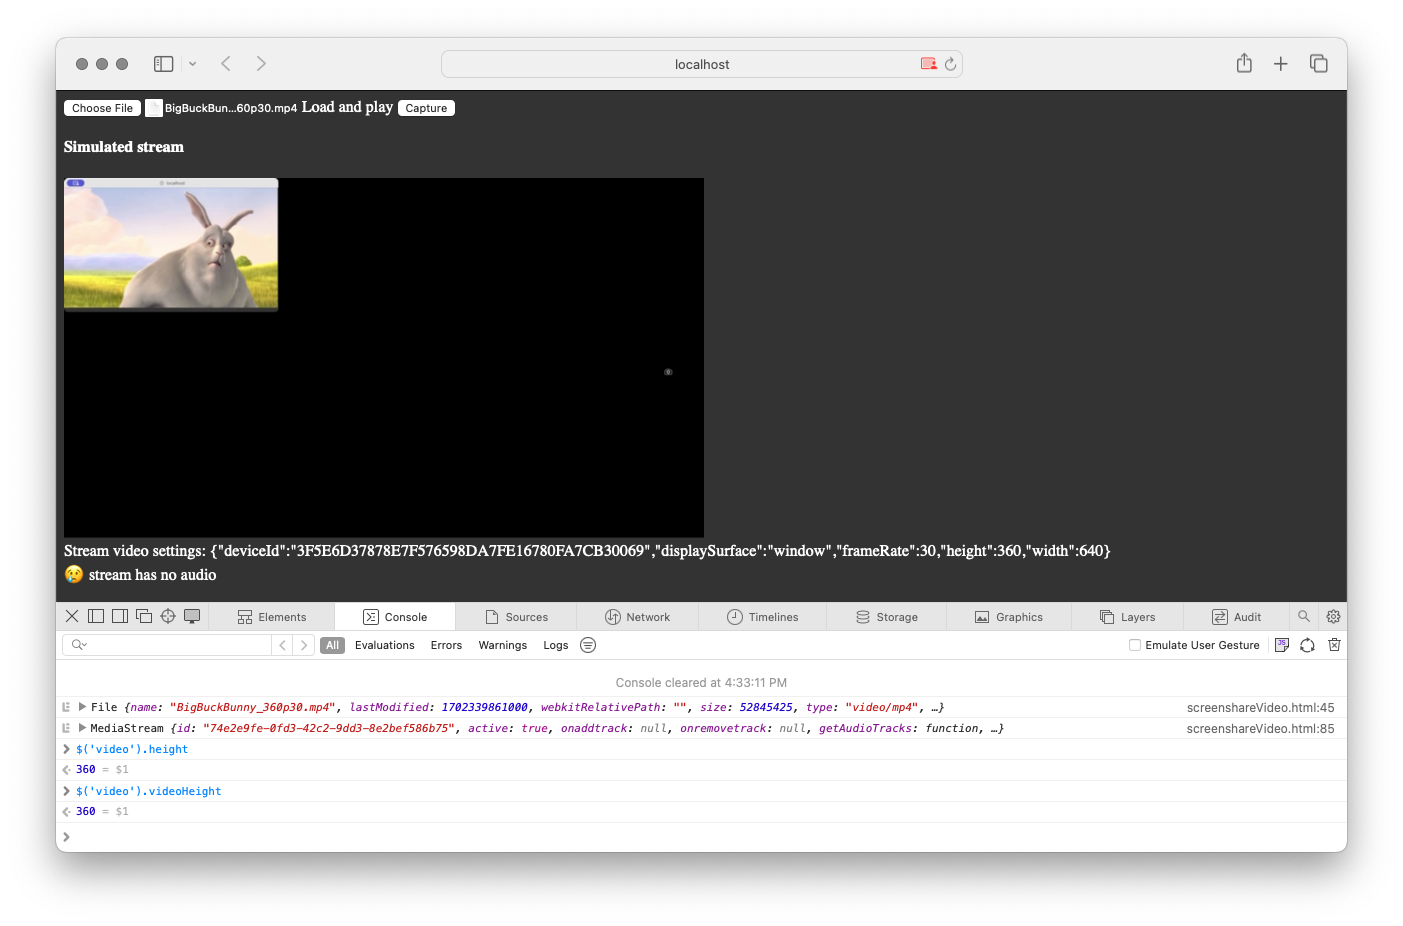
I also did some quick experiments with the new Experimental Chrome API called Element Capture currently available under this flag chrome://flags/#element-capture. It lets you specific a specific region of a shared tab for sharing. One advantage of sharing from a tab is that you can use preferCurrentTab. preferCurrentTab limits the user’s choices in the screen share selector to “cancel” or “allow”, as shown below:
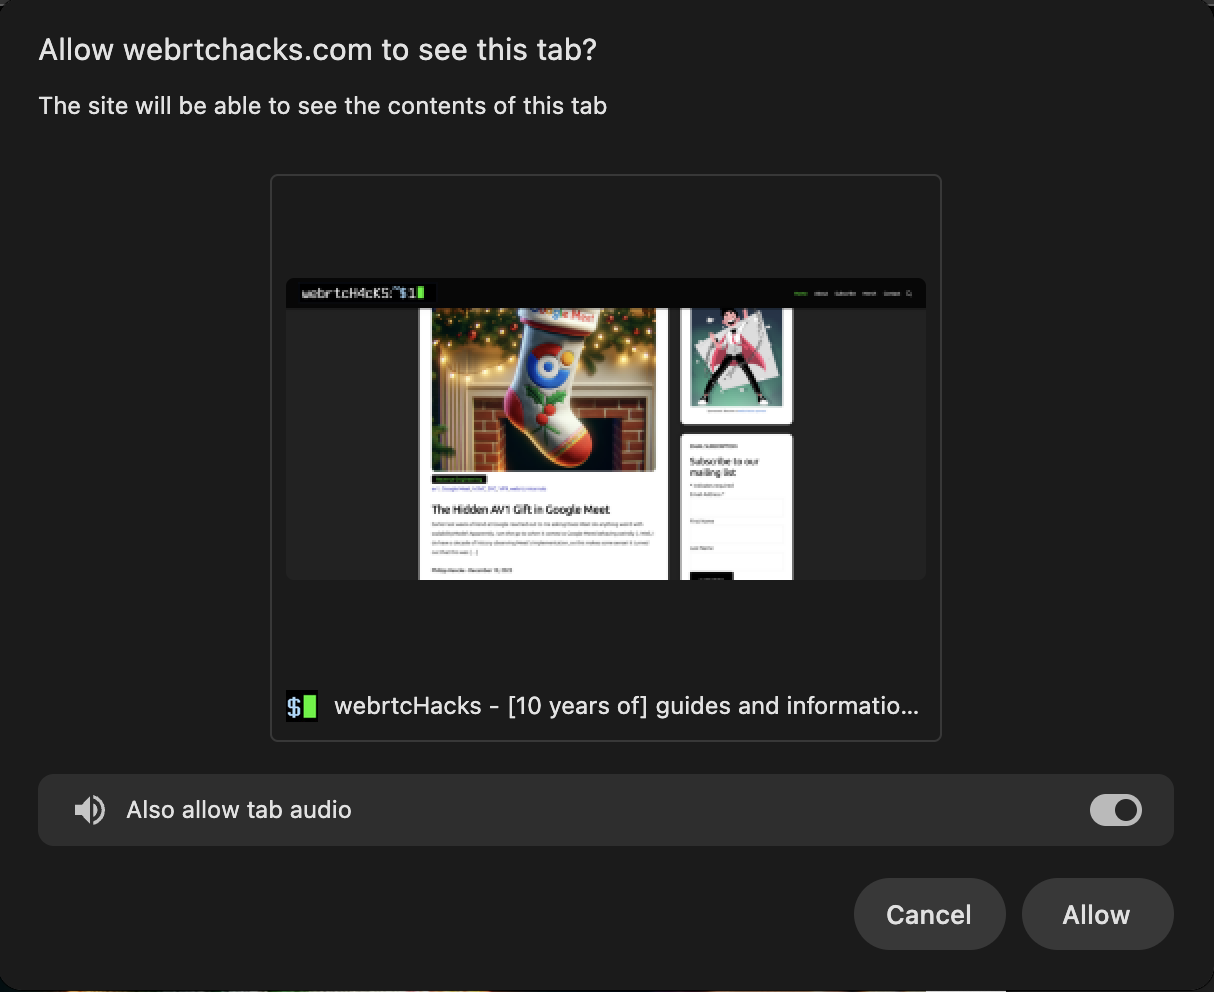
preferCurrentTab constraint.Some notes and challenges I see:
preferCurrentTabreduces the chances of user error for this specific use case, but they could still click “Cancel” or not select the audio so it is better but isn’t perfect- the
getDisplayMediavideo track settings returns the size of the entire captured tab, so make sure to keep track of the sizes you want to display – I specified{video: {height: 360, width: 640}}in my constraints to match the source target size (the video in my case) - You can’t use
suppressLocalAudioPlayback– that mutes the entire tab - Audio capture seems to take the entire tab audio, which causes echo if you play the receiver video out of the same device which I am doing to keep this all on one page
- Hiding the source video element sets the output video track to
muted: trueand the video freezes; Element Capture should work if hte video is obscured, so a work-around may be to just move it behind somethign else to hide it - The output audio track follows whatever you do to the source – muting, mutes the output, lowering the volume lowers the volume on the output, and setting the audio sink to
noneresults in no audio output - Muting the source video does not appear to set the output audio track to
muted: true - This is still experimental, so you need to set chrome://flags/#element-capture or get an origin trial token – status tracker here
Once you set the flag, you can experiment with it here:
See below for a a pop-out player example that using non-experimental API’s.
Can the getDisplayMedia approach work?
Noting that this mechanism would only be available to Chrome users, I gave implementing this an earnest try to see what is possible.
See it here:
Some highlights:
- It loads a separate video player page – which is just a
<video>element – into a popup with the chosen file as a source - A separate button calls
getDisplayMedia - To guide the user to picking the right tab, the
getDisplayMediahides the cursor, excludes sharing of whole screens, and doesn’t prefer thecurrentTab - I do my best call attention to the VideoPlayer pop-up in its title
- The captured video is sent to a local preview window that you can hide, mute, and lower the volume
- The capture stream is sent over a
RTCPeerConnectionand then played - I included an audio output selection drop down – choose a different device to verify the local audio output is independent of what is sent over the peer connection
The user can still choose the wrong thing, but this works better than I thought it would in ideal conditions. However, it still needs some work. Here are some caveats and to-dos:
- This is aimed at Chromium browsers-only – I made no accommodations for other browsers (skip to the canvas.captureStream + Web Audio example for that)
- It assumes pop-ups are allowed – I should check for that
- The file I used for testing was 640×360, so I set all sizes statically assuming that resolution – one could load the file to a hidden video Element to get the sizes that way and then adjust the size of the Window for the video size and browser
- The pop-out loads as a tab if the browser is full-screen, and the capture area ends up too big in that scenario – region-capture or the new element capture mentioned above to help here
- Sizing the video inside the player so you can screen share every pixel of the video without anything else is not all that straightforward. The tab share notification panel and shared tab highlight end up changing the size of the window and I couldn’t get it to share perfectly without an extra bar on the bottom. I colored this fuchsia to make it easier to see. Again, region-capture or the new element capture could mitigate some of this.
- The cursor shows because the cursor constraint is not supported – you could possibly get around this by implementing your own video controls under the video and using a
div.style.cursor=”none” - I could use conditional-focus to choose whether to focus on the player or the main tab
Summary
Good
- Audio and video handled together on Chromium browsers
- Let’s you put the player in a separate window (like the Zoom desktop share a video does)
Bad
- No audio unless you are on a Chromium-based browser
- Source video player needs to be in the foreground on Firefox and Safari
- UX – the extra window pop-up has limits and the browser screen picker UI not great for this use case
captureStream
One of the easiest ways to convert a video to a stream is to use captureStream on a source Video Element. This works on Chromium browsers, but not Safari. There you need write to a canvas and do canvas.captureStream, instead of on a Video Element. We will cover that in the next section.
You can see the basic API as part of the official WebRTC samples here: https://webrtc.github.io/samples/src/content/capture/video-pc/
I initially tried to embed this here on codepen.io, but I discovered captureStream is hard to show like my other examples here because it requires the source of the captured element be from the same origin as the page. So here are the links to GitHub:
Local audio quirks
If your video element is producing both audio and video, captureStream will output both an audioTrack and a videoTrack. There are no constraints to select for just audio or video like in getUserMedia or getDisplayMedia. Also, Unlike with getDisplayMedia, there is no suppressLocalAudio option. You can’t do an applyConstraints with that parameter.
The spec says:
Whether a media element is actively rendering content (e.g., to a screen or audio device) has no effect on the content of captured streams. Muting the audio on a media element does not cause the capture to produce silence, nor does hiding a media element cause captured video to stop. Similarly, the audio level or volume of the media element does not affect the volume of captured audio.
However, I found lowering the volume on the source element does lower the volume on the output stream. Muting on the source mutes the output stream. You can attach the source to a hidden Video Element and capture from that – you won’t see the video but you’ll still hear the audio in the background. I tried cloning tracks and messing with Web Audio, but nothing worked for local volume control other than making a mute hack by setting the audioSink to “none” in Chromium browsers. I will talk about Web Audio and that sink hack more in the next section.
Summary
Good
- Easy – least amount of code
- Captures both audio and video
- Source video doesn’t need to be visible
Bad
- No Safari or iOS support
- Firefox has some peculiarities you should review
- Video source has to be on the same origin as the page – no saving your video to a CDN on a different domain
- Requires inclusion in DOM, so not available in workers
- No independent mute state or volume level – what you hear is exactly what is sent
canvas.captureStream + Web Audio
Safari doesn’t support captureStream on video elements, but you can capture from a canvas there. Unfortunately, that doesn’t give you audio, but we can use Web Audio for that. Canvases and Web Audio are also available inside workers, which would be nice to offload the processing intensive task of encoding. So, I set out to see how easy full audio and video capture is from these two methods.
No capturing from an offscreen canvas
For the canvas capture part, my first instinct was to do something like this:
|
1 2 3 4 5 6 7 8 9 10 |
const offscreenCanvas = new OffscreenCanvas(sourceVideo.width, sourceVideo.height); const ctx = offscreenCanvas.getContext('2d'); const outputVideo.srcObject = offscreenCanvas.captureStream(); function processFrame() { ctx.drawImage(sourceVideo, 0, 0); requestAnimationFrame(processFrame); } requestAnimationFrame(processFrame); |
but, that gives:
Uncaught TypeError: offscreenCanvas.captureStream is not a function
You can’t capture a stream on an OffscreenCanvas, but you can do a canvas.transferControlToOffscreen(). That lets you transfer control of the canvas to a worker:
|
1 |
worker.postMessage({canvas: offscreen}, [offscreen]); |
But unless you are modifying the source image – say by adding some annotation – moving to offscreen does not buy you much processing offload. The video stream isn’t transferrable. You can transfer control of a MediaStreamTrackGenerator, but we will get to that in the WebCodecs section.
So, this brings us back to using a normal canvas.
Web Audio
We can use Web Audio’s createMediaElementSource on the video element. That looks like:
|
1 2 3 4 5 6 |
const audioCtx = new (window.AudioContext || window.webkitAudioContext)(); const sourceNode = audioCtx.createMediaElementSource(sourceVideo); const destinationNode = audioCtx.createMediaStreamDestination(); sourceNode.connect(destinationNode); sourceNode.connect(audioCtx.destination); // Connect to speakers to play audio |
Local Audio control
Once again, I struggled with how to control the local audio independently of the converted MediaStream. As explained in the Screen Sharing approach, modifying the local audio stream impacts the captured output. However, now that we have WebAudio, we have more control over the audio outputs.
Chromium browsers let you Change the destination output device in Web Audio with an audio context setSinkId based on the audioOutput devices you get from navigator.mediaDevices.enumerateDevices(). The audioCtx.createMediaStreamDestination() creates its own destination independent of the source, so this is unaffected. As a bonus, you can even set the sink ID to none so the audio doesn’t go anywhere. We can use this to control local audio output:
|
1 2 3 4 5 6 7 |
if (audioCtx.sinkId === '') { await audioCtx?.setSinkId({type: "none"}); muteButton.innerText = "Unmute local video" } else { await audioCtx?.setSinkId(''); muteButton.innerText = "Mute local video"; } |
Unfortunately, this is not available on Safari or Firefox, so there is no local audio control solution I could figure out there. At least you can hide the video without issue on all browsers. You can experiment with muting and hiding the video in the example below.
Example
Summary
Good
- Work on Safari
- Relatively easy
- Some worker offload
Bad
- Most decoding and encoding on main thread
- Need to worry about audio-video sync
- Additional processing to render to the canvas
WebCodecs
All the prior examples require rendering the source file to a DOM element. WebCodecs lets you directly decode video. Chromium browsers and even Safari support WebCodecs, but Firefox does not as of this writing.
There is even a great example on using WebCodecs as an audio and video player here – particularly the Audio and Video Player example. Note the examples on w3c.github.io/webcodecs have CORS issues and so won’t work – you should use the netlify hosted one I linked to in the first sentence or run it locally. The Audio and Video Player example actually loads specifically encoded (fragmented H.264) from separate audio and video files. I wanted to understand what it was doing as well as read from any browser-supported video file, so I made my own example.
This approach works (kind of), but it wasn’t easy!
Building your own video player is a lot of work
Going through the W3C’s Audio Video Player code is a good way to understand all the aspects that go into playing a video file. Those include:
- Demuxing the source file
- Decoding the media
- Synchronizing playback timing
- Rendering the media
Demuxing
Video files have various formats for holding audio and video data. Demuxing to separate audio and video tracks and to get frames from each track and necessary metadata needed to decode the file properly.

Parsing through all binary encoded data to get the frames out looks like a major amount of work. You could let the browser do that in your Video element or with Media Source Extensions, but the whole point of this approach was to avoid that.
Using mp4box.js
Fortunately, there are libraries to help you do the demuxing. The W3C WebCodecs examples use mp4box.js. It’s a JavaScript version of the MP4Box command line interface (CLI) tool. It supports more than MP4’s too. The project even supports a pre-built, single file version you can easily import. I did this inside a worker:
|
1 |
importScripts("https://gpac.github.io/mp4box.js/dist/mp4box.all.js"); // mp4box.js - https://github.com/gpac/mp4box.js |
mp4box has methods that let you (references from worker.js):
- Load the file chunks – useful for large files and controlling file streaming:
12345678910fs.write = chunk => {// MP4Box.js requires buffers to be Uint8Array, but we have a ArrayBuffers.const buffer = new ArrayBuffer(chunk.byteLength);new Uint8Array(buffer).set(chunk);// see the source for the full code// Append chunk.fs.appendBuffer(buffer);} - read the file’s encoding information for each track (needed for WebCodecs):
123fs.onReady = info => {console.log("loaded track(s)", info);} - and then handle the raw frames – called
sampleshere – as they come in:
123456789fs.onSamples = async (trackId, ref, samples) => {console.log(`loaded ${samples.length} samples from track ${trackId}`);if (trackId === 1) {videoSamples.push(...samples);} else if (trackId === 2) {audioSamples.push(...samples);}render();}
Using ffmpeg.wasm (not implemented)
I did not get a chance to try this, but you should also be able to use ffmpeg.wasm to segment the files. That’s a much bigger library that also lets you do codec conversion, albeit with more complexity to deal with – i.e. WASM builds, larger downloads, etc..
Decoding the media
We can use standard WebCodecs with Insertable Streams to handle decoding. First, we feed our output stream with MediaStreamTrackGenerators for audio and video. Then we can transfer the writable stream to the worker:
|
1 2 |
const videoTrackGenerator = new MediaStreamTrackGenerator({kind: 'video'}); const audioTrackGenerator = new MediaStreamTrackGenerator({kind: 'audio'}); |
|
1 2 3 4 5 6 |
const worker = new Worker("./worker.js"); const videoWriter = videoTrackGenerator.writable; const audioWriter = audioTrackGenerator.writable; worker.postMessage({file, videoWriter, audioWriter}, [videoWriter, audioWriter]); |
As mentioned earlier, once mp4box is initialized with the file, we use the track information to setup the WebCodec configuration:
|
1 2 3 4 5 6 7 8 9 10 11 12 13 14 15 16 17 18 19 20 21 22 23 24 25 26 27 28 29 30 31 |
// when mp4box is ready, setup webcodecs with the track info fs.onReady = info => { console.log("loaded track(s)", info); // Video track setup const videoTrackInfo = info.videoTracks[0]; const videoTrack = fs.getTrackById(videoTrackInfo.id); const videoConfig = { codec: videoTrackInfo.codec.startsWith('vp08') ? 'vp8' : videoTrackInfo.codec, codedHeight: videoTrackInfo.video.height, codedWidth: videoTrackInfo.video.width, description: getDescription(videoTrack) }; console.log("video codec config", videoConfig); videoDecoder.configure(videoConfig); fs.setExtractionOptions(videoTrackInfo.id); // Audio track setup - requires fewer fields than video const audioTrackInfo = info.audioTracks[0]; // const audioTrack = fs.getTrackById(audioTrackInfo.id); const audioConfig = { codec: audioTrackInfo.codec, sampleRate: audioTrackInfo.audio.sample_rate, numberOfChannels: audioTrackInfo.audio.channel_count, sampleSize: audioTrackInfo.audio.sample_size, // description: getAudioSpecificConfig(fs) }; console.log("audio codec config", audioConfig); audioDecoder.configure(audioConfig); fs.setExtractionOptions(audioTrackInfo.id); } |
Later we use some decoding functions to decode the incoming samples:
|
1 2 3 4 5 6 7 8 9 10 11 12 13 14 15 16 17 18 19 20 21 22 23 24 25 26 27 28 29 |
/** * Decodes a mp4box Video sample by turning it into a EncodedVideoChunk and passing it to the decoder * @param sample - mp4box video sample * @returns number - the duration of the sample in ms */ function decodeVideoSample(sample) { const duration = 1e6 * sample.duration / sample.timescale; const chunk = new EncodedVideoChunk({ type: sample.is_sync ? "key" : "delta", timestamp: 1e6 * sample.cts / sample.timescale, duration: duration, data: sample.data //transfer: [sample.data] }); videoDecoder.decode(chunk); return duration / 1000; } function decodeAudioSample(sample) { const duration = 1e6 * sample.duration / sample.timescale; const chunk = new EncodedAudioChunk({ type: sample.is_sync ? "key" : "delta", timestamp: 1e6 * sample.cts / sample.timescale, duration: duration, data: sample.data }); audioDecoder.decode(chunk); return duration / 1000; } |
Synchronizing Playback
As shown above, the Audio and Video chunks are decoded independently at their own pace. There are many audio frames for each video frame and there is no guarantee they will stay in sync – in fact they definitely won’t. A synchronization function would match the audio and video timestamps to keep them in sync – holding frames as needed or even dropping them.
The W3C sample uses ringbuf.js and a bunch of wrapper code and shared timing info. This was all beyond my ability to quickly understand and my proof of concept worked well enough without any synchronization, so I omitted this functionality.
Rendering
As mentioned in the previous section, I skipped the synchronization logic and just wrote the samples as I got them. The below sends them to the decoder one at a time. When the decode is done it just moves on to the next item in the queue.
|
1 2 3 4 5 6 7 8 9 10 11 12 13 14 15 16 17 18 19 20 21 22 23 24 25 26 27 28 29 30 31 32 33 34 35 36 37 |
// Decode and loop - Video, waiting for each sample's duration before decoding the next. // NOTE: the audio one has a hard time keeping up function renderVideoLoop() { if (videoSamples.length > 0) { const duration = decodeVideoSample(videoSamples.shift()); setTimeout(renderVideoLoop, duration); } else { console.log("done rendering video"); rendering = false; } } // Decode and loop - audio, waiting for each sample's duration before decoding the next. function renderAudioLoop() { if (audioSamples.length > 0) { const duration = decodeAudioSample(audioSamples.shift()); setTimeout(renderAudioLoop, duration); } else { console.log("done rendering audio"); rendering = false; } } // Wait until we have a queue of both audio and video samples before staring the render loops function render() { if (!rendering && videoSamples.length > 100 && audioSamples.length > 100) { console.log("starting rendering"); rendering = true; renderAudioLoop(); // this is about ~1 second behind the video renderVideoLoop(); } else { // console.log("not enough samples to start rendering"); setTimeout(render, 1000); } } |
Initially the sound was about 2 seconds off from the video on my M1 Max machine. Through some quick trial and error, I found waiting for the buffer to fill up first helped a bit.
Caveat’s and To Do’s
- Requires just one audio and one video track; both are required
- Buffer implementation to coordinate audio and video – as mentioned in Synchronizing Playback
Summary
Good
- No need to show the video / play the audio locally
- Local audio and video are completely independent of the sent stream
- Offloads all heavy processing to a worker
- Easy to modify the video while you have it decoded – such as for resizing, cropping, adding effects, etc.
Bad
- Complexity – there is a significant amount of code and dependencies to maintain here
- Firefox doesn’t support WebCodecs
- MediaStreamTrack generator doesn’t work in Safari or FireFox– it may be possible to write to a MediaSourceExtension instead, but I didn’t try that
The End
That was another long one, but I think I understand all my options well. For my personal project, I prefer the WebCodecs approach but I am likely to start with simple VideoElement captureStream on Chromium-only to start simple. I have a historical bias for the media server approach for more general meeting services, but using a CDN is often way more practical.
What option did you choose?
{“author”: “chad hart“}


Thanks for your article! it would be nice to cover also webtransport as a solution with webcodec
Hi David – have you seen the interview I did with Bernard Aboba, Jordi Cenzano Ferret, and François Daoust on that topic: https://webrtchacks.com/webcodecs-webtransport-and-webrtc/. It includes links to several demos and code examples.
I didn’t cover WebTransport for transmission in this post because my goal was to use to add this as an option to existing WebRTC applications. No one I know of uses WebTransport+WebCodecs for production usage yet, but as we discussed in that interview, that will certainly be coming. We will certainly spend more time on that approach here on webrtcHacks as it continues to mature.