One of WebRTC’s biggest challenges has been providing consistent, reliable support across platforms. For most apps, especially those that started on the web, this generally means developing a native or hybrid mobile app in addition to supporting the web app. Progressive Web Apps (PWA) is a new concept that promises to unify the web for many applications by allowing web-based apps to look and act like native mobile ones without introducing an intermediary hybrid framework. As will be discussed, this approach has a lot of advantages, but does it make any sense for a WebRTC app?
Trond Kjetil “TK” Bremnes has been building a PWA for appear.in, so I asked him to share his secrets. Fortunately his boss agreed (thank you Ingrid!), so what follows is an intro to PWA and a detailed set of tips and tricks for making your app Progressive.
{“editor”, “chad hart“}
PWA Introduction
What is a PWA
In short a Progressive Web App, or PWA for short, is a web application with a few added bells and whistles. It is a way to write a web application that provides you a few hooks into the operating system that you ordinarily don’t have. PWA is not really a thing of its own, at least not in the same way that you could say that an “Android app” is a thing, but rather a collection of web based technologies with stringed together with a fancy name. Together this collection of technologies makes web pages look, feel and behave more like natively installed applications.
The “P” stands for “progressive”. First, as odd as it might initially sound, it means that the feature set of the application expands with the user using it. Secondly, it means you can’t really rely on a feature being present for the application to work correctly. Instead you need to progressively enhance the application based on the capabilities of the user’s phone and operating system. Because of the way that they progressively enhance behind the scenes, chances are that you are already using a number of PWAs today without noticing it. The “progressiveness” of PWAs is a reminder that the APIs and features you get should be considered added bonuses – extra features you can use. You can’t and shouldn’t require them.
What makes PWAs so great?
For one, as the case is with WebRTC, they work pretty much everywhere with a browser – after all they are just web pages. The user doesn’t have to download anything, they can just start using them.
Second, PWA can dramatically reduce the application size. Since you do not need to embed a browser, most of the runtime code already installed on the clients. This means the size of a minimal WebRTC application can be measured in kilobytes, even including UI libraries. The PWA version of appear.in weighs a measly 200 kilobytes. And with React and related libraries taking up 3/4 of the file size we could probably do a lot to reduce that further. For comparison, the desktop Skype client is 54 megabytes and even larger on Android and iOS.
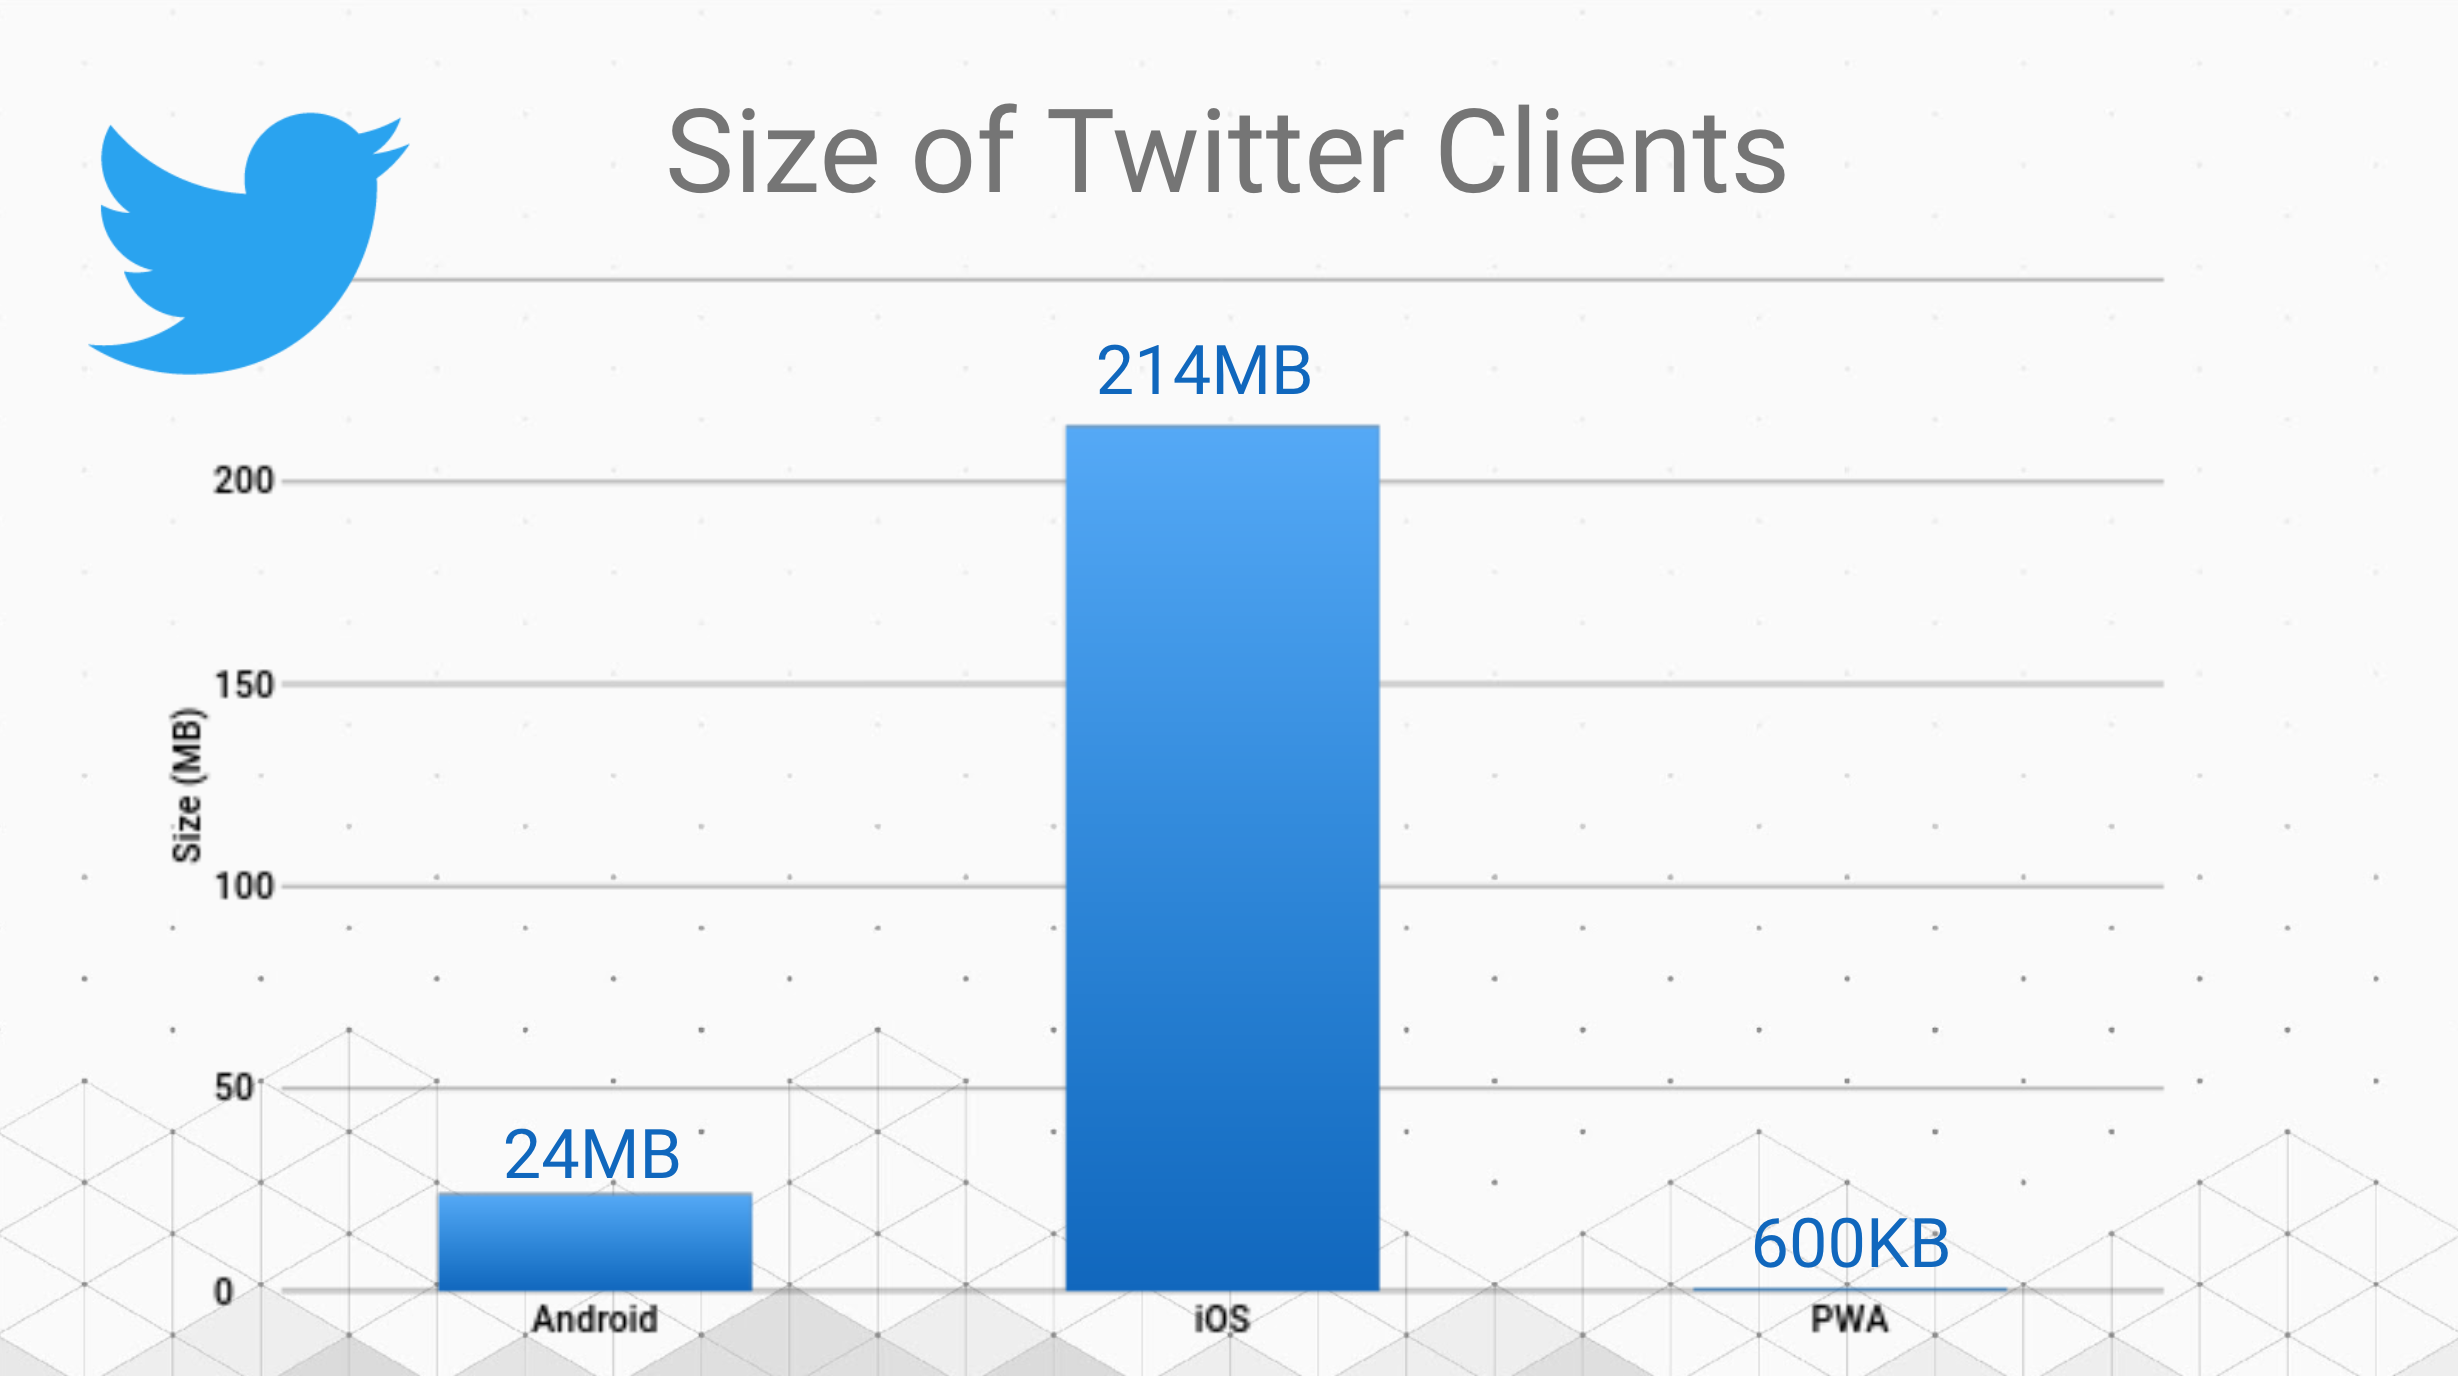
While your phone probably has more gigabytes of storage than you know what to do with, and your data plan might make downloading huge apps a non-issue, this is not at all true for all countries and users.
Third, PWAs let you rely on the security of the browser. Say what you will about web browser security – I still trust the large teams at Google, Mozilla, Microsoft and Apple to fix security issues quickly more than I trust pretty much any other app developer to do the same.
Installing a PWA
The ability to add web pages to a phone’s home screen has been with us for as long as smartphones has had web browsers. This was the only way for a user to add new applications to the phone on the first iPhone. This rarely used feature has been evolving since then to become much more than a simple bookmark.
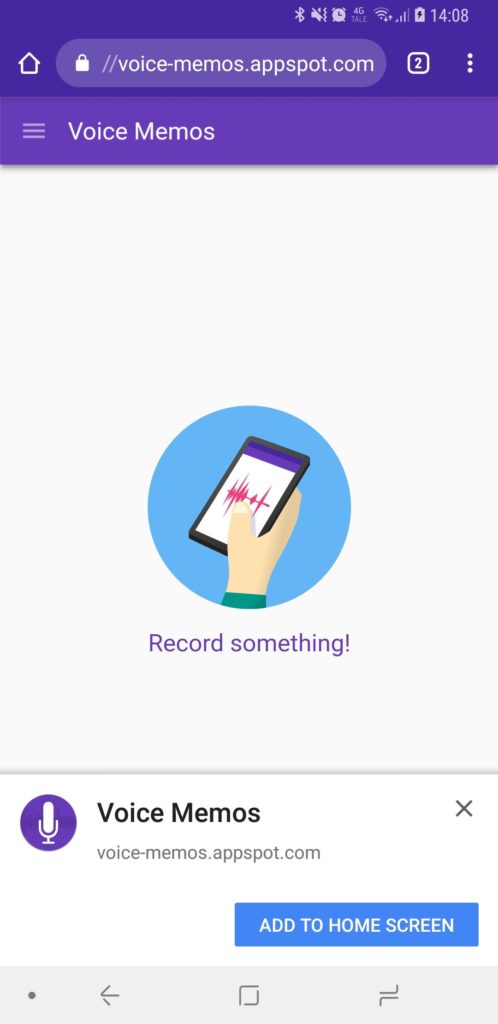
When a web application fulfills a set number of heuristics, browsers will take notice, and start nudging the user to “install” the web app as a PWA. This installation upsell differs quite a bit from browser to browser – for instance Chrome will present a pop-up, Samsung Internet will have a noticeable badge which the user can click. This provides the user with a clue that this is not a mere document, but a full-fledged web application.
Common misunderstandings
A few things had been said about PWAs that I feel has been rebutted time and time again, but I think it is worth to reiterate:
No, this is not just an Android thing.
While they probably work best on Android at the moment, they do work on other operating systems too. Chrome OS is one where they integrate nicely. PWAs are all just “normal” web applications with some added bells and whistles, they should work wherever there is a browser capable to view them.
No, this is not just a Google thing.
Mozilla, Samsung Internet and Microsoft are all heavily invested in the development of the PWA APIs. Further, Microsoft has announced that they will start listing PWAs alongside “proper” apps in their Windows Store. iOS support is also on its way, and while it is not quite fully baked yet it is getting better with every release.
No, this is not just a smartphone thing.
While support is better on phones today, The Chrome team has announced that 2018 is the year that they will bring PWAs to the desktop. More on this below.
Getting started
Getting started with developing a PWA is quite simple – the hard part is getting WebRTC up and running. I’m going to go ahead and assume that you’ve already gotten down the web part of this task and have a working application ready. If not then are plenty of other guides on this very site that will guide you towards that goal. This guide is about turning your WebRTC web app into a PWA.
Prerequisites
To build a progressive web application, you’ll need to know of two key concepts:
- Web app manifest
- Service worker
These two bits are the two key pieces of technology that makes a PWA a PWA. Additionally, the page needs to be served over HTTPS (note that this requirement is relaxed for localhost). Ideally it should also be performant, and ideally it should be responsive and work well on a variety of screen sizes and device.
Performance
When programming web apps for smartphones you’ll have to pay extra attention to performance. Even though many of today’s more popular devices are specced way better than laptops of yesteryear, these devices are thermally throttled and any performance bottlenecks will hit you tenfold. This requires you to make sure you tests on real devices – do not get fooled by device emulators and simulators. Chrome Dev Tools does have many knobs and dials for emulating throttling it is never as realistic as a proper phone.
WebRTC is a very resource intensive technology, which demands a lot from the users’ hardware, so you need to pay extra attention to this. Get to know the Performance panel inside Chrome Dev Tools, and minimize unnecessary repaints.

A quick word of advice to those who use React to create PWAs: the virtual DOM algorithm is quite keen on removing and re-adding video frames on UI updates, making for a huge performance bottleneck. Take extra care to make sure that this doesn’t happen. Luckily these repaints sticks out as a sore thumb, especially when testing the site on a real device.
Poor Connectivity
Since PWA devices are primarily mobile you should factor in variable network coverage. It might be worthwhile to add in rudimentary offline support, even though WebRTC doesn’t really work offline. Your goal is to deliver a native-like experience, and thus you should ideally try to own the offline user experience. This way you can provide the user with hints and information for what they can do to fix the situation. For example, the native Skype application does not show a dinosaur when your phone does not have a working connection. Loading times will be much faster if you can load the application from the device’s cache. Note that to have your app classify as a PWA according to Chrome, you’ll need to provide some basic offline capability.
Code examples
Now, let’s move on to some code examples to help you get started. I’m assuming that you already have a web app set up and ready to go.
Manifest
The web app manifest is a more structured version of the what you’d ordinarily put inside the <head> tag. Here you define the application’s name, icons, theming colors and other hints for the browser to use to define the user experience.
Below you’ll see a fairly minimal example of a manifest.
|
1 2 3 4 5 6 7 8 9 10 11 12 13 |
{ "name": "HackerWeb – A PWA Hacker News client", “short_name”: “HackerWeb”, "start_url": ".", "display": "standalone", "background_color": "#fff", "icons": [{ "src": "images/touch/homescreen192.png", "sizes": "192x192", "type": "image/png" }] } |
name , no surprise, is the application’s name used for the splash screen and the home screen. The optional short_name shows on the phone’s home screen when the full name of the application is too long to be shown in its entirety. The background_color is used in the splash screen’s background.
The start_url describes the URL where the application is supposed to start when opening. Usually set to . or / . This means that the user can browse a paths further down, and still add the “main” page to the home screen. This differs from the way “ordinary” bookmarks work, where whatever page URL you are on at the moment of bookmarking is the URL you get. This allows a hypothetical CNN PWA to always start from the root route even if the user added it from an article. For example, if the user is visiting https://cnn.com/article/all-is-well-with-the-world.html when they install the PWA it will still load https://cnn.com. A neat little hack here is to add a ?openedFromHomescreen at the end of the URL to track use.
The display field is used for describing how the application is to look like when launched. Setting it to "standalone" makes it strip out all of the browser chrome and make it look and feel more like a native app. The default setting is "browser" where it’ll open up in the device’s default browser.
icons is an array of icons used for the application. The OS then choose the one most appropriate for your device based on screen size and pixel density.
For a more thorough description of the application manifest, check out MDN’s excellent article. For a way to automatically set one up for you, I recommend https://tomitm.github.io/appmanifest/.
Service worker
A second part of making a PWA is to have an installed service worker. In short, a service worker is a programmable proxy and cache. It lives in its own thread, separate from the rest of the web application in both code execution and runtime environment, and can even run code when the web page is not open. This is where you program the cache strategy and set up push notifications.
There are plenty of resources on how to write a service worker, so I won’t go into details of how it works, or how to write one here. You can read about it more detail at MDN. If you don’t want to write one yourself, Google’s Workbox toolkit is a great library for administering a service worker. It is highly configurable, and removes a lot of the problems and headaches involved with creating one from the ground up yourself.
For your application to be classified as a PWA by Chrome, the app needs to load a service worker and some sort of offline capability. At a minimum you must serve something when the connection is severed.
Dealing with files
A point which is very important to note is that the service worker file location is of importance. The service worker can only cache resources in the same folder it is in, and folders below it. For maximum cache-ability I recommend putting it in the root folder if possible.
It is important to note that a service worker run time life cycle is completely separate from the rest of the web application. The installation and replacement life cycle is also very different. Generally, a new service worker will be installed whenever the browser notices that the file has changed. However, life isn’t always that simple, and there are already many stories of “zombie” service workers living indefinitely out there, caching stale content infinitely. If you decide to create a service worker yourself from scratch, do consider putting in a “kill-switch” – a way for the service worker to completely invalidate the cache and reinstall itself.
Also very important – do not use a hashing strategy for invalidating and replacing it as you would other assets. The Workbox library mentioned above has built in ways of handling this and will make sure that the asset cache is rebuilt when the application changes.
Push notifications
I also want to specifically mention push notifications. For WebRTC applications in particular, push notifications are a powerful way for pulling people into conversations, so I recommend investing time into getting them right. Peter Beverloo has created a great tool for testing out the capabilities of push notifications. I highly recommend you playing around with it. That site will let you experiment and figure out which features work on what device and in which browser.
Permissions
To be able to send push notifications to a user’s phone, you first have to request permission. It is generally considered bad form to immediately request permissions for push notification when the page opens. Make sure that the user knows why you need them, and give them the value upsell in a timely manner. Also worth noting is that if the user stops using your application, and doesn’t interact with your notifications, the permission will eventually be revoked. It is in your own best interest to make the notifications relevant and valuable for the user. Blocking notifications is also quite easy, so it is best not to rely on notifications being granted for your app to work as intended.
Tips and tricks
Camera direction
When using WebRTC on phones you need to pay extra attention to the camera direction. Desktop computers usually only provide single camera stream. Just using getUserMedia it will rationally default to the built-in camera or whatever is set as the default in the OS.
Quite differently, when developing a WebRTC smartphones client, you have to account for most of them having two cameras. The getUserMedia API lets you ask for a preferred one, so make sure you ask for the user facing (portrait) camera. If not it will most likely default to the back facing camera. To make life as a developer even more exciting there are handsets out there that will have these flipped, so you should build in the ability to change which camera is used. It can be a bit tricky to change the camera on-the-fly since you need to fiddle with the RTC connection for the new stream.
If you don’t want to tackle this, a way around this is to make a pre-call setup page where you can change the camera direction.
“Appiness”
Inline critical stuff
To avoid a flashing white frame when the application loads you should inline critical assets. If your app has a background color set, consider adding this into the <html> or <body> tag to make it load instantly. Secondly, you should have a look at the app shell pattern. In short: define a core shell for the application to load inside. This shell should be as slim and lightweight as possible. Third, see if you can identify a minimal set of critical stylesheet rules and inline them. You can also make use of rel=”preload” to fetch critical assets.
Want to load even faster? Look into offline caching for nigh-instant load times for return visits.
Use the platform
To further improve the appiness of the application, make sure to make use of the platform’s capabilities. On some browsers you can spawn the native share-dialog with a button on the page. Use this for inviting users to the call.
There are a lot of API’s like this, so take time to know what new APIs are being developed and consider implementing them. Use feature detection to make sure features are actually available. Obviously don’t rely on features that aren’t available on the platforms you support.
Chrome Developer Tools
Chrome Developer Tools is your new home now, and is a very powerful tool it pays off to learn. The Performance tab will show you how your application runs in real time. Look at this periodically on both your developer machine and on a real device. I focused on the Chrome Developer Tools here but this absolutely does not excuse you from testing your application in other browsers.
Application
The applications tab is where you can find an overview of the parts that makes out the application. It’ll read your application manifest and give you hints and clues to parts that are missing or not working. The “Add to homescreen” is a useful button which will trigger the installations code path, and will notify you if parts of the application is not following the PWA heuristics. Here’s also where you can test and diagnose the installed service worker.

Audits
Inside the “Audits” tab you’ll have access to Google’s Lighthouse. Lighthouse is a powerful tool where you can perform an automated performance and PWA heuristics assessment of your app. Running this will score your application on a scale between 0 and 100 based on how well your application is doing on various criteria. It will also provide you with guidance to how to improve your scope. Your score might change without you doing anything as the heuristics shift and evolve with future Chrome updates. For this reason among many, make sure to run this test periodically. This tool is also available as a CLI that you can plug into your Continuous Integration (CI) and have it notify you of regressions. See Google’s documentation for more info on Lighthouse.
Performance and Memory
This is very useful for diagnosing the performance of the application and identifying bottlenecks.
If you have issues here on your laptop then they will most certainly be bigger on a thermally throttled smartphone. Even more important – if this shows you that your application runs at a sold 60 fps at all time always do not assume this will be the case on a smartphone.
Which brings me to the most important tool available in the Chrome browser – remote debugging.
Remote debugging
This option is not available inside the Developer Tools, but from the URL chrome://inspect/#devices. From here you can set up remote debugging to run Chrome Developer Tools against a real device. I’ve mentioned the need to test on actual devices. This is a very powerful tool to help you diagnose issues you’re not seeing on your laptop. See https://developers.google.com/web/tools/chrome-devtools/remote-debugging/ for a more thorough guide on how to set it up and make use of it.

You can even inspect a live view from the phone.
PWA for Desktop?
To finish off, please remember that PWAs are not restricted for mobile, smartphone use. Most of the steps you take to make an awesome PWA are likely of value to a desktop application too. Just because you are sitting in front of a “proper” computer does it mean that you do not want a fast, instantly loading and performant user experience?
That said, the bells and whistles of the PWA toolbox are slowly making their way to the desktop this year. It is already available for testing on Chrome behind a feature flag. I’ve been running a handful of them already for a few weeks on my Macbook, and I’m enjoying it so far.
Unlike Electron apps, whose value proposition is quite similar, you can ship web applications to users desktops without bundling an entire instance of the Chromium browser. Again, this means that instead of measuring the application download size in the hundreds of megabytes, you can probably slim it down to being a few hundred kilobytes. In addition, by sharing a common browser engine you should see a smaller memory footprint than you would with a dedicated Chromium instance for each and every application.

Now It’s Your Turn
So go forth! Make amazing things! Make them for mobile, or make them for the desktop! Progressive Web Apps give you an extra set of tools for making the next great thing!
{“author”: “Trond Kjetil Bremnes“}





Hi!
Do you know how to allow camera access on iPhone for PWAa? Everything works well in Safari, but when the app is saved to desktop and launched from there camera/mic access is denied.
That is strange you did not mention the issues with accessing the camera from iOS/Safari PWA. The title of the article looked promising.
but navigator.mediaDevices.getUserMedia()
throws an error in iOS if PWA in “standalone”