
In part 1 of this set, I showed how one can use UV4L with the AIY Vision Kit send the camera stream and any of the default annotations to any point on the Web with WebRTC. In this post I will build on this by showing how to send image inference data over a WebRTC dataChannel and render annotations in the browser. To do this we will use a basic Python server, tweak some of the Vision Kit samples, and leverage the dataChannel features of UV4L.
To fully follow along you will need to have a Vision Kit and should have completed all the instructions in part 1. If you don’t have a Vision Kit, you still may get some value out of seeing how UV4L’s dataChannels can be used for easily sending data from a Raspberry Pi to your browser application.
Just let me try it
Have an AIY Vision Kit and want to see the project before you read? Even if you do want to read, use this as the setup. Here is what you need to do:
- Buy a AIY Vision Kit – they probably won’t be in stock again until Spring sometime
- Follow the Vision Kit Assembly Guide to build it
- Install UV4L:
1234curl http://www.linux-projects.org/listing/uv4l_repo/lpkey.asc | sudo apt-key add -echo "deb http://www.linux-projects.org/listing/uv4l_repo/raspbian/stretch stretch main" | sudo tee -a /etc/apt/sources.listsudo apt-get updatesudo apt-get install -y uv4l uv4l-raspicam uv4l-raspicam-extras uv4l-webrtc-armv6 uv4l-raspidisp uv4l-raspidisp-extras - Install git if you don’t have it: sudo apt-get install git
- Clone the repo: git clone https://github.com/webrtcHacks/aiy_vision_web_server.git
- Go to the directory: cd aiy_vision_web_server/
- Install Python dependencies: python3 setup.py install
- Turn the default Joy Detection demo off: sudo systemctl stop joy_detection_demo.service
- Run the server: python3 server.py
- Point your web browser to http://raspberrypi.local:5000 or whatever you set your hostname or IP address to
If you reboot…
The default Joy Detection Demo is loaded as a system service and will start up again every time you boot. To permanently disable the service just run:
|
1 |
sudo systemctl disable joy_detection_demo.service |
Environment changes
The original AIY kit code/image used a Python Virtual Environment that had to be loaded before running any of the Python commands. This was changed in the Feb 21 image so you don’t need the virtual environment. You might need to run sudo if you get errors.
Architecture
In the Computer Vision on the Web with WebRTC and TensorFlow post, I showed how to build a computer vision server using Tensor Flow and how to send frames from a WebRTC stream to it. This is different in that we are generating and sending a WebRTC stream from a local device (a Raspberry Pi Zero) with a camera that is actually doing the image processing itself. We will use a browser client to see what the Vision Kit sees and provide annotations.
The architecture of this project looks like this:

Hardware
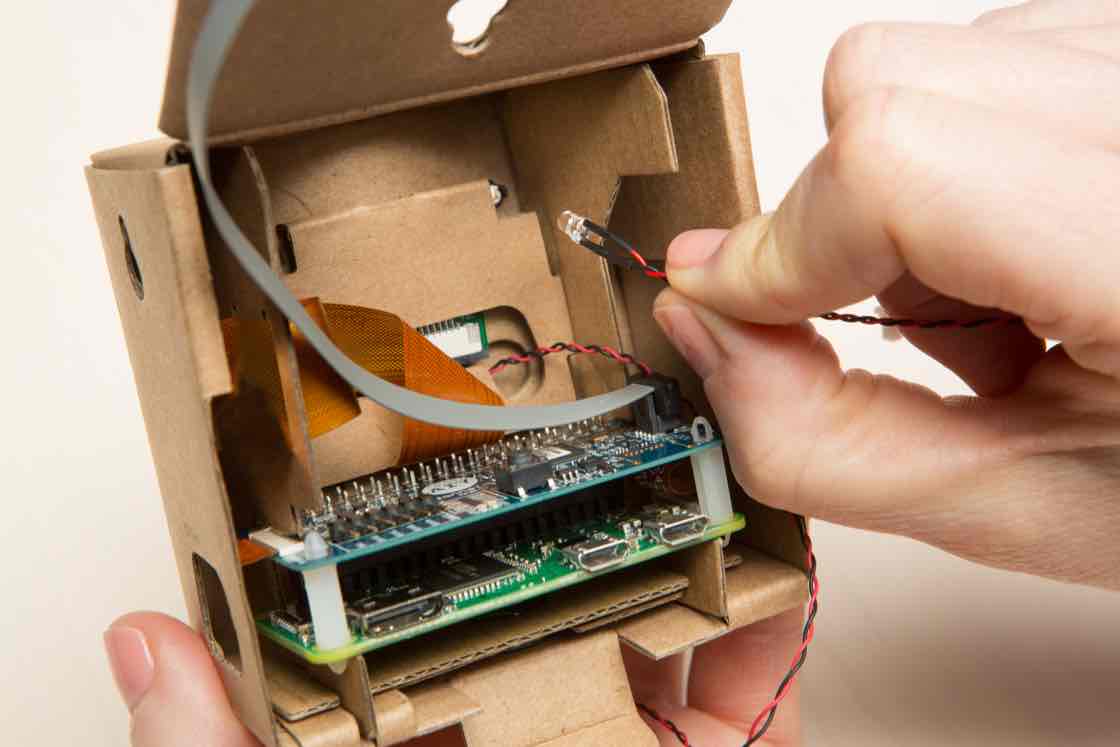
On the hardware side, you attach a Pi Camera 2 and the Vision Bonnet to a Raspberry Pi Zero W attaches. I covered this a lot in part 1, so check back there for details.
WebRTC & DataChannels
Then for software we will use UV4L on the Pi Zero to manage all our WebRTC. UV4L includes a WebSocket-based signaling server, so we do not need to write any WebRTC logic on the server. This is one less thing we need to implement, but we also loose easy use of that WebSocket to transmit our data from the server to the client. We could build an additional WebSocket interface or some polling method, but there is an easier way – UV4L includes a gateway between Linux’s socket interface and a WebRTC DataChannel. Since the PeerConnect is already there we just add a DataChannel to it send our inference and annotation data to the browser.
Web server & client
We will also run a Python-based server that will interface with the Vision Bonnet and use Flask for our web server. Finally, our browser client just needs to receive a websocket, DataChannel, and video stream from the PiZero and display our annotations.
Each of these components will be explained in a lot more detail below.
Code
I will not be going line-by-line in order with any of the code below, but I will touch on the main pieces. You can follow along with the code in the repo.
server.py
server.py has 3 main elements:
- Flask as our webserver
- The AIY inference module to run our computer vision
- Socket communications which UV4L will convert to websockets
I will describe each of these individually.
Server setup
Our main server code needs to do 2 things:
- Setup Flask to serve static content for our web server
- Spawn threads
Let’s do the Flask setup first.
Web Server
There isn’t much to this –
|
1 2 3 4 5 6 7 8 9 10 11 12 13 14 15 16 17 18 19 20 21 22 |
from flask import Flask, Response # other functions to be covered later # Web server setup app = Flask(__name__) def flask_server(): app.run(debug=False, host='0.0.0.0', threaded=True) # use_reloader=False @app.route('/') def index(): return Response(open('static/index.html').read(), mimetype="text/html") def main(webserver): # I'll cover this next if __name__ == '__main__': main(app) |
Threads
Working in Node.js for many years made me forget how much I hate dealing with threads.
We need to run 3 threads to make this all work:
- The Flask code above that we will run in the main thread
- A thread for inference
- A thread for our socket communication
Since we need to pass data from our inference thread to the socket thread, we will also need an inter-thread communications mechanism. We will use the queue library to pass data and Event library in threading to make a global event that the threads can check to see if they should shut down.
Here are the imports and globals:
|
1 2 3 4 |
from threading import Thread, Event import queue q = queue.Queue(maxsize=1) # we'll use this for inter-process communication |
Now we can finish our main function:
|
1 2 3 4 5 6 7 8 9 10 11 12 13 14 15 16 17 18 19 20 21 22 |
def main(webserver): is_running = Event() is_running.set() # run this independent of a flask connection so we can test it with the uv4l console socket_thread = Thread(target=socket_data, args=(is_running, 1 / args.framerate,)) socket_thread.start() # thread for running AIY Tensorflow inference detection_thread = Thread(target=run_inference, args=(is_running, args.model, args.framerate, args.cam_mode, args.hres, args.vres,)) detection_thread.start() # run Flask in the main thread webserver.run(debug=False, host='0.0.0.0') # close threads when flask is done print("exiting...") is_running.clear() detection_thread.join(0) socket_thread.join(0) |
Running Inference
The Vision Kit comes with several examples of how to run various inference models. In my setup I cared about 2 – the object detection and face detection models. There is no reason this would not work with the other models, but those just provide a label and that is not really to relevant for realtime web-based annotations.
Make sure you include the relevant AIY libraries along with the PiCamera libary:
|
1 |
from aiy.vision.leds import Leds |
from aiy._drivers._rgbled import PrivacyLed from aiy.vision.inference import CameraInference from aiy.vision.models import object_detection, face_detection from picamera import PiCamera
I also included the PrivacyLed just to make it easier to see when the camera is on. Note the Leds code changed in the Feb 21 image.
Much like in the Computer Vision on the Web with WebRTC and TensorFlow project, we will eventually need to convert our TensorFlow model helper library to JSON. To make this simple, we’ll make a simple Class to help set this up:
|
1 2 3 4 5 6 7 8 9 10 |
# helper class to convert inference output to JSON class ApiObject(object): def __init__(self): self.name = "webrtcHacks AIY Vision Server REST API" self.version = "0.0.1" self.numObjects = 0 self.objects = [] def to_json(self): return json.dumps(self.__dict__) |
Now let’s stub out what we want our inference function to look like:
|
1 |
def run_inference(run_event, model="face", framerate=15, cammode=5, hres=1640, vres=922): |
You’ll see the run_event argument a few times – that is a cross-process event to signal when to shut down the function so its thread can be killed. The model parameter let’s you choose between the face or object detection modes. The other arguments let you configure the camera – I left these here to help with optimizations between image quality, frame-rate, CPU, battery, and bandwidth. For more on camera initialization parameters, see the PiCam v2 docs.
Then we setup our camera with the parameters provided:
|
1 2 3 4 5 |
with PiCamera() as camera, PrivacyLed(leds): camera.sensor_mode = cammode camera.resolution = (hres, vres) camera.framerate = framerate camera.start_preview(fullscreen=True) |
In addition to initializing the camera above, we also started the Privacy LED.
Next we choose our TensorFlow model:
|
1 2 3 4 5 6 7 8 9 |
if model == "object": tf_model = object_detection.model() elif model == "face": tf_model = face_detection.model() else: print("No tensorflow model or invalid model specified - exiting..") camera.stop_preview() os._exit(0) return |
Now the fun part – running inference:
|
1 2 3 4 5 6 7 8 |
for result in inference.run(): # exit on shutdown if not run_event.is_set(): camera.stop_preview() return output = ApiObject() |
There is isn’t much here other than an infinite look that keeps checking returning any inference data to result . We’ll exit the loop if we notice the run_event is cleared.
Object Detection Model
Next we will need separate modules to handle that result object. Let’s do the object detection model first:
|
1 2 3 4 5 6 7 8 9 10 11 12 13 14 15 16 17 18 19 |
# handler for the AIY Vision object detection model if model == "object": output.threshold = 0.3 objects = object_detection.get_objects(result, output.threshold) for obj in objects: # print(object) item = { 'name': 'object', 'class_name': obj._LABELS[obj.kind], 'score': obj.score, 'x': obj.bounding_box[0] / capture_width, 'y': obj.bounding_box[1] / capture_height, 'width': obj.bounding_box[2] / capture_width, 'height': obj.bounding_box[3] / capture_height } output.numObjects += 1 output.objects.append(item) |
The AIY Kit comes with a object_detection library that takes the inference result and a minimum score threshold since you will often will give lots of values with low scores. It outputs a bounding box with x & y coordinates with a pixel width and height , score , and a class_name corresponding to each object it saw. The built in object detection model only only includes 3 classes – person , cat , and dog . I am not totally sure why they limited this to just 3, but I have people and cats in my house to test on so this is an ok demo model for me. (Note: after more testing I think this is limited due to performance – see that section later on).
I hardcoded the input threshold to 30% ( 0.3 ) – I guess I could make this a parameter but as we’ll see in the next section, there is not a corresponding input parameter in that model.
After that this is very similar to what I did in the Computer Vision on the Web with WebRTC and TensorFlow project with the by adding each item to its own object so it can be converted to JSON nicely. On the bounding box – unlike the TensorFlow Object Detection API where the result was a percentage you could then multiply by the image dimensions, the Vision Kit returns actual pixel width. To align this with my previous project, I needed to convert it to a percentage.
Face Detection Model
The face detection model is simpler:
|
1 2 3 4 5 6 7 8 9 10 11 12 13 14 15 16 17 18 |
# handler for the AIY Vision face detection model elif model == "face": faces = face_detection.get_faces(result) for face in faces: print(face) item = { 'name': 'face', 'score': face.face_score, 'joy': face.joy_score, 'x': face.bounding_box[0] / capture_width, 'y': face.bounding_box[1] / capture_height, 'width': face.bounding_box[2] / capture_width, 'height': face.bounding_box[3] / capture_height, } output.numObjects += 1 output.objects.append(item) |
This model just takes the result and returns a face_score , bounding box coordinates that are the same as the object detection model, and a joy_score .
Lastly, we take this data and send it to the console and socket if the socket is connect (more on that next) before we repeat the loop:
|
1 2 3 4 5 6 7 8 |
# No need to do anything else if there are no objects if output.numObjects > 0: output_json = output.to_json() print(output_json) # Send the json object if there is a socket connection if socket_connected is True: q.put(output_json) |
Socket
As I explained in the Architecture section above, UV4L provides a bridge between Linux’s built in sockets and the WebRTC DataChannel. This means you just need to use Python’s socket module and do not need to touch any WebRTC code inside Python. There is an example of how to do this here.
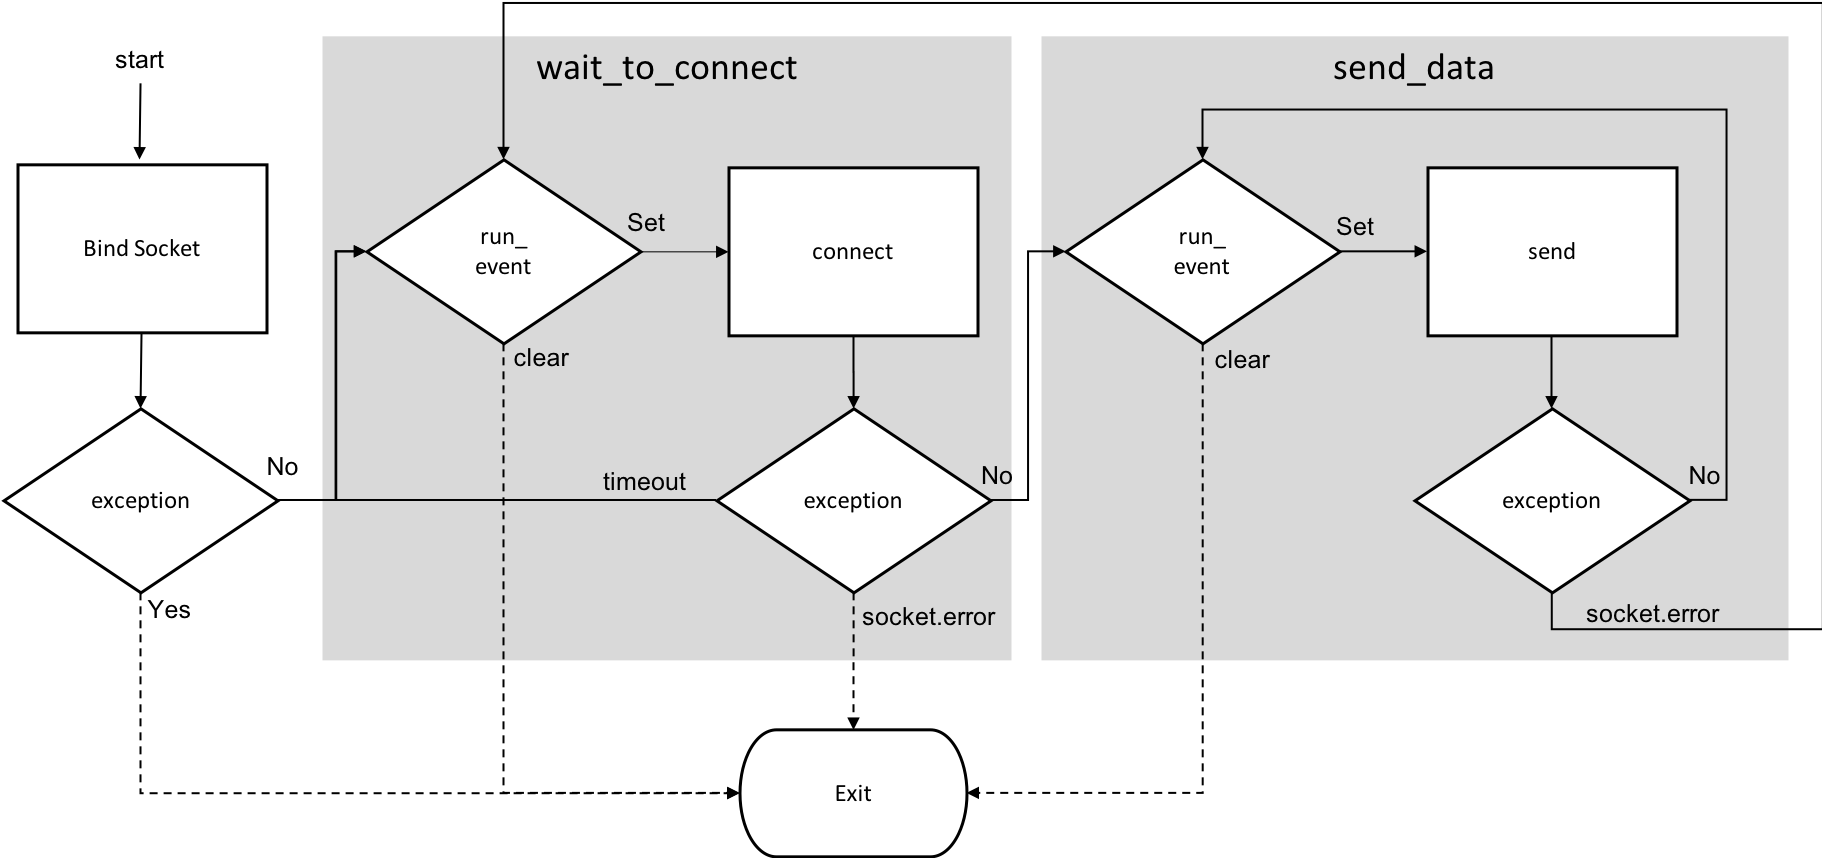
We do not need to do anything fancy for our example – just send the output_json we created in the previous section to our client. Indeed this is simple, but I found the control loop logic to run this in a single thread while managing clients connecting and disconnecting while still being able to exit the thread cleanly on exit to be less than straight forward. Coming from more of a Node.js background where I am used to callbacks and promises, I found managing the process by exception handling to be strange. After I took a step back and made a flow chart diagram, I managed to figure it out.
It looks complicated for 58 lines or so of Python. If that did not scare you off, read on for the code.
Setup
Import the socket module and make a global variable to track if it is connected:
|
1 2 3 |
import socket socket_connected = False |
The socket_data function
My main socket_data function is below. As I illustrated above, this includes 2 sub-functions that I will just leave placeholders for and cover in the following sections. The Python socket library requires that you bind to something. That can be any address, like an IP address, but in this case we will use the socket_path that is setup by default with uv4l-raspidisp-extras when we installed UV4L. Make sure you see the note on the owner of this file in the Just Let Me Try It section.
As a precaution, we will unlink this file incase it is used somewhere else. Then we setup our socket, bind it, set how many max connections to listen for, and then set a timeout parameters before moving to the wait_to_connect sub-function.
|
1 2 3 4 5 6 7 8 9 10 11 12 13 14 15 16 17 18 19 20 21 22 23 24 25 26 27 28 29 30 |
# Control connection to the linux socket and send messages to it def socket_data(run_event, send_rate): socket_path = '/tmp/uv4l-raspidisp.socket' # wait_to_connect sub-function goes here # send_data sub-function goes here try: # Create the socket file if it does not exist if not os.path.exists(socket_path): f = open(socket_path, 'w') f.close() os.unlink(socket_path) s = socket.socket(socket.AF_UNIX, socket.SOCK_SEQPACKET) s.bind(socket_path) s.listen(1) s.settimeout(1) wait_to_connect() except OSError: if os.path.exists(socket_path): print("Error accessing %s\nTry running 'sudo chown pi: %s'" % (socket_path, socket_path)) os._exit(0) return else: print("Socket file not found. Did you configure uv4l-raspidisp to use %s?" % socket_path) raise except socket.error as err: print("socket error: %s" % err) |
Waiting for a connection
The Socket library uses s.accept to listen for an incoming connection. It will only do this for the time you specify in the settimeout parameter in the previous section. The problem is that a timeout while we are waiting for our browser to connect is expected, while a timeout when we are trying to send data is not. To handle this we will just catch the timeout exception and continue. If there is another socket error then we’ll assume something is wrong and close the connection down.
Once we are connected, we will proceed to the send_data sub-function.
|
1 2 3 4 5 6 7 8 9 10 11 12 13 14 15 16 17 18 19 20 21 22 23 |
# wait for a connection def wait_to_connect(): global socket_connected print('socket waiting for connection...') while run_event.is_set(): try: socket_connected = False connection, client_address = s.accept() print('socket connected') socket_connected = True send_data(connection) except socket.timeout: continue except socket.error as err: print("socket error: %s" % err) break socket_connected = False s.close() print("closing socket") |
Sending data
The last thing we will do is check our global q to see if there is any data. If there is we will send it. To keep from blocking the thread we will use a sleep command.
This will go on until there is a socket error, which would happen if there is a disconnect.
|
1 2 3 4 5 6 7 8 9 10 11 12 |
# continually send data as it comes in from the q def send_data(connection): while run_event.is_set(): try: if q.qsize() > 0: message = q.get() connection.send(str(message).encode()) sleep(send_rate) except socket.error as err: print("connected socket error: %s" % err) return |
Client
Lastly we have our web client which consists of:
- A few lines of html
- JavaScript to interface with UV4L’s signaling, WebRTC video feed, and DataChannel
- JavaScript to draw our annotations (i.e. bounding boxes and labels) on the screen
HTML – index.html
In our HTML file we will link to WebRTC’s adapter.js (as you always should), define some minimal styles for proper display, define our video element to play the WebRTC stream, and initialize our other JavaScript libraries:
|
1 2 3 4 5 6 7 8 9 10 11 12 13 14 15 16 17 18 19 20 21 22 23 24 25 26 |
<!DOCTYPE html> <html> <head> <meta charset="UTF-8"> <title>AIY Vision Detection View and Annotation</title> <script src="https://webrtc.github.io/adapter/adapter-latest.js"></script> <style> video { position: absolute; top: 0; left: 0; } canvas{ position: absolute; top: 0; left: 0; z-index:1 } </style> </head> <body> <video id="remoteVideo" autoplay></video> <script src="static/drawAiyVision.js"></script> <script src="static/uv4l.js"></script> </body> </html> |
Receiving WebRTC – uv4l.js
Handling the WebRTC connection is one of the most complex elements of this project, especially if you are not familiar with WebRTC. Unfortunately there is no JavaScript client library but there is some WebRTC signaling documentation. If you know the typical WebRTC flow, getting started with this is not so bad. I started with the built-in UV4L WebRTC app you can see at https://raspberrypi.local/stream/webrtc, cut out everything not needed to a bare minimum. This application only needs to receive a video stream, not send one, so that helps to minimize what we need to do.
After that I cleaned up the code to more closely match best practices for a modern WebRTC implementation – thanks to Fippo for his guidance there.
I do not have room here to dive deep here, but let me give some highlights. See the uv4l.js file on GitHub for the whole thing in order.
Setup the WebSocket
The first thing we’ll do is connect to the UV4L websocket server:
|
1 2 3 4 |
const uv4lPort = 9080; //This is determined by the uv4l configuration. 9080 is default set by uv4l-raspidisp-extras const protocol = location.protocol === "https:" ? "wss:" : "ws:"; const signalling_server_address = location.hostname; let ws = new WebSocket(protocol + '//' + signalling_server_address + ':' + uv4lPort + '/stream/webrtc'); |
Then we need to setup our WebSocket logic:
|
1 2 3 4 5 6 7 8 9 10 11 12 13 14 15 16 17 18 19 20 21 22 23 24 25 26 27 28 29 30 31 32 33 34 35 36 37 38 39 40 41 42 43 |
function websocketEvents() { ws.onopen = () => { console.log("websocket open"); startCall(); }; /*** Signaling logic ***/ ws.onmessage = (event) => { let message = JSON.parse(event.data); console.log("Incoming message:" + JSON.stringify(message)); if (!message.what) { console.error("Websocket message not defined"); return; } switch (message.what) { case "offer": offerAnswer(JSON.parse(message.data)); break; case "iceCandidates": onIceCandidates(JSON.parse(message.data)); break; default: console.warn("Unhandled websocket message: " + JSON.stringify(message)) } }; ws.onerror = (err) => { console.error("Websocket error: " + err.toString()); }; ws.onclose = () => { console.log("Websocket closed."); }; } |
When the WebSocket is opened we will start our call with a startCall function. When we get an offer message we’ll start an offerAnswer function. When we get an iceCandidates we’ll start an onIceCandidates function. We’ll cover those below in a moment.
PeerConnect setup
Then we will setup our PeerConnection.
|
1 2 3 4 5 6 7 8 9 10 11 12 13 14 15 16 17 18 19 20 21 22 23 24 25 26 27 28 29 30 31 32 33 34 35 36 37 38 39 40 41 42 43 44 45 46 47 48 49 50 |
////////////////////////// /*** Peer Connection ***/ function setupPeerConnection() { const pcConfig = { iceServers: [{ urls: [ //"stun:stun.l.google.com:19302", "stun:" + signalling_server_address + ":3478" ] }] }; //Setup our peerConnection object pc = new RTCPeerConnection(pcConfig); //Start video pc.ontrack = (event) => { if (remoteVideo.srcObject !== event.streams[0]) { remoteVideo.srcObject = event.streams[0]; remoteVideo.play() .then(() => console.log('Remote stream added.')); } }; pc.onremovestream = (event) => { console.log('Remote stream removed. Event: ', event); remoteVideo.stop(); }; //Handle datachannel messages pc.ondatachannel = (event) => { dataChannel = event.channel; dataChannel.onopen = () => console.log("Data Channel opened"); dataChannel.onerror = (err) => console.error("Data Channel Error:", err); dataChannel.onmessage = (event) => { //console.log("DataChannel Message:", event.data); processAiyData(JSON.parse(event.data)); }; dataChannel.onclose = () => console.log("The Data Channel is Closed"); }; console.log('Created RTCPeerConnnection'); } |
First we create a new RTCPeerConnection with some STUN servers. UV4L actually acts as a STUN server and I do not want any traffic leaving my LAN, so I just used that. Stick in the Google STUN server and the TURN server of your choice if your network topology requires that.
Then we assign of bunch of actions to various events. All of this is pretty standard. The unique one for this application is handling the dataChannel.onmessage event to pass that data to the processAiyData function we made in the previous section.
Start the call
The way we start a call with UV4L is to signal the server to call is back with a basic WebSocket command. We can pass some options as we do this. As I covered in Part 1, force_hw_vcodec will use hardware encoding. Without that our CPU usage is likely to be too high to do anything else. If you omit these parameters it should use the defaults set in /etc/uv4l/uv4l-raspidisp.conf. vformat: 55 corresponds to 720p at 15 Frames Per Second (FPS).
|
1 2 3 4 5 6 7 8 9 10 11 12 13 14 15 16 17 18 |
function startCall() { //Initialize the peerConnection setupPeerConnection(); //Send the call commmand let req = { what: "call", options: { force_hw_vcodec: true, vformat: 55 } }; ws.send(JSON.stringify(req)); console.log("Initiating call request" + JSON.stringify(req)); } |
ICE Candidates
Part of a usual WebRTC exchange is handling ICE Candidates. Unfortunately UV4L does not seem to support Trickle-ICE (see here for more on what that is), so we get them all at once which adds some delay to the setup. They also do not appear to be in a standard format that adapter.js likes so I had to take the data provided and regenerate them.
|
1 2 3 4 5 6 7 8 9 10 11 12 13 14 15 16 17 18 19 20 21 |
function onIceCandidates(remoteCandidates) { function onAddIceCandidateSuccess() { console.log("Successfully added ICE candidate") } function onAddIceCandidateError(err) { console.error("Failed to add candidate: " + err) } remoteCandidates.forEach((candidate) => { let generatedCandidate = new RTCIceCandidate({ sdpMLineIndex: candidate.sdpMLineIndex, candidate: candidate.candidate, sdpMid: candidate.sdpMid }); console.log("Created ICE candidate: " + JSON.stringify(generatedCandidate)); pc.addIceCandidate(generatedCandidate) .then(onAddIceCandidateSuccess, onAddIceCandidateError); }); } |
Offer/Answer
The final piece is handling the Offer Answer exchange. This looks kind of complicated, but are really only doing a few things:
- Setting our remote SDP based on what was sent(see here for our many posts covering SDP)
- Generating a local SDP
- Setting that local SDP
- Responding to the UV4L server with that SDP
Concurrent with all of this, we will ask the UV4L server to generate some ICE candidates which we handle above.
|
1 2 3 4 5 6 7 8 9 10 11 12 13 14 15 16 17 18 19 20 21 22 23 24 25 26 27 28 29 30 31 32 33 34 35 36 37 |
function offerAnswer(remoteSdp) { //Start the answer by setting the remote SDP pc.setRemoteDescription(new RTCSessionDescription(remoteSdp)) .then(() => { console.log("setRemoteDescription complete"); //Create the local SDP pc.createAnswer() .then( (localSdp) => { pc.setLocalDescription(localSdp) .then(() => { console.log("setLocalDescription complete"); //send the answer let req = { what: "answer", data: JSON.stringify(localSdp) }; ws.send(JSON.stringify(req)); console.log("Sent local SDP: " + JSON.stringify(localSdp)); }, (err) => console.error("setLocalDescription error:" + err)); }, (err) => console.log('Failed to create session description: ' + err.toString()) ); }, (err) => console.error("Failed to setRemoteDescription: " + err)); //Now ask for ICE candidates console.log("telling uv4l-server to generate IceCandidates"); ws.send(JSON.stringify({what: "generateIceCandidates"})); } |
Annotation – drawAiyVision.js
The annotation code in drawAiyVision.js is very similar to the annotation code in Computer Vision on the Web with WebRTC and TensorFlow. Enough so that I am not going to explain it again – see the client section in that post to see how to use the canvas to draw some squares and add labels.
The main modification I made here was to change the bounding box color to match the joy_score variable in face detection mode. This is very similar to how the arcade button changes color depending on mood of the detected faces in the joy_detection_demo.py that runs by default in the AIY Vision Kit.
Here is what the main function looks like:
|
1 2 3 4 5 6 7 8 9 10 11 12 13 14 15 16 17 18 19 20 21 22 23 24 25 26 27 28 |
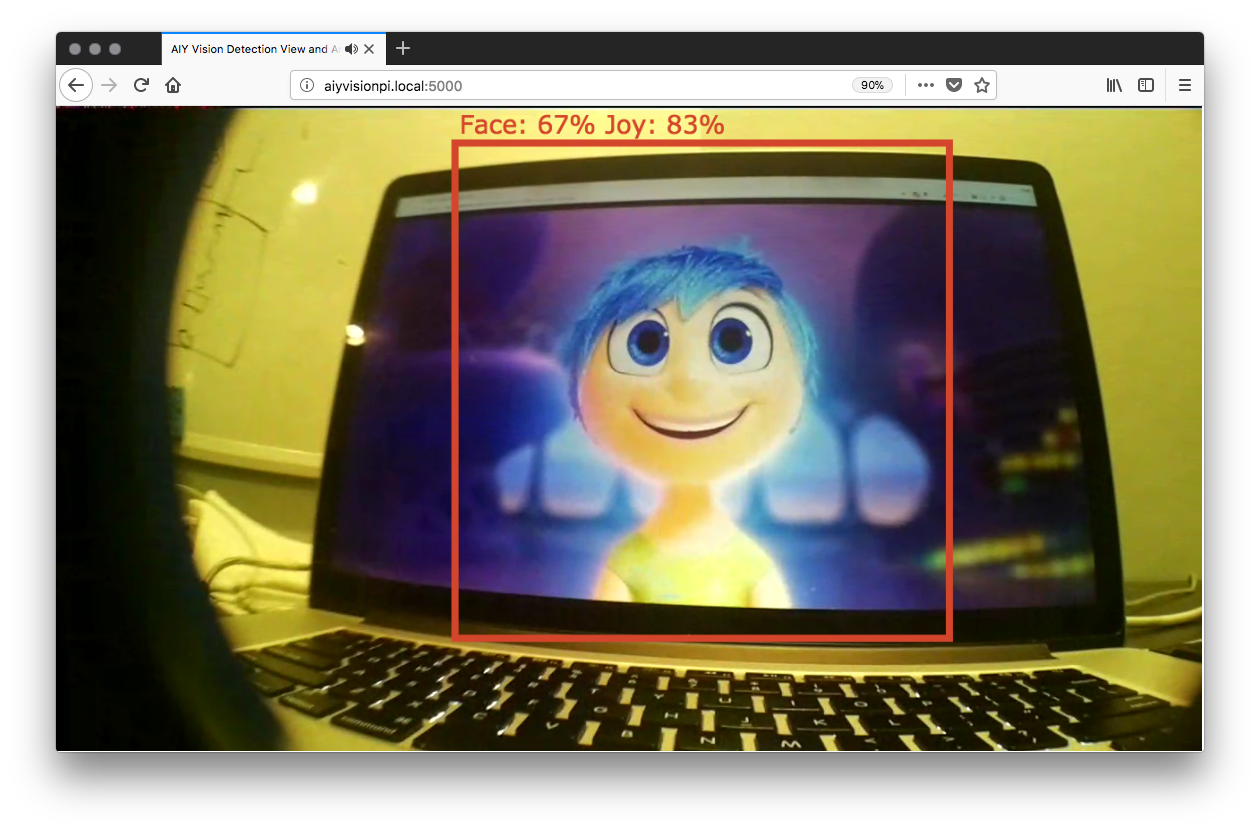
//Main function to export function processAiyData(result) { console.log(result); lastSighting = Date.now(); //clear the previous drawings drawCtx.clearRect(0, 0, drawCanvas.width, drawCanvas.height); result.objects.forEach((item) => { if (item.name === "face") { let label = "Face: " + Math.round(item.score * 100) + "%" + " Joy: " + Math.round(item.joy * 100) + "%"; let color = { r: Math.round(item.joy * 255), g: 70, b: Math.round((1 - item.joy) * 255) }; drawBox(item.x, item.y, item.width, item.height, label, color) } else if (item.name === "object") { let label = item.class_name + " - " + Math.round(item.score * 100) + "%"; drawBox(item.x, item.y, item.width, item.height, label) } else console.log("I don't know what that AIY Vision server response was"); }); } |
See the whole file on GitHub for the helper functions around this.
Test it
When you are all done, you should be able to run:
|
1 |
python3 server.py -m object |
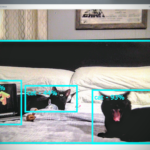
Then point your browser to http://raspberrypi.local:5000 and you should see something like this (if you have a cat, dog, or person):
Optimizations
The face detection model runs very fast without any tinkering. No so much for the object detection model. I have a lot more work to do here, but here are some starting thoughts for making this work better.
Use the latest AIY code
The Raspberry Pi image was updated 3 times since I purchased the kit and the repo has had had a few performance updates. As stated by weiranzhao here, the AIY Kit team has already improved performance with more to come.
Tweaking UV4L
There are a lot of things running on the Raspberry Pi image – most of which we do not need for this application, so we can turn some of them off or disable them. I found that disabling the uv4l_raspicam service helped with stability.
|
1 |
sudo systemctl disable uv4l_raspicam.service |
There are also a few parameters that can be updated in /etc/uv4l/uv4l-raspidisp.conf . We can set the resolution and frame rate to 720px15FPS or lower if we will not ever be sending a stream higher than that. The UV4L server also does not need to send audio, or receive anything. UV4L also has a CPU overuse detection feature that appears to help the most.
|
1 2 3 4 5 6 |
framerate = 15 #default: 0 resolution = 7 #default: 0 server-option = --enable-webrtc-audio=no #default: yes server-option = --webrtc-receive-video=no #default: yes server-option = --webrtc-receive-audio=no #default: yes server-option = --webrtc-cpu-overuse-detection=yes #default: no |
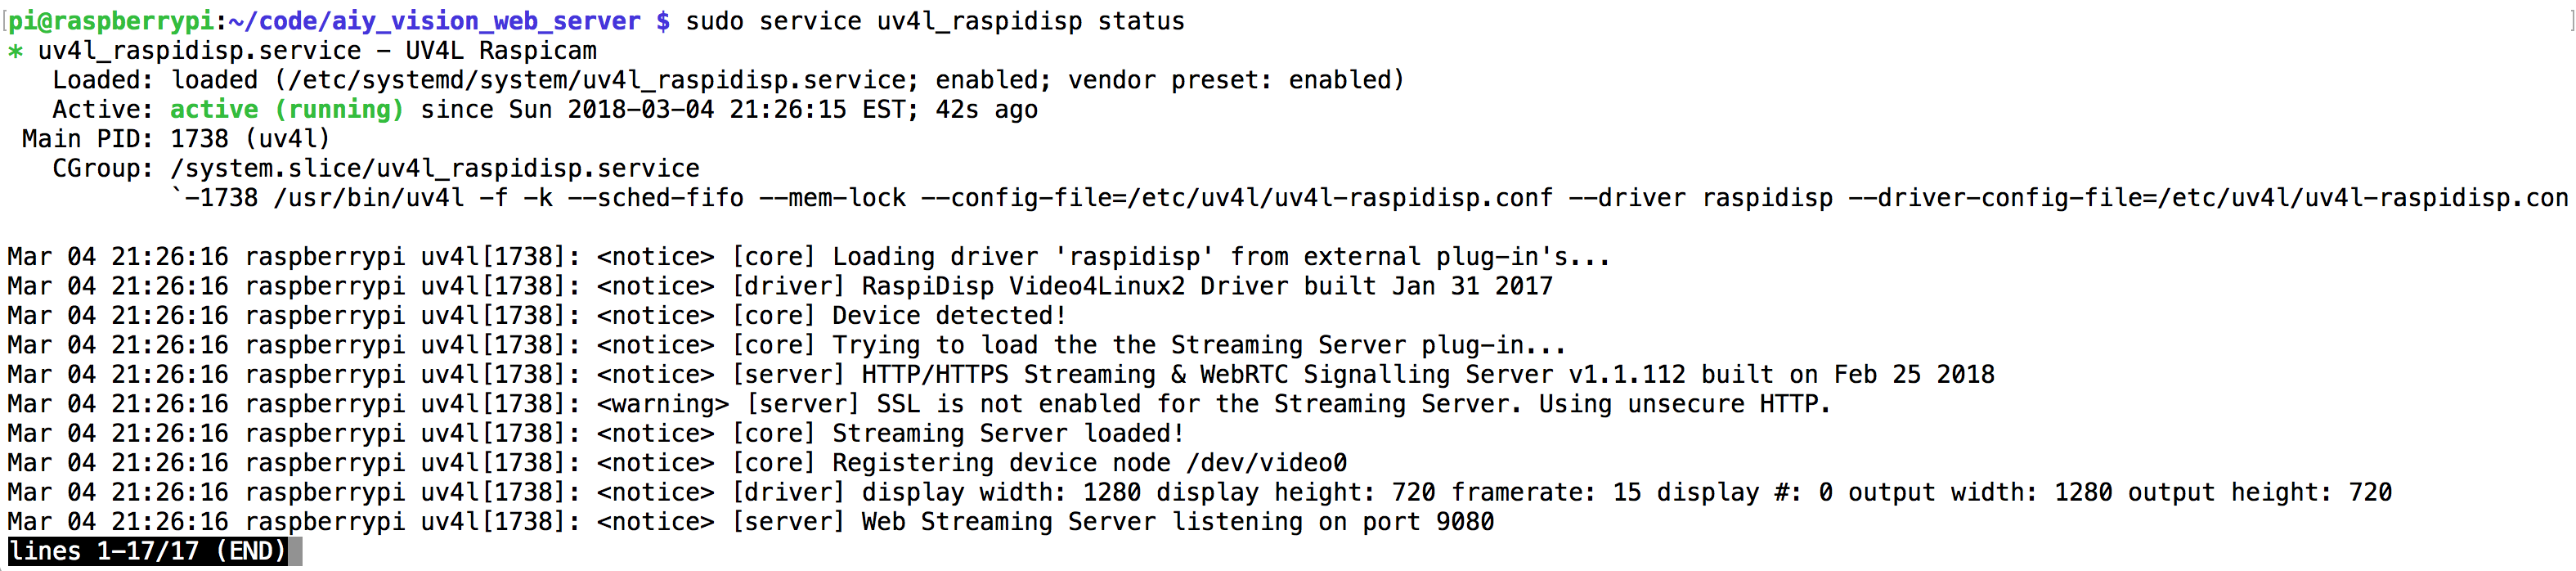
Make sure to restart the service or reboot after any changes. Checking the service status output will tell you what the current resolution settings are.
|
1 2 |
sudo service uv4l_raspidisp restart sudo service uv4l_raspidisp status |
I found I had to go into sudo raspi-config and set the resolution of the display there to match what I had configured elsewhere to make sure the preview window showed full screen:

Performance Tests
I did some quick tests to check the inference speed how much CPU I was using in various modes. You can see that the object model is much more CPU intensive than the face detector.
| Mode | UV4L | CPU | Inference time | FPS |
| face | off | 20% | 0.737 | ~13 |
| face | on | 80% | 0.743 | ~13 |
| object | off | 61% | 0.138 | ~7 |
| object | on | 94% | 0.37 | ~3 |
What Else
The CPU usage is still too close to 100%. This can be lowered further by reducing the resolution that UV4L runs at. Running it at 640×480 seemed to help a lot, but you loose a lot of the field of view from the camera. Lowering the resolution going into the inference code does not seem to make much difference – I guess the VPU hardware is more than thought to handle that piece.
One area that could use some throttling is the object_detection.get_objects method. This seems to consume a lot of CPU and we probably do not need to output those results multiple times per second. I would like to play around with putting a maximum output rate on that whole function so processing the inference results would be skipped if we do not need them as soon as we can produce them. Also, when the CPU gets overrun the socket stream gets behind – that could be controlled better too.
Thanks
Thanks to Fippo for his review of my WebRTC code and thank you to Luca Risolia at Linux Projects for his inputs on UV4L and looking into my feature requests.
{“author”, “chad hart“}
FYI – if you are looking for more things you can do with the AIY Vision Kit, I wrote a post on how to do custom Tensorflow training for kit over at cogint.ai. Check that out here: https://cogint.ai/custom-vision-training-on-the-aiy-vision-kit/


Hi,
I’m running into an error when trying to run the server.py script:
(env) pi@raspberrypi:~/AIY-projects-python $ sudo ../../../../env/bin/python3 server.py
Traceback (most recent call last):
File “server.py”, line 15, in
from aiy.vision.leds import Leds
ImportError: No module named ‘aiy.vision.leds’
It’s not able to find this module. Is there a step I’m missing somewhere?
Thanks
Rachel
Do you know what aiy image you loaded? It looks like you are on an older one. They removed the virtual environment and changed some of the library references, including the LEDs. You should download and reflash your SD card with the latest image that has some improvements over the previous ones: https://dl.google.com/dl/aiyprojects/aiyprojects-latest.img.xz
My code is working with aiyprojects-2018-02-21.img.xz.
The old source under the virtual environment use to be:
aiy._drivers._rgbled import PrivacyLED
That module just illuminates the privacy LED, so worst case you can comment it out if that is the only thing that is giving you trouble and you don’t care about the light.
I’ve been unable to find any documentation the face object and its methods and attributes (such as joy_score). could you point me in the right direction?
The AIY team has not published any docs on this that I know of. I learned enough for my projects just by reviewing their code samples in the repo and looking for related comments in their the repo’s issues section. Most of the samples have a good amount of comments in the code.
Good work!
Hi!
Great project! This was a smooth ride so far!
Any idea how I could go about adding a layer of security, like a login and password page before accessing the stream?
I would like to set it up as a security camera.
Also, I notice that only 1 device can access the stream with the setup in part 1. Do you have any pointers as to how to overcome that?
Its good to hear you are having success with this. The UV4L Server has a HTTP Basic authentication option – see the manual or just run through he config file to set this. I use this at home just by passing the user name and password as part of the URL. My first thought on improving this would be to setup a webpage that does some user authentication, then use Flask to mediate between the user authentication and to hide the UV4L credentials so they aren’t exposed to the browser.
When you say only 1 device can access the stream, I assume you mean only 1 WebRTC stream at a time? I believe best practice there is to use a media server like Janus or Jitsi for that. I know Janus runs well on a Pi 3, but I am not sure if you would have enough CPU to run it on a Pi Zero while doing inference processing too.
Thank you for your response! I will try the username, password url method.
I wonder if we could just record the stream and do the inference processing on the pi and upload the result as a video file on the cloud. This way we can then stream it directly from there. I don’t mind if my real-time has little delay. What do you think?
Unfortunately, although part I was working like a breeze, part II doesn’t work for me yet. Here’s my setup.
I am using Windows 10 and Putty. I am also using the latest AIY vision kit (1.1 I think). Joy detector is disabled.
The script runs and the inference processing seems to work well also (based on the terminal output). Although, when I use Chrome to connect on my local pi(with local IP) and port 5000. All I get is a blank page. The html is the same as described on this page.
Do I need to stop UV41 process? Why is the host 0.0.0.0 in your script ? Do we need to put our local pi IP address ?
If you want to setup a server in the cloud instead of running inference on device, see this post: https://webrtchacks.com/webrtc-cv-tensorflow/
I ran through the “Just let me try it” instructions above on the new 1.1 kit last week and did not have any issues.
You are connecting from your Windows 10 machine to the Pi Zero. “http://raspberry.pi:5000” should work in your browser unless you changed your Pi Zero host name and as long as you are on the same LAN.
What does the Python console and javascript console say when you try to connect?
The 0.0.0.0 just tells Flask to bind to the localhost on the Pi Zero.
I can give mine a try with my Win 10 machine tomorrow.
I gave this a try again with a fresh install on my 1.1 Vision Kit and did not have any issues. I did notice the websocket connection seems to be way slower now for some reason, but the video feed and annotation worked fine otherwise. I’ll need to investigate the websocket performance issue
Hi Chad!
Thanks for the update and the link for the tutorial. I will def give it a try too.:)
I have the webRTC running from the first tutorial. Should I disable it like you suggest in your tweaking section?
I will run some more tests tonight with part 2.
Right now, I am using a cronjob to start a tweaked version of face_detection_camera.py script to take a pictures and email it to me but it’s CPU intensive and I am afraid I am just opening sockets without closing them… I looked over your code and it seems to take care of that. Am I right?
You don’t need to keep the raspicam service going. That’s not used in part 2. You can disable that or even remove the uv4l-raspicam-extras package. However, that should not cause a conflict unless you connect to the uv4l raspicam somehow – so you don’t have to remove it.
I only open a single socket.
One other suggestion – check out the https://motion-project.github.io. You could set this up to snap a picture when motion is detected (with many parameters to choose from) and then run inference on that. That project is very CPU friendly.
Thanks Chad! Your code works perfectly fine! I was going about it all wrong. I was using the uv4l on port 8080 to stream as stated in the previous tutorials. I re-read your comments and went back to your original code, on the LAN. It worked like a charm until it got too CPU intensive(I assume) and crashed.
Here’s an example of what was printing in loop in the terminal.
Message from syslogd@raspberrypi at May 11 16:31:40 …
kernel:[ 780.303823] Internal error: : 11 [#1] ARM
Message from syslogd@raspberrypi at May 11 16:31:40 …
kernel:[ 780.304228] Process Thread 0x0xb390 (pid: 1059, stack limit = 0xc2190188)
But then I re-read the section about Optimizations. You really thought about everything!
I am very grateful about these blog posts. It got me to read about WebRTC, UV4l and to do some pretty cool tests with the face recognition scripts and live streaming!
Since my last post, I have a camera that records if there’s 2 faces and take a picture every minutes if there’s only 1 face. I wanted to do a timelapse but that was too heavy for the pi. The files are uploaded to Dropbox after being captured and are being deleted locally. I was thinking of using the Dropbox API and using it as a base to put my UI on it. I got it running in minutes but it’s too slow. Google Drive might be the next winner but I didn’t get so lucky with the Python 3 implementation.
I will give a try to the Motion project and the other webrthacks tutorial you suggested and run inference on the cloud or on some other machine at home. I wish I could use my old Xbox one lol.
You can use a raspberry pi 3b or 3b+, just connect the aiy bonnet and the raspberry using a standard camera adapter cable, just cut the 3.3v line.
I suggest doing the cut on the raspberry side of the cable as the cable is larger and easier to not screw up the cut.
on the 3b+ be careful of the poe plug.
Should give you a nice bump in the cpu area.
Hey guy, this is very cool project. I got some issues when run the server.py, seems like the uv4l was broken after about one minute. Then the process uv4l’s cpu was over 70% and ram was over 50%. Any ideas?
Did you apply the config changes in “Tweaking UV4L”? If the CPU gets overrun the whole thing stops working. If you are on a bad network connection with a lot of packet loss, UV4L will consume more CPU since it will need to work harder to encode the WebRTC stream. If you are going to use this outside of a tightly controlled environment I would recommend using a 640×480 resolution.
Thanks! That’s RIGHT, I config the uv4l and tweak it. The webrtc works well. But there still some problems. Such as the delay of the RECT drawed on the web.
I did not experience the rectangle drawing delay when I first released the the post, but noticed the issue on the new AIY Kit image. I’ll need to look into that. Make sure to keep an eye on the repo for updates when I get around to do that: https://github.com/webrtcHacks/aiy_vision_web_server
Or better yet, submit a pull request if you figure it out.
I did some investigation on the annotation delay. It was a problem with UV4L’s socket-to-dataChannel handling and Luca at UV4L fixed it today. Please run the following to fix this:
sudo apt-get install --reinstall uv4l uv4l-webrtc-armv6 uv4l-raspidisp uv4l-raspidisp-extrasAdd
uv4l-raspicam and uv4l-raspicam-extrasif you are using those. Things will still get messed up if you overrun the CPU, but the UV4L fix should bring the annotation updates back up to the video framerate.That’s very COOL! I will try it this evening, and give you a result!
Thanks for the writeup. I’m trying to output the recognition feed and inference to ffmpeg. Do you think that’s possible?
You are looking to save the video with annotations overlaid on it while streaming with WebRTC? The challenge is avoiding simultaneous access to the raspicam, which is why I did the uv4l-raspivid approach in the first place. In theory you should be able to write the uv4l-raspivid feed to disk. I would try some of the comments here: https://raspberrypi.stackexchange.com/questions/43708/using-the-uv4l-driver-to-stream-and-record-to-a-file-simultaneously.
Another approach would be to just do a camera.start_recording, and then use something like opencv to put the annotations over it later.
Either way, you will need to be sensitive to your CPU consumption. If are are streaming constantly it might be easier to just use WebRTC to record remotely.
Just plug the thing into a raspbery pi 3 or 3b+,
https://photos.app.goo.gl/jETGuDE3UUnD1XRi6
It works fine, you just have to cut the 3.3v line which is the first wire in the flex cable.
I am curious why you need to cut the 3.3 line? I didn’t see any references to that in other posts on that topic (like https://www.raspberrypi.org/forums/viewtopic.php?t=205926)
Its 3.3v+ on both sides, my vision bonnet is from the first batch before they where pulled from shelves temporary, it is possible the issue has been fixed. Its the version where you have to flip the 22 to 22 pin flex cable and connect the arrow for the pi to the bonnet instead when connecting to a pi zero.
Mine won’t work without clipping that line.
I asked google about this however and they did not seem to be aware of any change to fix the issue above, or acknowledge that it was an issue. From the couple of emails I had tho, I very much got the impression that at least the support guys had no clue about the hardware.
Maybe I will buy another kit and see what is different.
I was able to get the AIY Vision Kit to work with a Pi 3 without adjusting any of the cables. Just make sure the cables are connected properly and everything works with the stock SD card image right out of the box.
Just a note for others on using the Pi3 – make sure to use a 3 mode B, not the B+. There are some issues on the latest image and the 3B+: https://github.com/google/aiyprojects-raspbian/issues/310
pi@raspberrypi:~$
sudo service uv4l-raspidisp restartsudo service uv4l_raspidisp restartFailed to restart uv4l-raspidisp.service: Unit uv4l-raspidisp.service not found.
It sounds like uv4l-raspidisp might not be installed. Are you sure it was included in the
sudo apt-get installcommand to install the packages in the “Just Let me Try it” section above? You can see all the available services if you do asudo service status-allpi@raspberrypi:~$ sudo apt-get install -y uv4l uv4l-raspicam uv4l-raspicam-extras uv4l-webrtc-armv6 uv4l-raspidisp uv4l-raspidisp-extras
Reading package lists… Done
Building dependency tree
Reading state information… Done
uv4l is already the newest version (1.9.16).
uv4l-raspicam is already the newest version (1.9.60).
uv4l-raspicam-extras is already the newest version (1.42).
uv4l-raspidisp is already the newest version (1.6).
uv4l-raspidisp-extras is already the newest version (1.7).
uv4l-webrtc-armv6 is already the newest version (1.84).
0 upgraded, 0 newly installed, 0 to remove and 113 not upgraded.
Yes. I installed all the installation packages!
I found the problem!
Your command was wrong:
What you wrote is: sudo service uv4l-raspidisp restart
The correct one should be: sudo service uv4l_raspidisp restart
“_” is not “-”
Let’s change the content of the article. Lest other people be misled like me!
fixed. sorry for the typo
http://10.197.229.44:5000/
I access the page through the LAN is blank!
There is video on the monitor!
However, no face is identified after the face is recognized
i@raspberrypi:~$ ls
AIY-projects-python AIY-voice-kit-python bin Documents drivers-raspi Music Public Templates
aiy_vision_web_server assistant-sdk-python Desktop Downloads models Pictures python_games Videos
10.197.229.6 – – [22/Jun/2018 02:36:43] “GET / HTTP/1.1” 200 –
INFO:werkzeug:10.197.229.6 – – [22/Jun/2018 02:36:43] “GET / HTTP/1.1” 200 –
10.197.229.6 – – [22/Jun/2018 02:36:44] “GET /static/drawAiyVision.js HTTP/1.1” 200 –
INFO:werkzeug:10.197.229.6 – – [22/Jun/2018 02:36:44] “GET /static/drawAiyVision.js HTTP/1.1” 200 –
10.197.229.6 – – [22/Jun/2018 02:36:45] “GET /static/uv4l.js HTTP/1.1” 200 –
INFO:werkzeug:10.197.229.6 – – [22/Jun/2018 02:36:45] “GET /static/uv4l.js HTTP/1.1” 200 –
Hey there, thanks a lot for sharing your knowledge! Its been a great leap forward to my robotics project.
I am not a programmer or software engineer, so I depend on good tutorials like the one you did! 🙂
My understanding of the code only scratches the surface of understanding what is going on here…so my question would be, is it possible to also send the numerical values for the face.bounding_box in tandem with the camera stream?
I would like to be able to access my robots camera from within Unity, and drive my model with the position of the face.bounding_box. I would use http GET request from within Unity to fetch the values, if possible? Getting the Motion JPEG stream already works great, but it would be great to also have those values available! 🙂
So if I understand correctly you have already figured out how to get a video stream into Unity and now you just want a REST API on the Pi that will return the bounding box coordinates?
I did something along those lines here: https://webrtchacks.com/webrtc-cv-tensorflow/
With the SampleUnityMjpegViewer I am able to stream the Pi camera to Unity http://192.168.178.60:8080/stream/video.mjpeg
I am not able to import the http://raspberrypi.local:5000 though!
Also it seems that I am not able to import http://192.168.178.60:9080/stream/webrtc…
I would like to find a way to send face.bounding_box as numerical values, plus the camera stream to Unity!
At the moment I am running Blynk local server on my Pi, which works great but I could never wrap my head around how to stream images…so this here was just what I was looking for!
Let me know if I am on the right way, or if it is a dead end… 🙂
You will not be able to use the uv4l WebRTC with Unity unless you setup a WebRTC stack inside Unity and adapt it to use uv4l’s signaling.
If you have already figured out how to send a video stream, then I would recommend setting up a simple REST API (just using HTTP GETs) to send that information from the Pi to Unity.
Thanks a lot for the info, that will safe me the time trying to set this up…so I will use a simple mjpg-streamer to get my camera stream to Unity and sent the data with my REST API!
But thanks again for the help and for introducing uv4l WebRTC, it has some great features!
All the other tutorials are also great btw, they are all on my to do agenda!! 🙂
One thing that would be nice, is to get the http://raspberrypi.local:5000 as a video.mjepg, is this possible?
Then I could just send the values from within the Python script to my REST server, I cannot import to Unity in another form than Motion JPEG…
Hello, again…so I got to explore this project a little more, and it seems to be the most reliable option for streaming after all! I just had to let go the idea of showing the camera feed inside of Unity, which is not the worst thing. So here I am again! 🙂
I am redesigning my robot a bit, and I was wondering, is there a way to flip the camera while using raspidisp? It would be beneficial to my robot design to do so!
I haven’t tried this, but there are hflip and vflip options if you look in the raspicam.conf configuration file that should help you.
Hey, thanks for the quick reply…it was a bit late and I was overthinking!! It turned out that I just had to do this in your server.py script! 🙂
camera.vflip = True
Hey, I just checked back on this since I am rebuilding my robot…
It seems like I cannot open the stream from my Windows 10 PC,
Android works fine with Firefox though.
Strange…is there a workaround? 🙂
Hi Swann – what browser are you using on Windows 10?
Hey, sorry for the late reply…I am using Firefox on Windows 10!
If there is any other browser you are recommending, I would surely switch!! 🙂
Hey, can you confirm the issue with desktop browsers?
Firefox on Android is the only browser which still shows the video stream…
If there is a solution how to fix this, it would be highly appreciated!! 🙂
Hey there, I updated the WebRtc packages…now Firefox Desktop on Windows 10 works fine, but Firefox Mobile on Android is only showing the bounding box, but no image!!
Just to let you know whats going on!! 🙂
For those curious about object detection, now the UV4L supports live, real-time object detection with accelerated TensorFlow Lite models, object tracking and WebRTC streaming “out-of-the-box”. Here is how to realize a Raspberry Pi-based robot doing the above:
https://www.linux-projects.org/uv4l/tutorials/video-tracking-with-tensor-flow/
Thanks Luca. I am ordering the hardware to try this out.