
A couple years ago I did a TADHack where I envisioned a cheap, low-powered camera that could run complex computer vision and stream remotely when needed. After considering what it would take to build something like this myself, I waited patiently for this tech to come. Today with Google’s new AIY Vision kit, we are pretty much there.
The AIY Vision Kit is a $45 add-on board that attaches to a Raspberry Pi Zero with a Pi 2 camera. The board includes a Vision Processing Unit (VPU) chip that runs Tensor Flow image processing graphs super efficiently. The kit comes with a bunch of examples out of the box, but to actually see what the camera see’s you need to plug the HDMI into a monitor. That’s not very useful when you want to put your battery powered kit in a remote location. And while it is nice that the rig does not require any Internet connectivity, that misses out on a lot of the fun applications. So, let’s add some WebRTC to the AIY Vision Kit to let it stream over the web.
In this post I will give some background on the kit and show how to use UV4L on a Raspberry Pi Zero. This post aims to be useful to:
- Raspberry Pi nerds who want to learn how to send real time streams from their device,
- WebRTC geeks who want to see an embedded/IoT/CV application, and
- makers lucky enough to get a hold of one of few AIY Vision Kits released so far.

AIY Vision Kit
The AIY Vision Kit was initially released on December 29, 2017 only at Microcenter. I am glad I reserved one early in November because they quickly sold out of the initial 2000 global unit run. Odds are you will have a hard time getting one until Spring some time unless you want to get ripped off on Ebay.

The Pi
The kit requires a Pi Zero. They recommend a Pi Zero W since its handy to have WiFi built-in, but I confirmed it worked fine with a normal Pi Zero when I tried it. Important – you’ll need to solder a header to the Pi Zero or buy a Zero WH that includes one. I was lazy and grabbed the wrong solder and butchered my first attempt, which caused me some problems.

Vision Bonnet
The Bonnet is just a small Pi Hat that attaches to the Pi Zero GPIO header. As one of the Googlers on the project was nice enough to explain, the Vision Bonnet reads directly from the Pi Camera via the standard Pi camera flex cable that passes through it. This means your other process have full access to the Pi Camera while it is running your code. It also means it does not use use any of the Pi’s resources other than what is needed for control signaling and the overhead to transfer the TensorFlow graph (more on that below), which is good because any kind of image processing can quickly exceed the Pi Zero’s single-core 1GHz ARM. Note that you do need something to initialize the camera since the Bonnett is just passively listening and can’t turn it on.
But that’s not all – the bonnet itself also has its own Micro Controller Unit (MCU) that helps to offload the Kit’s push button with RGB LED and Piezo buzzer while leaving room for an extra 4 GPIO headers, a button, and some onboard LEDs.
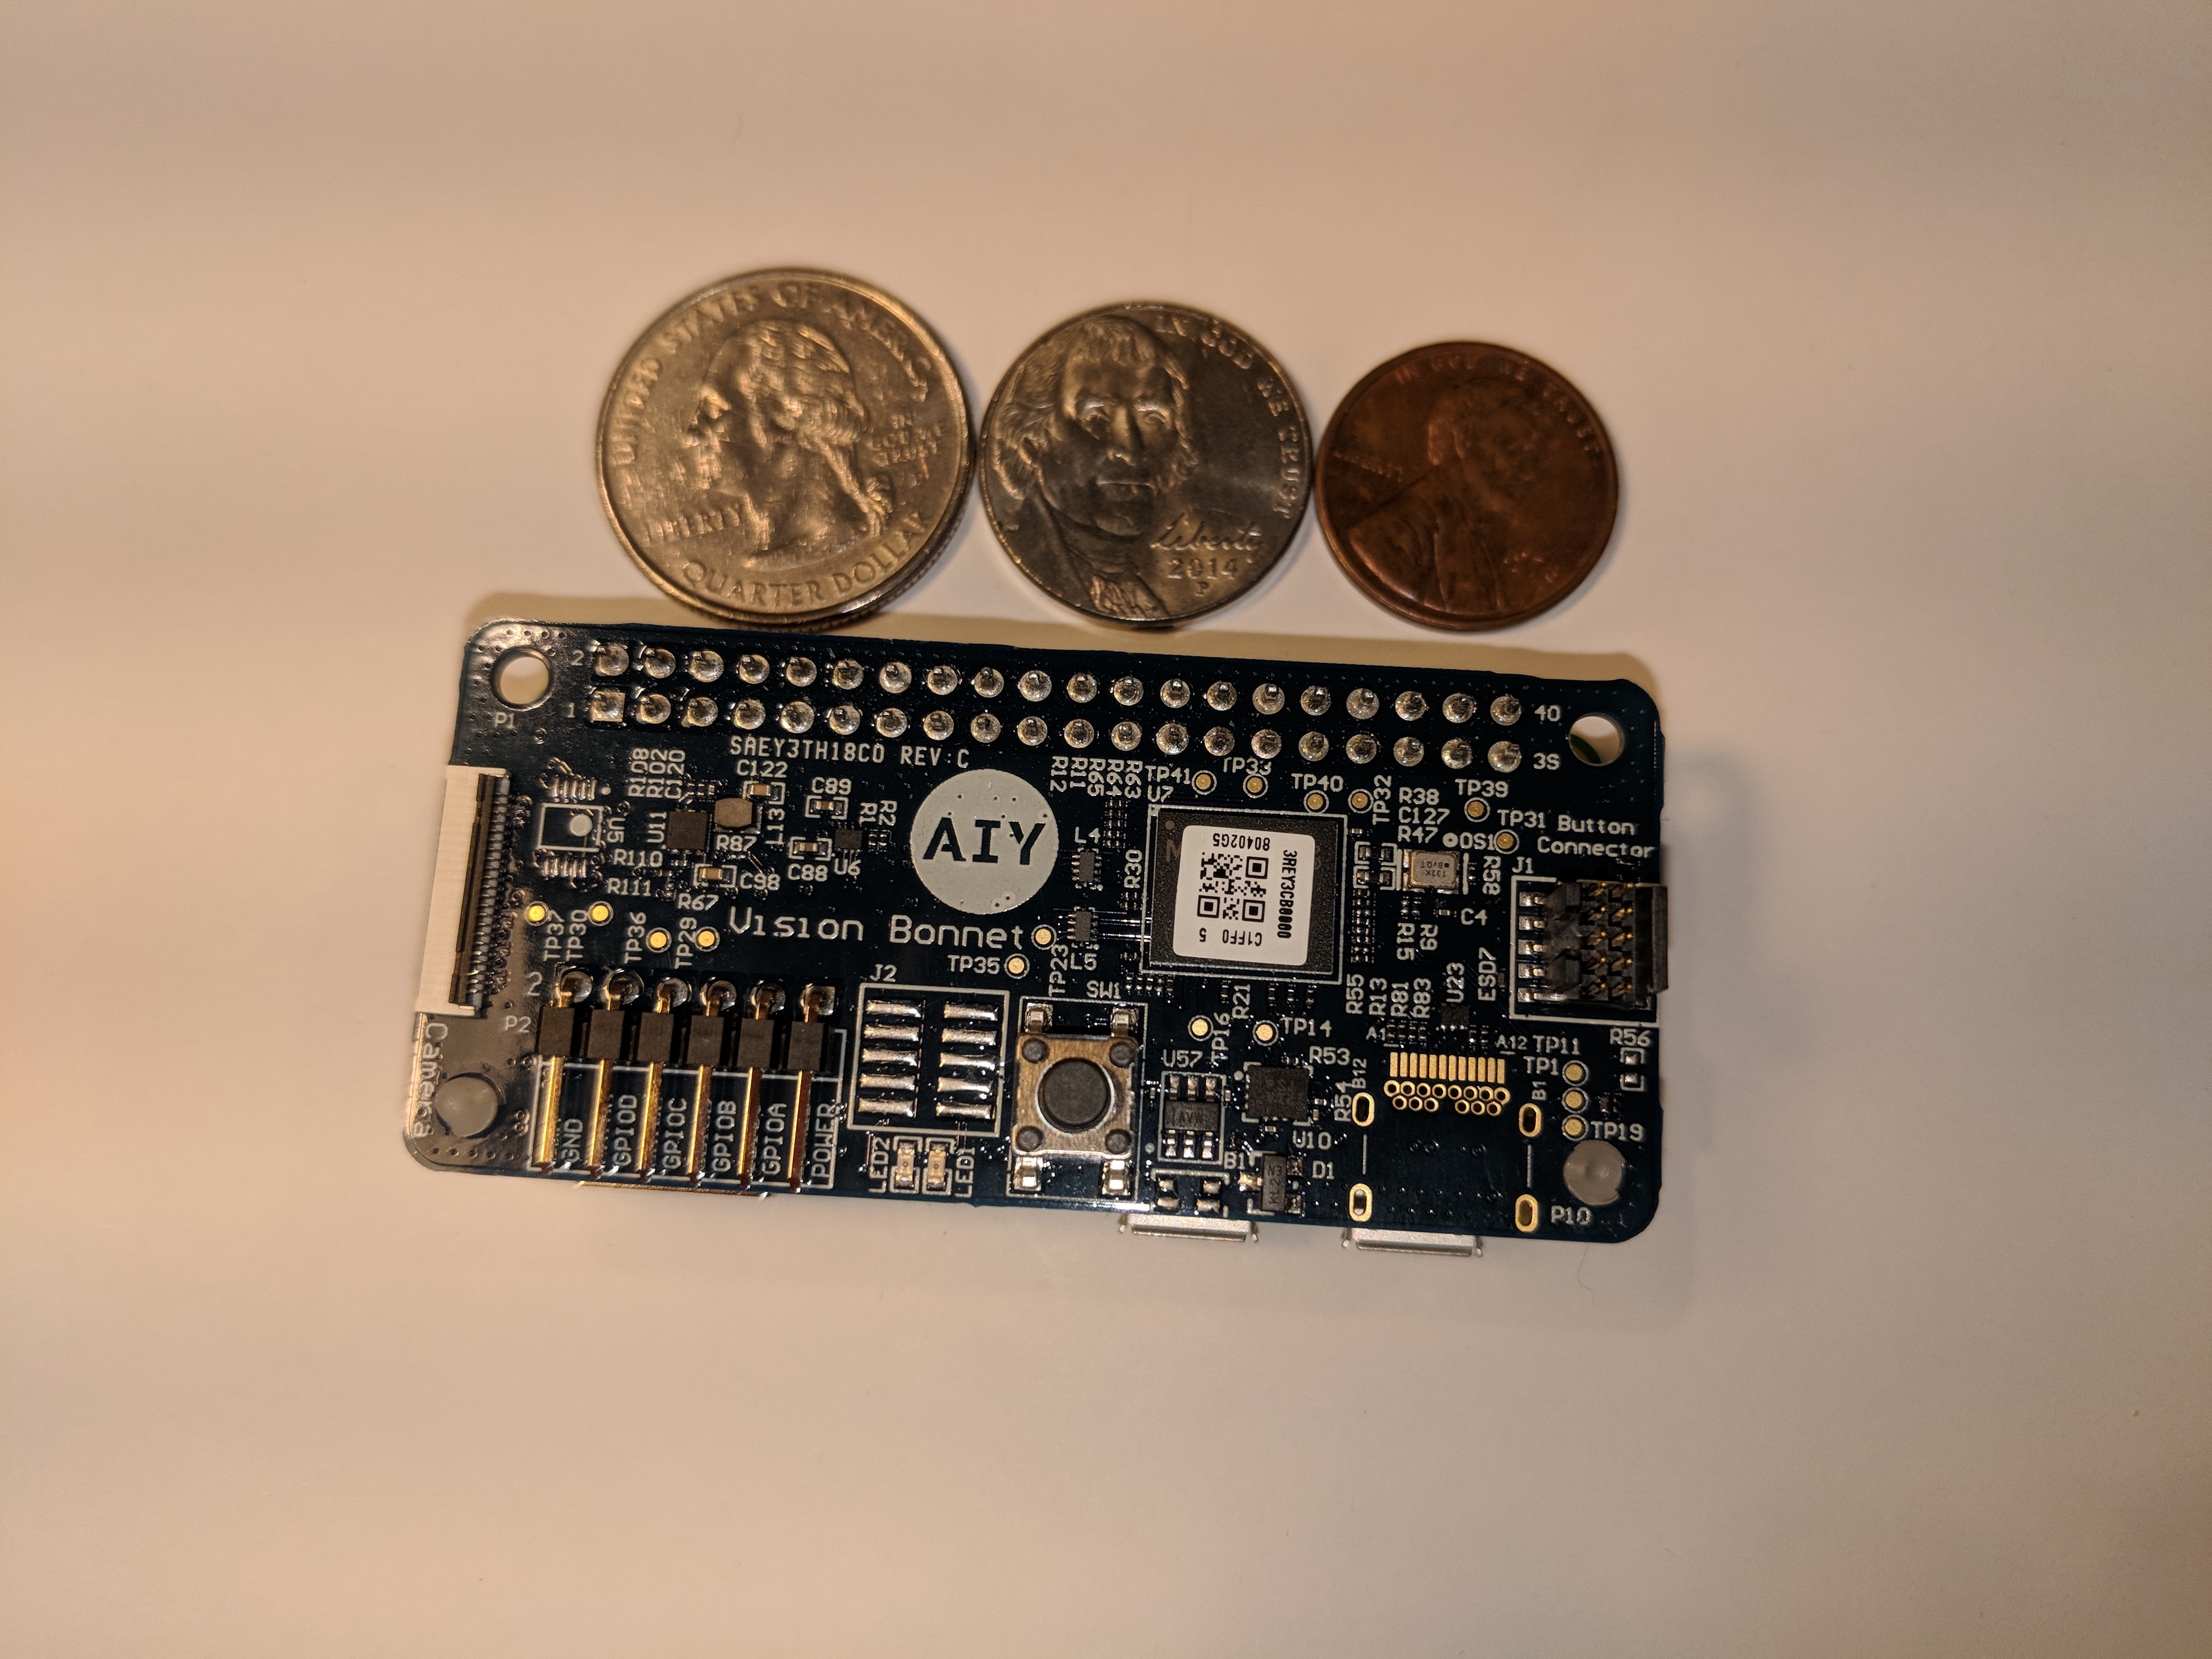
Vision Processing Chip
The main feature of the board is an Intel® Movidius™ Myriad 2 MA2450 vision processing unit (VPU) chip. This is the magic that does all the vision processing heavy lifting . The VPU has hardware acceleration that runs neural network graphs at low power. Intel actually sells this chip on a USB stick for $80 called the Neural Compute Stick (NCS), but it is no where near as easy to develop as the Vision Kit and you need a Pi 3 to run it (ToDo: write a post on that). Google actually wrote the inference engine from scratch to improve the runtime, so they say it is even faster than what you can get on the NCS.
Costs
In the end you get a decent kit for prototyping for less than $100 – way cheaper than the AWS’s DeepLense which you can pre-order for $249 for delivery in June. (Google announced the AIY Vision Kit one day after Amazon announced DeepLense – coincidence?).
| Item | AIY Vision Kit | Intel NCS |
| Pi* | $5-$14 | $35 |
| VPU** | $45 | $80 |
| Pi Camera | $25 | $25 |
| MicroSD card | $5 | $5 |
| Power supply | $5 | $5 |
| Total | $85-$94 | $150 |
*The Pi Zero W’s are usually $10, but I got a few on sale for $5. I see the WH with headers for $14. If you want to solder yourself then you can get a header for less than $1.
**Don’t forget the AIY Vision kit includes not only the VPU chip, but the bonnet board with buzzer, LED, and push button along with wires, a wide angle camera lens, and a cardboard enclosure to hold the whole thing.
Standard Assembly
Just follow the official instructions to put it together. This was pretty easy – the only thing to look out for is not accidentally folding any of the camera ribbon cables too much as you put it in the box.
Note that the image has been updated a couple of times since I first got the kit and the instructions and code have changed. I originally wrote this post with the AIY image posted on Jan 3 and made some adjustments based on the Feb 21 image.
Models
The kit comes with code for several demos and updates to the repo indicate there is more coming. Here are the models that were available at the time of writing:
- Face Detection – identifies faces with bounding boxes and returns a happiness score for each
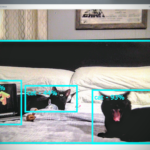
- Object Detection – This looks like a Vision Bonnet optimized variant to the Object Detection API I covered earlier but only trained setup to detect Cats, Dogs, and People with bounding boxes
- Image Classification – takes an image and assigns it to one of 1000 different image classes (no bounding boxes)
- Dish Classifier – takes an image and assigns it to one of 2023 prepared food classes
It is also possible to build your own TensorFlow model for the AIY Vision Kit with some restrictions. I quickly attempted to compile one of the Object Detection API models, but did not get close to making it work. I hope Google releases more details on how these models were built incase you wanted to adjust the ones they made already and as a guide for making new ones.
Inference Methods
The aiy.vision.inference library comes with 2 methods of providing image input to the models above:
- ImageInference – this method requires that you send it an image and it only processes one at a time
- CameraInference – this method takes the image directly off of the PiCamera in a continuous fashion util it is stopped
Inference is fast – just 36 ms in my tests, though interpreting the output, which requires the Pi Zero CPU, slowed down my effectively results to around 2-3 frames per second with the Object Detection model.
Demos
There are python demos for each of these. The Joy Detection demo runs automatically out of the box. This demo detects faces and displays a color ranging from orange to blue representing the average of what it sees. If it sees a bunch of happy faces it will make an 8-bit noise.
For purposes of this post (and the next), I mainly focused on the Face Detection and and Object Detection models.
Adding WebRTC with UV4L
There are several ways to WebRTC on the Raspberry Pi, but very few that work well on the limited Pi Zero. My preferred method is UV4L. UV4L has supported WebRTC for a while in its streaming server. It has a bunch of great features, but the ones that matter most for this project are:
- Included WebRTC signaling server & demo page – one less thing to worry about
- H.264 Hardware acceleration – this helps to keep our CPU usage down by using the ARM’s hardware to encode the video stream instead of doing it in software.
- Raspidisp driver – this lets you create a virtual video capture device from the Pi’s HDMI output; I’ll explain why I need this in a bit
- DataChannels – an easy way to send data to our browser client
Unfortunately UV4L is not an open source project, but it has been around a while and has a reasonably sized community that helps on the message boards.
General Setup on the Pi
Install
If you are running the default AIY Kit image with the Joy Detector demo, then make sure to stop that so UV4L has full access to the camera for now.
|
1 |
sudo systemctl stop joy_detection_demo.service |
UV4L install is straight-forward:
|
1 2 3 4 |
curl http://www.linux-projects.org/listing/uv4l_repo/lpkey.asc | sudo apt-key add - echo "deb http://www.linux-projects.org/listing/uv4l_repo/raspbian/stretch stretch main" | sudo tee -a /etc/apt/sources.list sudo apt-get update sudo apt-get install -y uv4l uv4l-raspicam uv4l-raspicam-extras uv4l-webrtc-armv6 uv4l-raspidisp uv4l-raspidisp-extras |
Want to run this on a Pi 2 or Pi 3? Everything here will work the same on any Pi 2 or Pi 3 – just put uv4l-webrtc instead of uv4l-webrtc-armv6 above.
Testing
Open a browser that supports WebRTC and go to http://raspberrypi.local:8080/stream/webrtc where raspberrypi is the hostname or IP address of your Pi (the default hostname on the Vision Kit image is raspberrypi ).
Click the green call button, and you should see something like this:
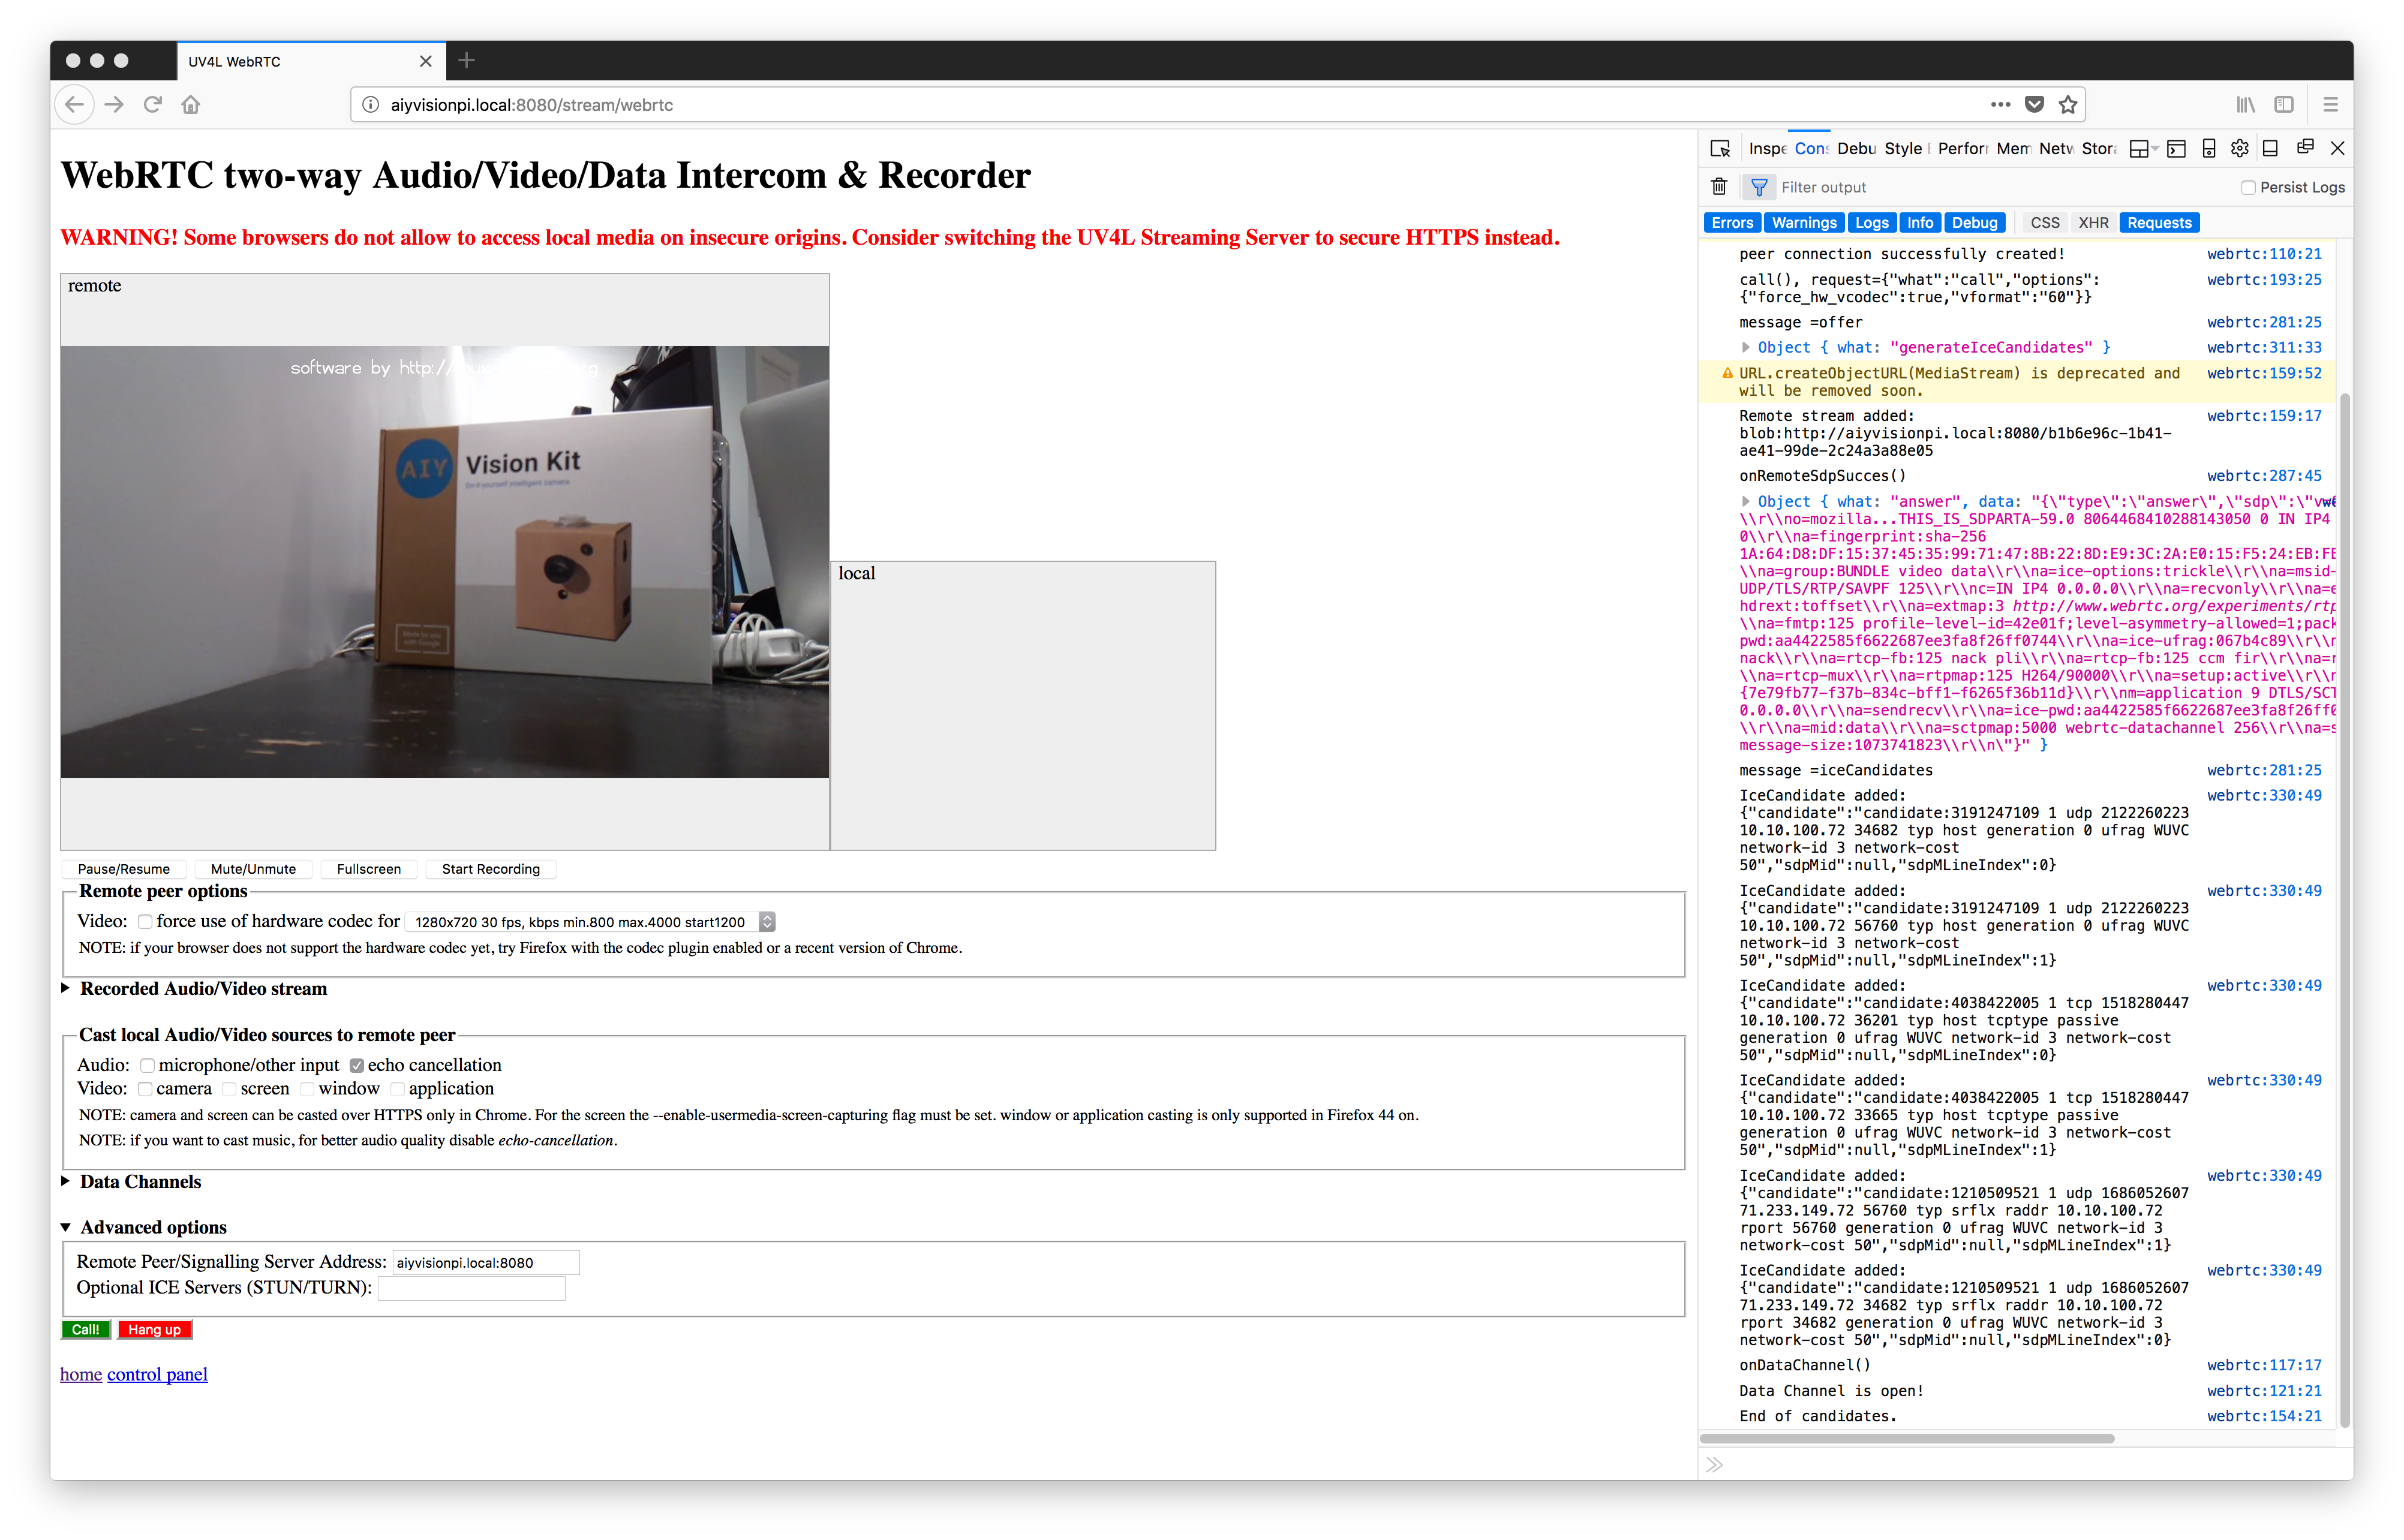
If you run top , you’ll see your CPU runs at just about 100% in the default 1280x720x30fps stream. Hang-up, click on “force use of hardware codec” and call again. This drops the UV4L CPU usage down to around 55%. We can work with this.
Hang up when you’re done.
Configuration
There are so many options you can play with if you edit the configuration file:
|
1 |
sudo nano /etc/uv4l/uv4l-raspicam.conf |
Go ahead and play with that, but let’s first get this working with our kit.
Making it work with the Vision Kit
Let’s run the Joy Detection Demo that we stopped earlier. This time, instead of running the service that is setup, let’s run it manually:
|
1 |
python3 ~/AIY-projects-python/src/examples/vision/joy/joy_detection_demo.py |
The demo should be started.
Now go back to http://raspberrypi.local:8080/stream/webrtc and try to make a call again. You’ll get an “Invalid video device!” That’s no fun 🙁
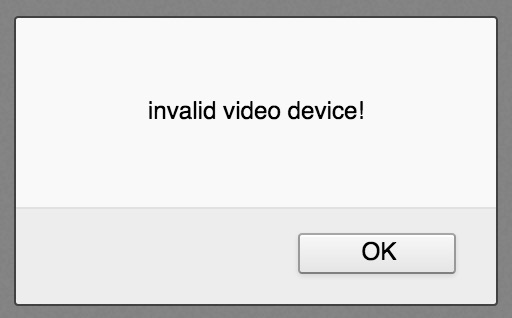
This is because all the AIY demos use the PiCamera command to initialize the camera and only a single process can access the camera at any one time. The Vision Bonnet is a passive listener, so it does not care who starts the camera, but it needs someone to do it. One approach to get around this is to:
- Rewrite the AIY demo code to take out all PiCamera references
- Start streaming from UV4L – that’ll initialize the camera
- Run the modified AIY demo code after the camera is initialized by a live UV4L stream
The downside to the above approach is that you are streaming constantly – consuming battery, CPU, and bandwidth. It is more typical to want to view the video feed after some kind of alert – like if a person or object is detected so you can see what’s going on. It is also a bunch of coding you need to do. Fortunately UV4L provides an easy way to do this without any code changes.
Display output
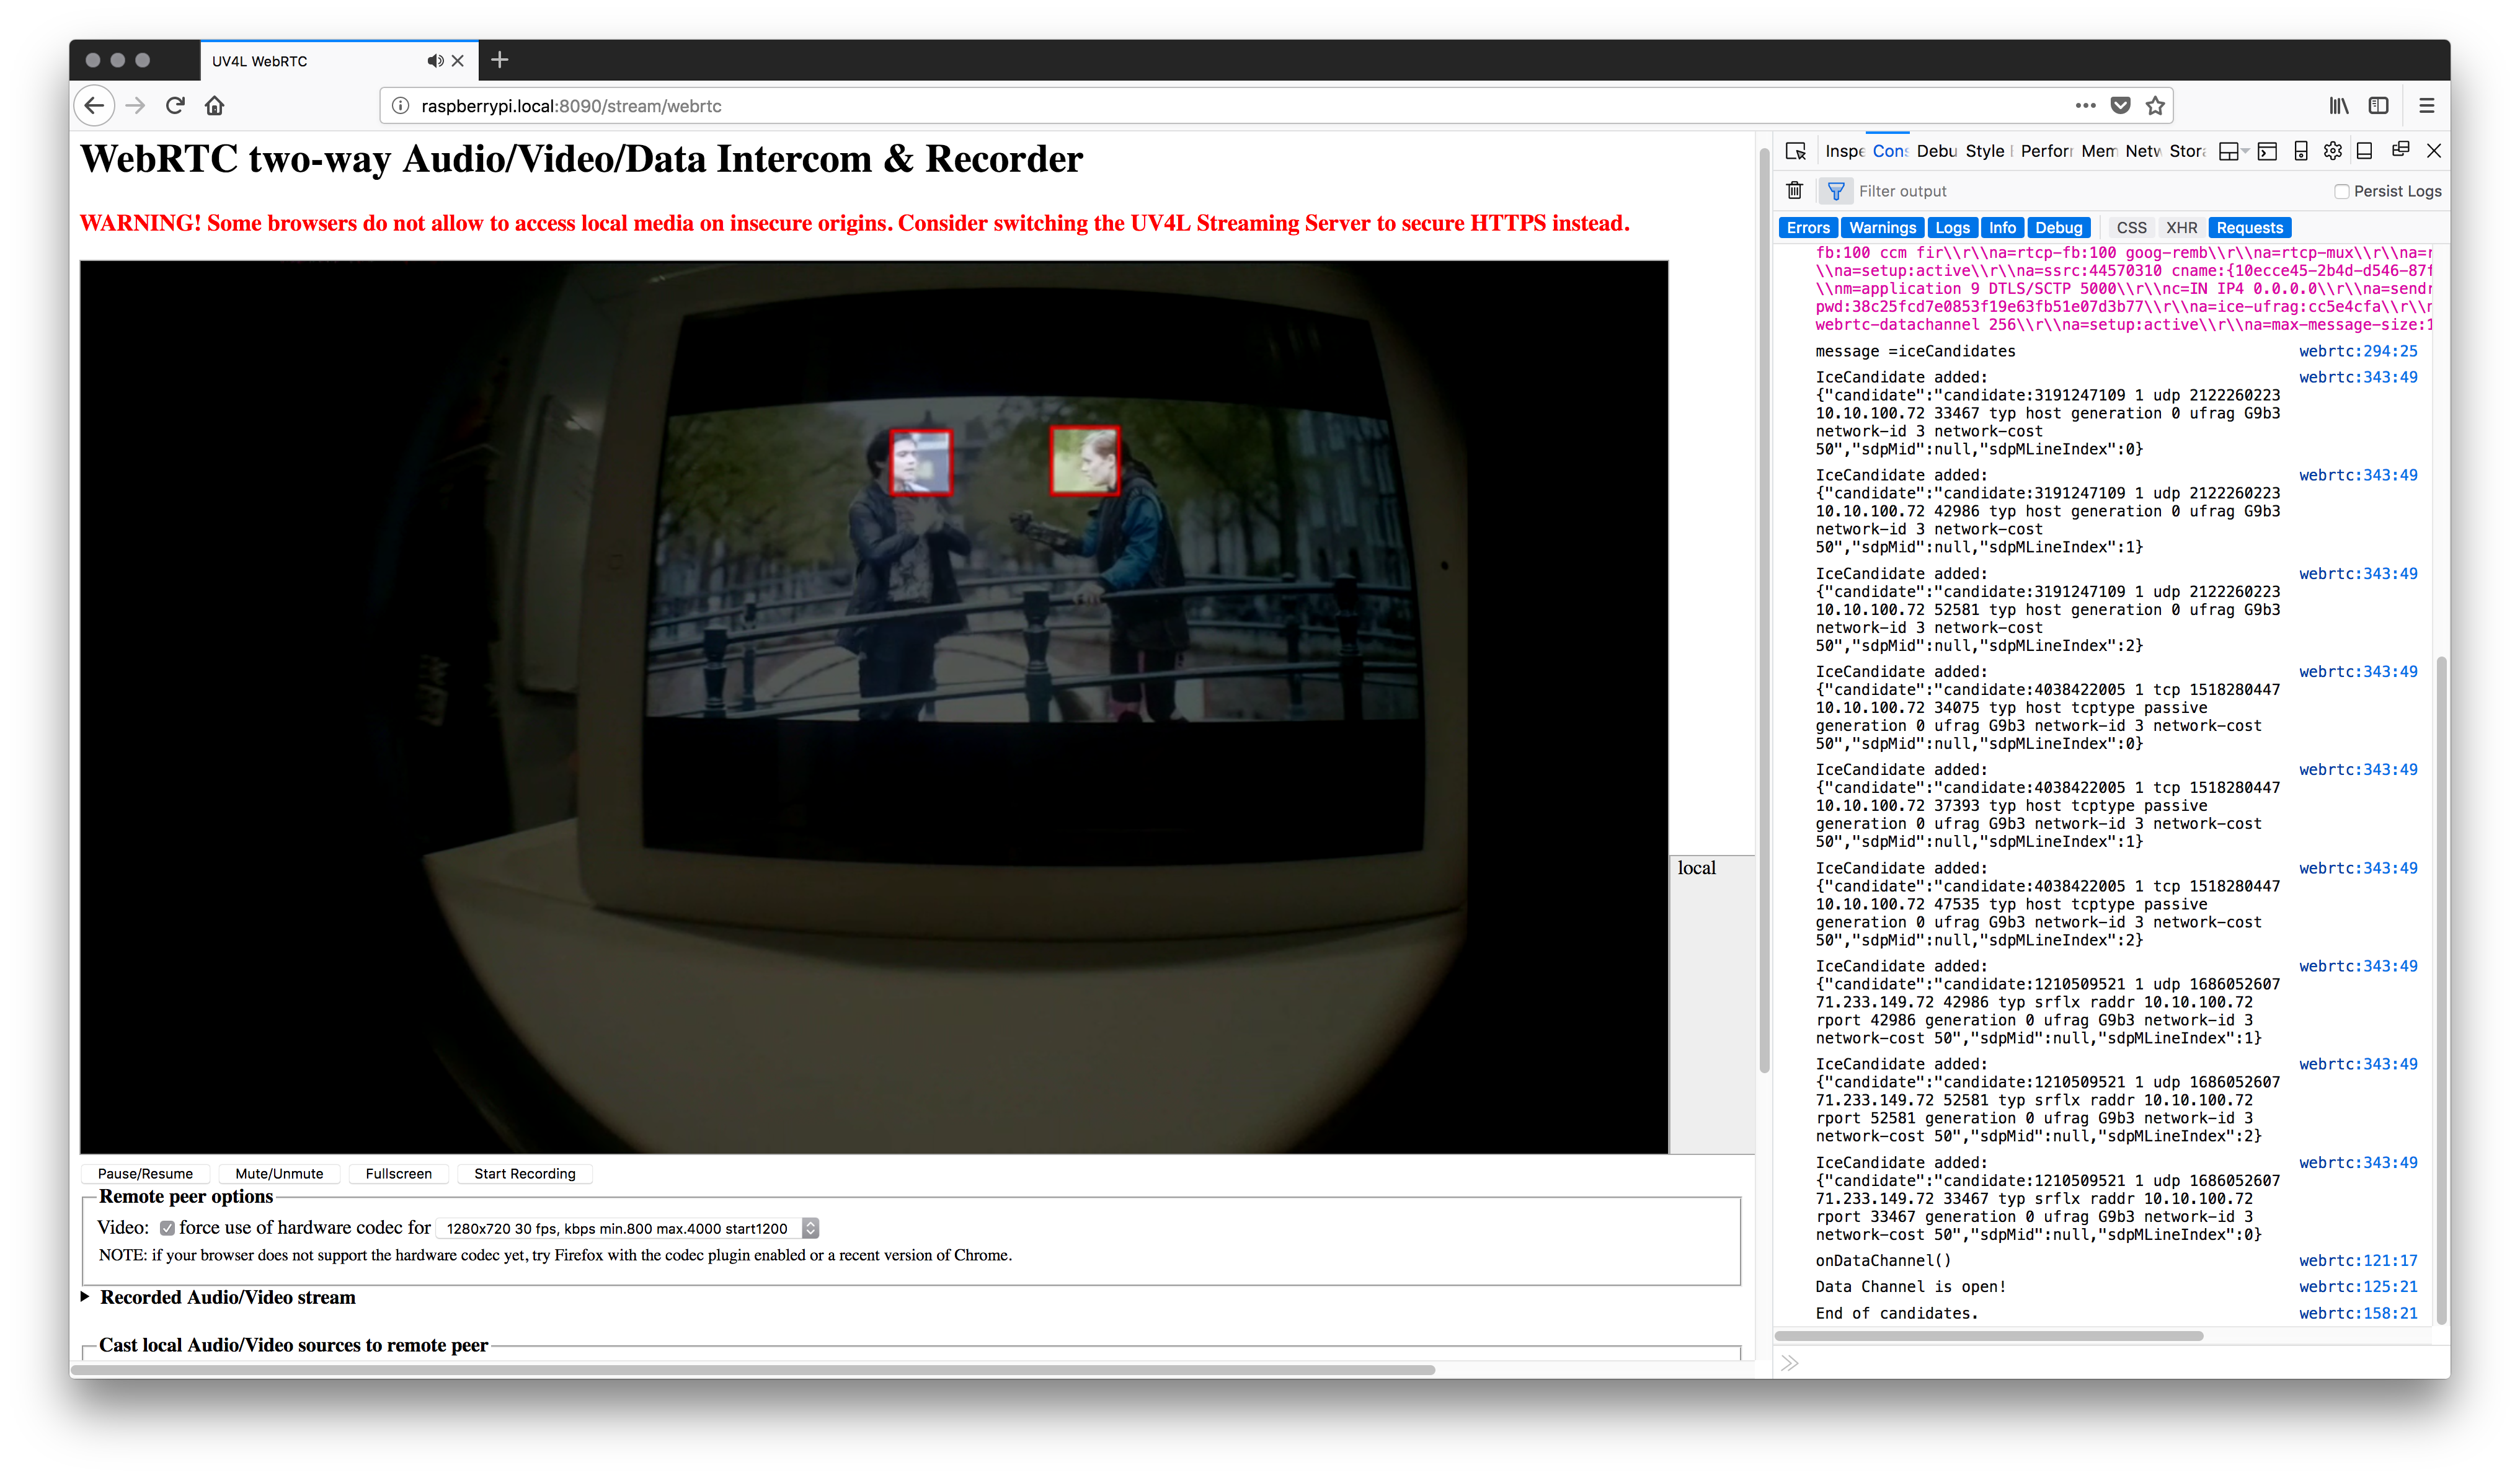
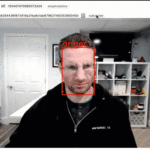
If you haven’t already, hook up a TV/monitor to the Pi Zero’s HDMI output. Most of the AIY demos that run off of the camera include a preview. For example, if you run the face detection camera demo:
|
1 |
python3 AIY-projects-python/src/examples/vision/face_detection_camera.py |
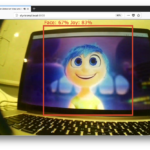
Then you should see this on the monitor:
For testing purposes I am playing Tears of Steel on my iPad so I can test with multiple faces without convincing my family to stare at the camera while I play around.
We really just want to stream this camera feed over WebRTC without messing with any of the code, so let’s do that with UV4L’s Raspidisp.
Raspidisp
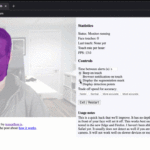
Raspidisp captures a stream directly from the display and you can stream this like any other UV4L video source. This means we are effectively using PiCamera.start_preview() to duplicate the camera stream. This will let us keep all the PiCamera code untouched and still stream our video. If you ran the UV4L install instructions then raspidisp should already be running. Run face_detection.camera.py again, go back to http://raspberrypi.local:9080/stream/webrtc and then call again. Make sure you put 9080 as the port – this is the default in /etc/uv4l/uv4l-raspidisp.conf unless you change it.
You should see the camera feed with annotations on your web browser:
Notice if you now stop face_detection.camera.py , you’ll see a video feed of the Pi Desktop.
That’s all you need to do to stream the camera feed from the AIY Vision Kit demos. Just make sure the demo uses the PiCamera.start_preview() otherwise there will be nothing on the display to show. Note that some demos, like the joy_detector have a command line option where you need to set the display preview alpha to 255 , otherwise the preview won’t be visible.
Summary
- For less than $100 you can run complex CV algorithms on a low power device without Internet connectivity using the AIY Vision Kit
- In a few minutes you can stream the feed to any browser with less than 300ms of latency using Uv4L
What’s Next
In my Computer Vision on the Web with WebRTC and TensorFlow post I rendered the image annotations locally in the browser. In this case we are rendering them on the Pi, but limits the ability to provide a responsive UI and chews some additional cycles on the server. It would be better to render the annotations in a browser. To do this, I built a web server for the AIY Vision Kit that leverages the UV4L’s DataChannels to send object details to a browser. As this post is getting long, see Part 2 for details on that project’s architecture, a code walk through, and some optimizations I made to make this work.
{“author”, “chad hart“}

Why?
WebRTC two-way Audio/Video/Data Intercom & Recorder
WARNING! Some browsers do not allow to access local media on insecure origins. Consider switching the UV4L Streaming Server to secure HTTPS instead.
QI – the secure origin restriction only applies to sending your camera/microphone/screen-share from your web browser. We are not sending anything from the browser in this use case, so that does not matter. UV4L does have a https option. This post explains secure origins: https://webrtchacks.com/chrome-secure-origin-https/ for background on that.
No, that is not entirely true. It also appears, if you – while loading your web page from a secure domain – are trying to do Ajax requests towards an insecure server (maybe localhost or even the RPI). That works nowadays in Chrome, but Firefox complains (can be switched into acceptance mode) and Safari is a NoGo
yes, if your web server is running https and you try to get assets over http you will run into issues. The example in this post uses the uv4l web server on raspberry pi, all over http so it is not an issue here.
My raspberry doesn’t want to download the file… Here is the error I got:
pi@raspberrypi:~ $ curl http://www.linux-projects.org/listing/uv4l_repo/lpkey.asc | sudo apt-key add –
% Total % Received % Xferd Average Speed Time Time Time Current
Dload Upload Total Spent Left Speed
0 0 0 0 0 0 0 0 –:–:– 0:00:19 –:–:– 0curl: (6) Could not resolve host: http://www.linux-projects.org
gpg: no valid OpenPGP data found.
Any idea?
I just tried it and it worked fine for me. I have done this a bunch now and have not had any connection issues. I would check your local network.
Hi Chad; I am using picamera.start_recording() instead of .preview() and can stream the output except I am only getting flickering of green and pink and no bounding boxes. Did you modify the face_detection_camera.py in any way?
I still have the general stream and face detection stdout text. Just no bounding boxes. 🙁
Thanks!
Do you happen to have a screen shot of the flickering green and pink?
I have not used
picamera.start_recording()but I have a project where I intend to try that in the next week or two.Assuming you are not using my part 2 code, I would take a look at this AIY example: https://github.com/google/aiyprojects-raspbian/blob/aiyprojects/src/examples/vision/video_capture.py
Hi Chad sorry for the long reply. Work is getting hectic and haven’t had time to work on my projects. I checked out the links you’ve shared.
Following the instructions on this page; is there a way I can redirect the output of the video feed instead of going to the local server? I’d like to feed it into ffmpeg.
Thanks for your work!
2 things:
1. I would look at this for using raspidisp as an input to ffmpeg: https://www.linux-projects.org/uv4l/tutorials/ffmpeg/
2. I have been playing around with local recording and using ffmpeg to convert the mp4’s on this branch: https://github.com/webrtcHacks/aiy_vision_web_server/tree/recording
Any idea if the “bonnet” would work with a Pi3?
It’d be nice to have more CPU power around the AI co-processor. I see this as the main advantage of the NCS as you can also run multiples NCS sticks on a single computer..
It’d be great it if the Pi4 has real USB3.
In any event, I just ordered an AIY Vision kit from Target (of all places!) so I’ll soon be able to compare it to the NCS I’ve been using.
I have been using the Vision Bonnet on the Pi3. See the comments in part 2: https://webrtchacks.com/aiy-vision-kit-uv4l-web-server
I could not get it to work with the Pi3B+ but it does work with a Pi3B, I’m mystified as to why, but the Pi3B+ doesn’t boot if the bonnet is plugged in (even if the flat flex cables are not installed).
It appears the AIY kit can’t do models larger 256×256 pixels, where as the NCS stick does 300×300 pixel models, perhaps larger, I’ve not tried, but I’m disappointed in the AIY Vision kit for this reason, I was hoping for a bit of a speed up over the NCS but it seems I can’t run the model that I use on the NCS.
Pi3B+ is not supported by AIY
Yes – I should have been clearer that my Pi3 was a 3 Model B, not a 3 Model B+.
Quick question if you don’t mind.
When I run:
python3 AIY-projects-python/src/examples/vision/face_detection_camera.py
I don’t see a window with real time annotation. Which would be really nice to show the kids.
All I have is a terminal that shows something similar to:
Iteration #5: num_faces=2
Iteration #6: num_faces=2
Iteration #7: num_faces=1
Iteration #8: num_faces=0
Iteration #9: num_faces=0
Iteration #10: num_faces=1
Iteration #11: num_faces=1
How do I get that preview with the real-time annotation?
Thank you.
The annotations do not show to a terminal window – you need to have the Pi plugged into a monitor. Remote viewing of the annotations is one reason why I put this post series together.
I have a question. You tested the face_detection_camera.py by playing a video on your ipad and faced it towards the kit so that it can view and detect faces.? Is that correct?
How can we pass video in the python code to test.?
Yes – for ease of testing I pointed the Pi Camera at a video playing on a screen rather than a person.
The AIY Vision Kit has a method to run inference on a single image. If you wanted to process a video file you could use something like OpenCV or a similar library to pass individual frames from a video through that method.
Hi, I had run your tutorial before and it worked exceptionally. fast forward to today and I’m trying to reload my vision aiy kit and was trying to run thru your tutorial when running the command pi@raspberrypi:~ $ sudo apt-get install -y uv4l uv4l-raspicam uv4l-raspicam-extr
as uv4l-webrtc-armv6 uv4l-raspidisp uv4l-raspidisp-extras
Reading package lists… Done
Building dependency tree
Reading state information… Done
E: Unable to locate package uv4l
E: Unable to locate package uv4l-raspicam
E: Unable to locate package uv4l-raspicam-extras
E: Unable to locate package uv4l-webrtc-armv6
E: Unable to locate package uv4l-raspidisp
E: Unable to locate package uv4l-raspidisp-extras
is this no longer supported? I hope it is I am very intrigued to continue on with where i was before. Thanks in advance.
just an added note I just realized that attempting to get the pgp key returned “no valid OpenPGP data found” would this cause the failure?