A while ago we looked at how Zoom was avoiding WebRTC by using WebAssembly to ship their own audio and video codecs instead of using the ones built into the browser’s WebRTC. I found an interesting branch in Google’s main (and sadly mostly abandoned) WebRTC sample application apprtc this past January. The branch is named wartc… a name which is going to stick as warts!
The repo contains a number of experiments related to compiling the webrtc.org library as WebAssembly and evaluating the performance. From the rapid timeline, this looks to have been a hackathon project.
Project Architecture
The project includes a few pieces:
- encoding individual images using libwebp as a baseline
- using libvpx for encoding video streams
- using WebRTC for audio and video
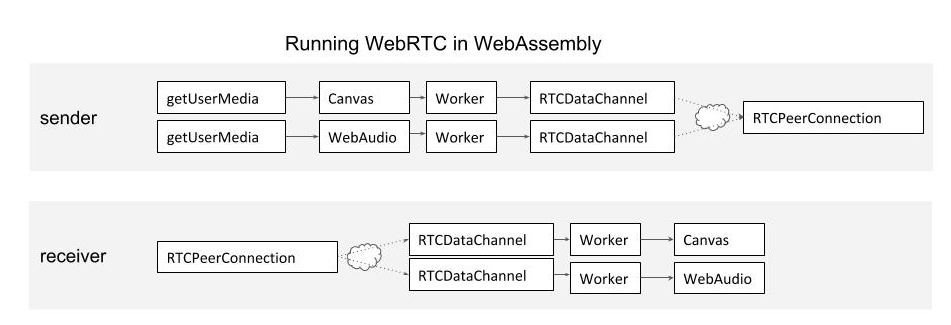
Transferring the resulting data is done using the WebRTC DataChannel. The high-level architecture is shown below:

I decided to apply the Web Assembly (aka wasm) techniques to webrtc sample pages since apprtc is a bit cumbersome to set up. The sample pages are easier framework to work with and don’t need a signaling server. Actually you do not need any server of your own since you can simply run them from github pages.
You can find the source code here.
Basic techniques
Before we get to WebAssembly, first we need to walk through the common techniques to capture and render RTC audio and video. We will use WebAudio to grab and play raw audio samples and the HTML5 canvas element to grab frames from a video and render images.
Let’s look at each.
WebAudio
Grab audio from a stream using WebAudio
To grab audio from a MediaStream one can use a WebAudio MediaStreamSource and a ScriptProcessor node. After connecting these, call the ScriptProcessorNode’s onaudioprocess with an object containing the raw samples to be sent over the DataChannel.
|
1 2 3 4 5 6 7 8 9 10 |
const audioCtx = new AudioContext(); const source = audioCtx.createMediaStreamSource(stream); // var processor = audioCtx.createScriptProcessor(framesPerPacket, 2, 2); const processor = audioCtx.createScriptProcessor(framesPerPacket, 1, 1); source.connect(processor); processor.onaudioprocess = function (e) { if (sendChannel.readyState !== 'open') return; const channelData = e.inputBuffer.getChannelData(0); sendChannel.send(channelData); }; |
Render audio using WebAudio
Rendering audio is a bit more complicated. The solution that seems to have come up during the hackathon is quite a good hack. It creates an AudioContext with a square input, connects it to a ScriptProcessorNode and pulls data from a buffer (which is fed by the data channel) at a high frequency. Then the ScriptProcessorNode is connected the AudioContext’s destination node which will play out things without needing an element, similar to what we have seen Zoom do.
|
1 2 3 4 5 6 7 8 9 10 11 12 13 14 15 16 17 18 19 20 |
// Playback, hacky, using script processor const destination = audioCtx.createMediaStreamDestination(); document.querySelector("#remoteVideo").srcObject = destination.stream; const playbackProcessor = audioCtx.createScriptProcessor(framesPerPacket, 1, 1); const oscillator = audioCtx.createOscillator(); oscillator.type = 'square'; oscillator.frequency.setValueAtTime(440, audioCtx.currentTime); // value in hertz oscillator.connect(playbackProcessor).connect(audioCtx.destination); playbackProcessor.onaudioprocess = function (e) { const data = buffer.shift(); if (!data) { return; } const outputBuffer = e.outputBuffer; const channel1 = outputBuffer.getChannelData(0); for(let i=0; i < framesPerPacket; i++) { channel1[i] = data[i]; } }; oscillator.start(); |
Try these here. Make sure to open about:webrtc or chrome://webrtc-internals to see the WebRTC connection in action.
Canvas
Grab images from a canvas element
Grabbing image data from a canvas is quite simple. After creating a canvas element with the desired width and height, we draw the video element to the canvas context and then call getImageData to get the data which we can then process further.
|
1 2 3 4 5 6 7 8 |
setInterval(() => { localContext.drawImage(localVideo, 0, 0, width, height); const frame = localContext.getImageData(0, 0, width, height); const encoded = libwebp.encode(frame); sendChannel.send(encoded); // 320x240 fits a single 65k frame. bytesSent += encoded.length; frames++; }, 1000.0 / fps); |
Draw images to a canvas element
Drawing to a canvas is equally simple by creating a frame of the right size and then setting the frames data to the data we want to draw. When this is done at a high enough frequency the result looks quite smooth. To optimize the process, this could be coordinated with the rendering using the requestAnimationFrame method.
|
1 2 3 4 5 6 7 8 9 10 11 |
pc2.ondatachannel = e => { receiveChannel = e.channel; receiveChannel.binaryType = 'arraybuffer'; receiveChannel.onmessage = (ev) => { const encoded = new Uint8Array(ev.data); const {data, width, height} = libwebp.decode(encoded); const frame = remoteContext.createImageData(width, height); frame.data.set(data, 0); remoteContext.putImageData(frame, 0, 0); }; }; |
Encoding images using libwebp
Encoding images using libwebp is a baseline experiment. Each frame is encoded as an individual image, with no reference to other frames like in a video codec. If this example would not deliver acceptable visual quality, it would not make sense to expand the experiment to more advanced stage.
The code is a very simple extension of the basic code that grabs and renders frame. The only difference is a synchronous call to
|
1 |
const encoded = libwebp.encode(frame); |
The DataChannel limits the transmitted object size to 65kb. Anything larger needs to be fragmented, which means more code. In our sample we use a 320×240 resolution. At this low resolution, we come in below 65kb and do not need to fragment and reassemble the data.
We show a side-by-side example of this and WebRTC here. The visual quality is comparable but the webp stream seems to be slightly delayed. This is probably only visible in a side-by-side comparison.
In terms of bitrate this can easily go up to 1.5mbps — for a 320×240@8fps stream (and using a decent CPU. WebRTC clearly delivers the same quality at a much lower bitrate. Also you will notice, the page gets throttled when in the background and setInterval is no longer executed at a high frequency.
Encoding a video stream using libvpx
The WebP example encodes a series of individual images. But we are really encoding a series of images that are following each other in time and therefore repeat a lot of content that is easily compressed. Using libvpx, an actual video encoding/decoding library that contains the VP8 and VP9 codecs has some benefits as we will see.
Once again, the basic techniques for grabbing and rendering the frames remains the same. The encoder and decoder are run in a WebWorker this time which means we need to use
postMessage to send and receive frames.
Sending is done with
|
1 2 3 4 5 6 |
vpxenc_.postMessage({ id: ‘enc’, type: ‘call’, name: ‘encode’, args: [frame.data.buffer] }) |
and the encoder will send a message containing the encoded frame:
|
1 2 3 |
vpxenc_.onmessage = e => { // fragment and send as shown } |
Our data is bigger than 65kbps this time so we need to fragment it before sending it over the DataChannel:
|
1 2 3 4 5 6 7 |
const encoded = new Uint8Array(e.data.res); for (let offset = 0; offset < encoded.length; offset += 16384) { const length = Math.min(16384, encoded.length - offset); const view = new Uint8Array(encoded.buffer, offset, length); sendChannel.send(view); // 64 KB max } bytesSent += encoded.length; |
and reassemble on the other side.
Looking at this in comparison with WebRTC we get pretty close already, it is hard to spot a visual difference. The bitrate is much lower as well, only using about 500kbps compared to the 1.5mbps of the webp sample.

Note that if you want to tinker with libvpx is it probably better to use Surma’s webm-wasm which also gives you the source code used to built the WebAssembly module.
Easy simulation of packet loss
There is an interesting experiment one can do here: drop packets.
The easiest way to do so is to introduce a some code that stops vpxenc._onmessage from sending some data:
|
1 2 3 4 |
vpxenc_.onmessage = e => { // introduce 10% chance to drop // fragment and send as shown } |
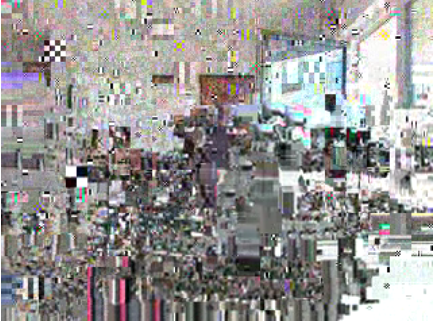
The decoder will still attempt to decode the stream but there are quite severe artifacts until the next keyframe arrives. WebRTC (which is based on RTP) has built-in mechanism to recover from packet loss by either requesting the sender to resend a lost packet (using a RTCP NACK) or send a new keyframe (using RTCP PLI). This can be added to the protocol that runs on top of the DataChannel of course or the WebAssembly could simply emit and process RTP and RTCP packets like Zoom does.
Compiling WebRTC to WebAssembly
Last but not least the hackathon team managed to compile webrtc.org as WebAssembly. Which is no small feat. Note that synchronization between audio and video is a very hard problem that we have ignored so far. WebRTC does this for us magically.
We are focusing on audio this time as this was the only thing which we got to work. The structure is a bit different from the previous examples – this time we are using a Transport object that is defined in WebAssembly
|
1 2 3 4 5 6 7 8 9 |
const Transport = Module.Transport.extend("Transport", { __construct: function () { // ... sendPacket: function (payload) { const payloadCopy = new Uint8Array(payload); dc.send(payloadCopy); return true; }, // ... |
The sendPacket function is called with each RTP packet which is already guaranteed to be smaller than 65k which means we do not need to split it up ourselves.
This turned out to not work very well – audio was severely distorted. One of the problems is confusion between the platform/WebAudio sampling rate of 44.1khz and the Opus sampling rate rate of 48khz. This is fairly easy to fix though by replacing a couple of references to 480 by 441.
In addition, the encoder seems to lock up at times, for reasons which are not really possible to debug without access to the source code used to build this. Simply recording the packets and playing them out in the decoder was working better. Clearly this needs a bit more work.
Summary
The Hackathon results are very interesting. They show what is possible today, even without WebRTC NV’s lower-level API’s and give us a much better idea at what problems still need to be solved there. In particular the current ways of accessing raw data and feeding it back into the engine show above are cumbersome and inefficient at present. It would of course be great if the Google folks would be a bit more open about these results which are quite interesting (nudge 🙂 ) but… the repository is public at least.
Zooms Web client still achieves a better result…
{“author”: “Philipp Hancke“}


I’m experiencing a ~15 fps video in wasm test. Is this expected?
I noticed the same. Performance was a bit better in January 😐
Thanks for the reply, I have some more questions 🙂
1A) Can you explain why are you considering a 64KB limit for SCTP message?
1B) Given the mentioned limit, why are you fragmenting in 16KB chunks?
2) How hard would it be to test with an unreliable and unordered SCTP connection?
3) Digging in the js code: can you clarify the meaning of
vpxconfig_.packetSize = 16;
in vpxconfig_ of main.js ?
1) didn’t want to check the adapter-provided max-message-size and vaguely remembered 64k as the value. Using 16k is a bit silly indeed!
2) On localhost that would be silly since the chance of loosing a packet is very, very low. As the framedrop experiment in the libvpx sample shows you’ll need a buffer to both reorder and recover lost packets, basically redoing the whole NACK/PLI mechanism. This would be an interesting hack but I’d say its better to start from Surma’s encoder — you can modify the source and add a requestKeyFrame() method. You already know how to submit posts here 🙂
3) One would have to have access to the source for that and sadly that wasn’t part of the wart branch.