The fact that you can use WebRTC to implement a secure, reliable, and standards based peer-to-peer network is a huge deal that is often overlooked. We have been notably light on the DataChannel here at webrtcHacks, so I asked Arin Sime if would be interested in providing one of his great walkthrough’s on this topic. He put together a very practical example of a multi-player game. You make recognize Arin from RealTime Weekly or from his company Agility Feat or his new webRTC.ventures brand. Check out this excellent step-by-step guide below and start lightening the load on your servers and reducing message latency with the DataChannel.
{“editor”: “chad hart“}
WebRTC is “all about video chat”, right? I’ve been guilty of saying things like that myself when explaining WebRTC to colleagues and clients, but it’s a drastic oversimplification that should never go beyond your first explanation of WebRTC to someone.
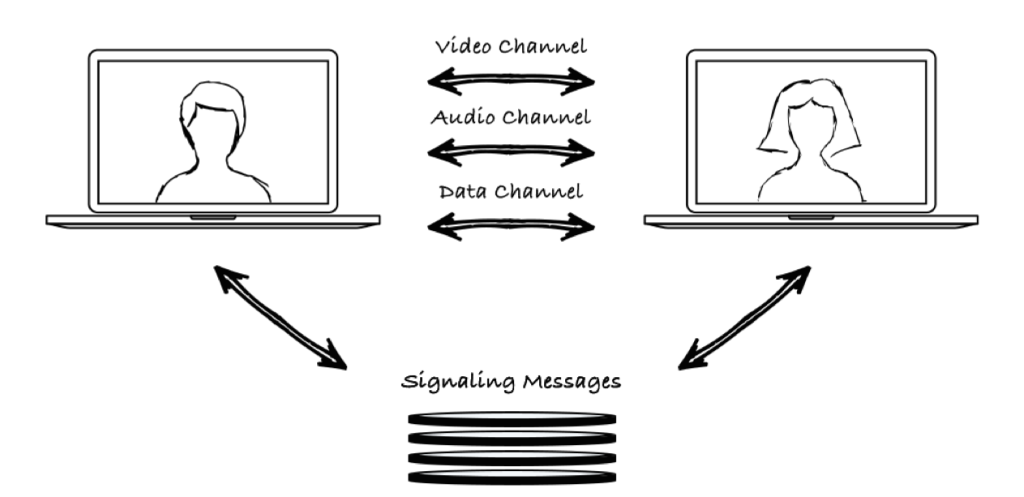
Of course, there’s more to WebRTC than just video chat. WebRTC allows for peer-to-peer video, audio, and data channels. The Data channels are a distinct part of that architecture and often forgotten in the excitement of seeing your video pop up in the browser.
Don’t forget about the Data Channel!
Being able to exchange data directly between two browsers, without any sort of intermediary web socket server, is very useful. The Data Channel carries the same advantages of WebRTC video and audio: it’s fully peer-to-peer and encrypted. This means Data Channels are useful for things like text chat applications, file transfers, P2P file exchanges, gaming, and more.a
In this post, I’m going to show you the basics of how to setup and use a WebRTC Data Channel.
First, let’s review the architecture of a WebRTC application.
You have to setup signaling code in order to establish the peer to peer connection between two peers. Once the signaling is complete (which takes place over a 3rd party server), then you have a Peer to Peer (P2P) connection between two users which can contain video and audio streams, and a data channel.
The signaling for both processes is very similar, except that if you are building a Data Channel only application then you don’t need to call GetUserMedia or exchange streams with the other peer.
Data Channel Security
There are a couple of other differences about using the DataChannel. The most obvious one is that users don’t need to give you their permission in order to establish a Data Channel over an RTCPeerConnection object. That’s different than video and audio, which will prompt the browser to ask the user for permissions to turn on their camera and microphone.
Although it’s generating some debate right now, data channels don’t require explicit permission from users. That makes it similar to a web socket connection, which can be used in a website without the knowledge of users.
The Data Channel can be used for many different things. The most common examples are for implementing text chat to go with your video chat. If you’re already setting up an RTCPeerConnection for video chat, then you might as well use the same connection to supply a Data Channel for text chat instead of setting up a different socket connection for text chat.
Likewise, you can use the Data Channel for transferring files directly between your peers in the RTCPeerConnection. This is nicer than a normal socket style connection because just like WebRTC video, the Data Channel is completely peer-to-peer and encrypted in transit. So your file transfer is more secure than in other architectures.
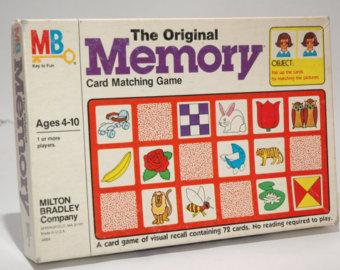
The game of “Memory”
Don’t limit your Data Channel imagination by these common examples though. In this post, I’m going to show you how to use the Data Channel to build a very simple two-player game. You can use the Data Channel to transfer any type of data you like between two browsers, so in this case we’ll use it to send commands and data between two players of a game you might remember called “Memory”.
In the game of memory, you can flip over a card, and then flip a second card, and if they match, you win that round and the cards stay face up. If they didn’t match, you put both face down again, and it’s the next person’s turn. By trying to remember what you and your opponents have been flipping, and where those cards were, you can win the game by correctly flipping the most pairs.
Adam Khoury already built a javascript implementation of this game for a single player, and you can read his tutorial on how to build the game Memory for a single player. I won’t explain the logic of his code for building the game, what I’m going to do instead is build on top of his code with a very simple WebRTC Data Channel implementation to keep the card flipping in synch across two browsers.
You can see my complete code on GitHub, and below I’m going to show you the relevant segments.
In this example view of my modified Memory game, the user has correctly flipped pairs of F, D, and B, so those cards will stay face up. The cards K and L were just flipped and did not match, so they will go back face down.
Setting up the Data Channel configuration
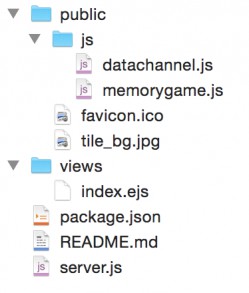
I started with a simple NodeJS application to serve up my code, and I added in Express to create a simple visual layer. My project structure looks like this:
The important files for you to look at are datachannel.js (where the majority of the WebRTC logic is), memorygame.js (where Adam’s game javascript is, and which I have modified slightly to accommodate the Data Channel communications), and index.ejs, which contains a very lightweight presentation layer.
In datachannel.js, I have included some logic to setup the Data Channel. Let’s take a look at that:
|
1 2 3 4 5 6 7 8 9 10 11 12 13 14 15 16 |
//Signaling Code Setup var configuration = { 'iceServers': [{ 'url': 'stun:stun.l.google.com:19302' }] }; var rtcPeerConn; var dataChannelOptions = { ordered: false, //no guaranteed delivery, unreliable but faster maxRetransmitTime: 1000, //milliseconds }; var dataChannel; |
The configuration variable is what we pass into the RTCPeerConnection object, and we’re using a public STUN server from Google, which you often see used in WebRTC demos online. Google is kind enough to let people use this for demos, but remember that it is not suitable for public use and if you are building a real app for production use, you should look into setting up your own servers or using a commercial service like Xirsys to provide production ready STUN and TURN signaling for you.
The next set of options we define are the data channel options. You can choose for “ordered” to be either true or false.
When you specify “ordered: true”, then you are specifying that you want a Reliable Data Channel. That means that the packets are guaranteed to all arrive in the correct order, without any loss, otherwise the whole transaction will fail. This is a good idea for applications where there is significant burden if packets are occasionally lost due to a poor connection. However, it can slow down your application a little bit.
We’ve set ordered to false, which means we are okay with an Unreliable Data Channel. Our commands are not guaranteed to all arrive, but they probably will unless we are experiencing poor connectivity. Unless you take the Memory game very seriously and have money on the line, it’s probably not a big deal if you have to click twice. Unreliable data channels are a little faster.
Finally, we set a maxRetransmitTime before the Data Channel will fail and give up on that packet. Alternatively, we could have specified a number for maxRetransmits, but we can’t specify both constraints together.
Those are the most common options for a data channel, but you can also specify the protocol if you want something other than the default SCTP, and you can set negotiated to true if you want to keep WebRTC from setting up a data channel on the other side. If you choose to do that, then you might also want to supply your own id for the data channel. Typically you won’t need to set any of these options, leave them at their defaults by not including them in the configuration variable.
Set up your own Signaling layer
The next section of code may be different based on your favorite options, but I have chosen to use express.io in my project, which is a socket.io package for node that integrates nicely with the express templating engine.
So the next bit of code is how I’m using socket.io to signal to any others on the web page that I am here and ready to play a game. Again, none of this is specified by WebRTC. You can choose to kick off the WebRTC signaling process in a different way.
|
1 2 3 4 5 6 7 8 9 |
io = io.connect(); io.emit('ready', {"signal_room": SIGNAL_ROOM}); //Send a first signaling message to anyone listening //In other apps this would be on a button click, we are just doing it on page load io.emit('signal',{"type":"user_here", "message":"Would you like to play a game?", "room":SIGNAL_ROOM}); |
In the next segment of datachannel.js, I’ve setup the event handler for when a different visitor to the site sends out a socket.io message that they are ready to play.
|
1 2 3 4 5 6 7 8 9 10 11 12 13 14 15 16 17 18 19 20 21 22 23 |
io.on('signaling_message', function(data) { //Setup the RTC Peer Connection object if (!rtcPeerConn) startSignaling(); if (data.type != "user_here") { var message = JSON.parse(data.message); if (message.sdp) { rtcPeerConn.setRemoteDescription(new RTCSessionDescription(message.sdp), function () { // if we received an offer, we need to answer if (rtcPeerConn.remoteDescription.type == 'offer') { rtcPeerConn.createAnswer(sendLocalDesc, logError); } }, logError); } else { rtcPeerConn.addIceCandidate(new RTCIceCandidate(message.candidate)); } } }); |
There are several things going on here. The first one to be executed is that if the rtcPeerConn object has not been initialized yet, then we call a local function to start the signaling process. So when Visitor 2 announces themselves as here, they will cause Visitor 1 to receive that message and start the signaling process.
If the type of socket.io message is not “user_here”, which is something I arbitrarily defined in my socket.io layer and not part of WebRTC signaling, then the code goes into a couple of WebRTC specific signaling scenarios – handling an SDP “offer” that was sent and crafting the “answer” to send back, as well as handling ICE candidates that were sent.
The WebRTC part of Signaling
For a more detailed discussion of WebRTC signaling, I refer you to http://www.html5rocks.com/en/tutorials/webrtc/infrastructure/”>Sam Dutton’s HTML5 Rocks tutorial, which is what my signaling code here is based on.
For completeness’ sake, I’m including below the remainder of the signaling code, including the startSignaling method referred to previously.
|
1 2 3 4 5 6 7 8 9 10 11 12 13 14 15 16 17 18 19 20 21 22 23 24 25 26 |
function startSignaling() { rtcPeerConn = new webkitRTCPeerConnection(configuration, null); dataChannel = rtcPeerConn.createDataChannel('textMessages', dataChannelOptions); dataChannel.onopen = dataChannelStateChanged; rtcPeerConn.ondatachannel = receiveDataChannel; // send any ice candidates to the other peer rtcPeerConn.onicecandidate = function (evt) { if (evt.candidate) io.emit('signal',{"type":"ice candidate", "message": JSON.stringify({ 'candidate': evt.candidate }), "room":SIGNAL_ROOM}); }; // let the 'negotiationneeded' event trigger offer generation rtcPeerConn.onnegotiationneeded = function () { rtcPeerConn.createOffer(sendLocalDesc, logError); } } function sendLocalDesc(desc) { rtcPeerConn.setLocalDescription(desc, function () { io.emit('signal',{"type":"SDP", "message": JSON.stringify({ 'sdp': rtcPeerConn.localDescription }), "room":SIGNAL_ROOM}); }, logError); } |
This code handles setting up the event handlers on the RTCPeerConnection object for dealing with ICE candidates to establish the Peer to Peer connection.
Adding DataChannel options to RTCPeerConnection
This blog post is focused on the DataChannel more than the signaling process, so the following lines in the above code are the most important thing for us to discuss here:
|
1 2 3 4 5 |
rtcPeerConn = new webkitRTCPeerConnection(configuration, null); dataChannel = rtcPeerConn.createDataChannel('textMessages', dataChannelOptions); dataChannel.onopen = dataChannelStateChanged; rtcPeerConn.ondatachannel = receiveDataChannel; |
In this code what you are seeing is that after an RTCPeerConnection object is created, we take a couple extra steps that are not needed in the more common WebRTC video chat use case.
First we ask the rtcPeerConn to also create a DataChannel, which I arbitrarily named ‘textMessages’, and I passed in those dataChannelOptions we defined previously.
Setting up Message Event Handlers
Then we just define where to send two important Data Channel events: onopen and ondatachannel. These do basically what the names imply, so let’s look at those two events.
|
1 2 3 4 5 6 7 8 9 10 |
function dataChannelStateChanged() { if (dataChannel.readyState === 'open') { dataChannel.onmessage = receiveDataChannelMessage; } } function receiveDataChannel(event) { dataChannel = event.channel; dataChannel.onmessage = receiveDataChannelMessage; } |
When the data channel is opened, we’ve told the RTCPeerConnection to call dataChannelStateChanged, which in turn tells the dataChannel to call another method we’ve defined, receiveDataChannelMessage, whenever a data channel message is received.
The receiveDataChannel method gets called when we receive a data channel from our peer, so that both parties have a reference to the same data channel. Here again, we are also setting the onmessage event of the data channel to call our method receiveDataChannelMessage method.
Receiving a Data Channel Message
So let’s look at that method for receiving a Data Channel message:
|
1 2 3 4 5 6 7 8 9 10 11 12 13 14 |
function receiveDataChannelMessage(event) { if (event.data.split(" ")[0] == "memoryFlipTile") { var tileToFlip = event.data.split(" ")[1]; displayMessage("Flipping tile " + tileToFlip); var tile = document.querySelector("#" + tileToFlip); var index = tileToFlip.split("_")[1]; var tile_value = memory_array[index]; flipTheTile(tile,tile_value); } else if (event.data.split(" ")[0] == "newBoard") { displayMessage("Setting up new board"); memory_array = event.data.split(" ")[1].split(","); newBoard(); } } |
Depending on your application, this method might just print out a chat message to the screen. You can send any characters you want over the data channel, so how you parse and process them on the receiving end is up to you.
In our case, we’re sending a couple of specific commands about flipping tiles over the data channel. So my implementation is parsing out the string on spaces, and assuming the first item in the string is the command itself.
If the command is “memoryFlipTile”, then this is the command to flip the same tile on our screen that our peer just flipped on their screen.
If the command is “newBoard”, then that is the command from our peer to setup a new board on our screen with all the cards face down. The peer is also sending us a stringified array of values to go on each card so that our boards match. We split that back into an array and save it to a local variable.
Controlling the Memory game to flip tiles
The actual flipTheTile and newBoard methods that are called reside in the memorygame.js file, which is essentially the same code that we’ve modified from Adam.
I’m not going to step through all of Adam’s code to explain how he built the single player Memory game in javascript, but I do want to highlight two places where I refactored it to accommodate two players.
In memorygame.js, the following function tells the DataChannel to let our peer know which card to flip, as well as flips the card on our own screen:
|
1 2 3 4 |
function memoryFlipTile(tile,val){ dataChannel.send("memoryFlipTile " + tile.id); flipTheTile(tile,val); } |
Notice how simple it is to send a message to our peers using the data channel – just call the send method and pass any string you want. A more sophisticated example might send well formatted XML or JSON in a message, in any format you specify. In my case, I just send a command followed by the id of the tile to flip, with a space between.
Setting up a new game board
In Adam’s single player memory game, a new board is setup whenever you load the page. In my two player adaptation, I decided to have a new board triggered by a button click instead:
|
1 2 3 4 5 6 7 8 9 |
var setupBoard = document.querySelector("#setupBoard"); setupBoard.addEventListener('click', function(ev){ memory_array.memory_tile_shuffle(); newBoard(); dataChannel.send("newBoard " + memory_array.toString()); ev.preventDefault(); }, false); |
In this case, the only important thing to notice is that I’ve defined a “newBoard” string to send over the data channel, and in this case I want to send a stringified version of the array containing the values to put behind each card.
Next steps to make the game better
That’s really all there is to it! There’s a lot more we could do to make this a better game. I haven’t built in any logic to limit the game to two players, keep score by players, or enforce the turns between the players. But it’s enough to show you the basic idea behind using the WebRTC data channel to send commands in a multiplayer game.
The nice thing about building a game like this that uses the WebRTC data channel is it’s very scalable. All my website had to do is help the two players get a connection setup, and after that, all the data they need to exchange with each other is done over an encrypted peer-to-peer channel and it won’t burden my web server at all.
A completed multiplayer game using the Data Channel
Here’s a video showing the game in action:
Demo of a simple two player game using the WebRTC Data Channel video
As I hope this example shows you, the hard part of WebRTC data channels is really just in the signaling and configuration, and that’s not too hard. Once you have the data channel setup, sending messages back and forth is very simple. You can send messages that are as simple or complex as you like.
How are you using the Data Channel? What challenges have you run into? Feel free to contact me on Twitter or through my site to share your experiences too!
{“author”: “arin sime“}
Sources:
http://www.html5rocks.com/en/tutorials/webrtc/infrastructure/
http://www.w3.org/TR/webrtc/#simple-peer-to-peer-example
https://www.developphp.com/video/JavaScript/Memory-Game-Programming-Tutorial







I have been thinking about this as well. Using webrtc datachannels for an multiplayer game. Any chance you guys could do a benchmark comparison of webrtc datachannels vs websockets? preferably websockets on sockjs node. Thanks!
Hi Arnie Some,
I hope you may be able to get my problem.
I am a newbie and I just want to know external “ip:port” of my counterstrike server like in STUN in text format in a file on my server which I can give it to my friend (both of us behind different NATs and server is http://TIRAN.GA/IP )
Please contact me if you know the way for that.
Ty
Hi Arin,
i’m trying to install the git hub repository, having found out that you need build tools to install express.io, however there are now atleast 100 errors in installing the package to the repository. Would you give me a step by step guide to installing express.io?