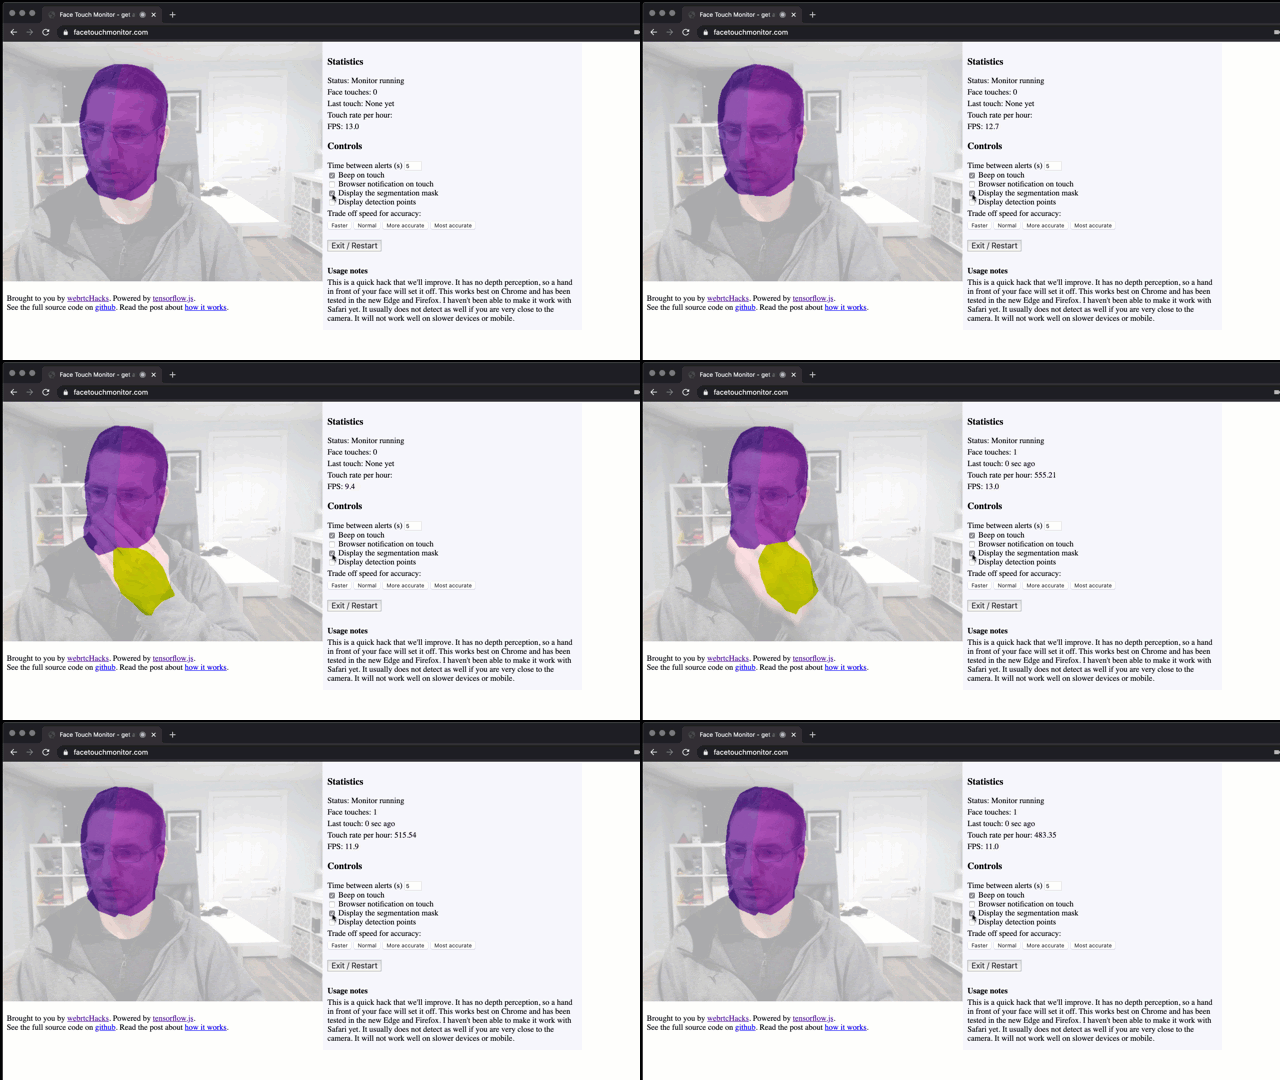
Don’t touch your face! To prevent the spread of disease, health bodies recommend not touching your face with unwashed hands. This is easier said than done if you are sitting in front of a computer for hours. I wondered, is this a problem that can be solved with a browser?
We have a number of computer vision + WebRTC experiments here. Experimenting with running computer vision locally in the browser using TensorFlow.js has been on my bucket list and this seemed like a good opportunity. A quick search revealed somebody already thought of this 2 week ago. That site used a model that requires some user training – which is interesting but can make it flaky. It also wasn’t open source for others to expand on, so I did some social distancing via coding isolation over the weekend to see what was possible.
Check it out at facetouchmonitor.com and keep reading below for how it works. All the code is available at github.com/webrtchacks/facetouchmonitor. I share some highlights and an alternative approach here.
TensorFlow.js
TensorFlow.js is a JavaScript version of Tensorflow. You’ve probably heard of Tensorflow because it is the most popular Machine Learning in the world. TensorFlow.js takes all the ML magic and brings it to JavaScript where it can be used in node.js and the browser. Better yet, TensorFlow.js includes several pre-built models for computer vision that are found in the main TensorFlow models library including. We’ll cover two of these here.
TensorFlow.js + WebRTC
Tensorflow is also very WebRTC friendly. The underlying models work on static images, but TensorFlow.js includes helper functions that automatically extract images from video feeds. For example, some functions, like tf.data.webcam(webcamElement) will even call getUserMedia for you.
Transfer Learning with KNN Classifier
donottouchyourface.com was launched a couple of weeks ago and received some good press. When you enter you need to train it on what your face looks like for about 5 seconds and then you repeat the process again touching your face. It plays an audio file and sends a browser notification. This seems to work well if you stay in a similar position as you did during the training. However, if you change your position or don’t provide enough variability during training, the results can be erratic. See this recording for an example.
How does it work?
Even if it isn’t all that accurate, it still seems pretty genius to do this in the browser. How did the authors do it? Inspecting their JavaScript reveals the mobilenet and knnClassifier libraries are used:
|
1 2 |
import * as mobilenet from '@tensorflow-models/mobilenet'; import * as knnClassifier from '@tensorflow-models/knn-classifier'; |
It looks like the MobileNet model is used as the base image recognition library. A series of images is grabbed from the video camera during training and assigned to one of two classes – touching or not touching. The KNN Classifier is then used to do transfer learning to retrain MobileNet to classify new images according to one of these two classes.
Google actually has a TensorFlow.js Transfer Learning Image Classifier codelab that does this exact same thing. I tweaked the codelab by a couple of lines to replicate what donottouchyourface.com does in a JSFiddle below:
BodyPix approach
As shown above, it’s hard to train a model in a few seconds. Ideally we could go and ask hundreds of people to share images of them touching their face and not touching their face in all different environments and positions. Then we could build a fresh model off of that. I’m not aware of a labeled dataset like that, but TensorFlow.js has something close – BodyPix. BodyPix provides identification of people and segmentation of their various body parts – arms, legs, face, etc. The new 2.0 version of BodyPix even includes pose detection, like what PoseNet offers.
Hypothesis: we can use BodyPix to detect hands and faces. When a hand overlaps a face, we have a face touch.
is BodyPix accurate enough?
The first step is to see how good the model is. If it doesn’t reliably detect hands and faces then it won’t work. The repo includes a demo page, so this was easy to test:

I was impressed how well it worked, especially compared to the 1.0 model.
Using the BodyPix API
The API has options for:
- PersonSegmentation – segmenting people from a background as a single mask,
- segmentMultiPerson – segmenting people from a background as a mask for each person,
- segmentPersonParts – segmenting individual body parts for one or more people as a single data set
- segmentMultiPersonParts – segmenting individual body parts for one or more people as an array of data sets.
The “personParts” ones was what I was looking for. The readme.md warned that
segmentMultiPersonParts is slower. It also has a more complex data structure, so I opted for segmentPersonParts to start. See the documentation on the BodyPix repo for the full set of possibilities.
This returns an object that looks like:
|
1 2 3 4 5 6 7 8 9 10 11 12 13 14 15 16 17 18 19 20 |
allPoses: Array(1) 0: keypoints: Array(17) 0: {score: 0.9987769722938538, part: "nose", position: {…}} 1: {score: 0.9987848401069641, part: "leftEye", position: {…}} 2: {score: 0.9993035793304443, part: "rightEye", position: {…}} 3: {score: 0.4915933609008789, part: "leftEar", position: {…}} 4: {score: 0.9960852861404419, part: "rightEar", position: {…}} 5: {score: 0.7297815680503845, part: "leftShoulder", position: {…}} 6: {score: 0.8029483556747437, part: "rightShoulder", position: {…}} 7: {score: 0.010065940208733082, part: "leftElbow", position: {…}} 8: {score: 0.01781448908150196, part: "rightElbow", position: {…}} 9: {score: 0.0034013951662927866, part: "leftWrist", position: {…}} 10: {score: 0.005708293989300728, part: "rightWrist", position: {…}} ... score: 0.3586419759016922 length: 1 data: Int32Array(307200) [-1, -1, -1, -1, -1, -1, -1, -1, -1, -1, -1, -1, -1, -1, -1, -1, -1, -1, -1, -1, -1, -1, -1, -1, -1, -1, -1, -1, -1, -1, -1, -1, -1, -1, -1, -1, -1, -1, -1, -1, -1, -1, -1, -1, -1, -1, -1, -1, -1, -1, -1, -1, -1, -1, -1, -1, -1, -1, -1, -1, -1, -1, -1, -1, -1, -1, -1, -1, -1, -1, -1, -1, -1, -1, -1, -1, -1, -1, -1, -1, -1, -1, -1, -1, -1, -1, -1, -1, -1, -1, -1, -1, -1, -1, -1, -1, -1, -1, -1, -1, …] height: 480 width: 640 |
Basically dimensions of the image, a score against each of 24 body parts with individual pose points, and an integer array that corresponds to the body part associated with each pixel or -1 for none. The pose points are essentially a less accurate version of what is offered in PoseNet, another TensorFlow library.
Algorithms rule everything around me
It took some fiddling, but I ended up on the following algorithm:
- Ignore the image if it doesn’t contain a nose and at least one eye with high probability
- Check if a hand is where a face part used to be in a previous frame – count 1 point for every overlap
- Check if a hand is touching a face part – count 1 point for every touch point
- When the combination of points from the above exceed a threshold, trigger the alert
Show me what’s happening
Being able to see what the classifier is doing in real time is tremendously helpful. Fortunately BodyPix includes a few helper APIs for drawing the Pose Points and Segmentation data. If you want to see all the segmentation parts you can just pass it the segmentation object returned by segmentPersonParts :
|
1 2 3 4 5 6 7 |
const coloredPartImage = bodyPix.toColoredPartMask(targetSegmentation); const opacity = 0.7; const maskBlurAmount = 0; bodyPix.drawMask( drawCanvas, sourceVideo, coloredPartImage, opacity, maskBlurAmount, flipHorizontal); |
In my case, I wanted to focus on just the hands and face so I modified the segmentation data to just include these parts in targetSegmentation above.
I also copied the code that draws the post estimation points from the keypoints array.
Optimizing
Making it work reliably on a variety of devices has probably taken the most time. It is not totally there yet, but there are plenty of levers to adjust to make it work optimally if you know the right ones to pull.
Sensitivity and false alarms
Touch detection happens whenever it sees a face. A face is considered anything with one eye and a nose (according to its detection). There is a sensitivity threshold here. I found the detection to be very reliable here so I set the threshold high.
segmentPerson takes a configuration object. There are several parameters in here that impact sensitivity. The two I used are segmentationThreshold and scoreThreshold .
It is not optimized to handle multiple people – that could be better handled by using segmentMultiPersonParts. I also kept maxDetections set to 1 inside configuration parameters. That tells the pose estimator how many people it should look for (but does not impact the part detection).
Lastly, there are several choices you can make with the model that impact performance that I will cover in the next section.
CPU usage
BodyPix can be a CPU hog. I have a 2.9 GHz 6-Core Intel Core i9 on my MacBook, so it is not a huge deal for me, but it is more noticeable on slower machines. TensorFlow.js makes use of the GPU if it can too, so it will be slower if you don’t have a decent GPU. This is evident in the Frames per Second (FPS) rate.
Adjusting the model parameters
BodyPix has a number of model parameters that trade off accuracy for speed as described here. To help with testing these parameters, I added 4 buttons that will load the model with the following settings.
| Button | outputStride (higher is faster) | Multiplier (lower is faster) |
| Faster | 16 | 0.5 |
| Normal | 16 | 0.75 |
| More accurate | 8 | 0.75 |
| Most accurate | 8 | 1 |
The more and most accurate settings definitely pick up fewer false alarms.
Normal consumes about an entire vCPU core on my new MacBook and runs around 15 FPS.

This isn’t just BodyPix. My modified MobileNet + KNN Classifier example above with a much smaller video doesn’t do that much better.

I have a Windows Surface Go with a slower dual core Pentium 1.6 GHz that runs the normal model at around 5 FPS. It does take noticeably longer to load the model there.
Adjusting the settings had some impact on CPU and CPS, but only by a few percentage points on CPU and 1 or 2 FPS – much less than I expected.
wasm to the rescue?
TensorFlow.js actually has a Web Assembly library that runs significantly faster. I was hoping this would help make the CPU consumption an-issue, but I ran into two issues:
- The wasm backend only works with BodyPix 1.0 and the detection accuracy with 1.0 was nowhere near 2.0
- I wasn’t able to get it to load with BodyPix at all
I am sure I could have figured out 2, but there wasn’t much point with if it wasn’t going to work well anyway. I am sure a tfjs-backend-wasm version will be coming that supports BodyPix 2.0 some point soon.
Beware of throttling
I noticed when the video is no longer active on the screen it starts to act slow. This is way more pronounced on slower machines. Don’t forget that in an effort to conserve resources when too many tabs are open, browsers will throttle non-active tabs. I have some ideas on how to get around that for future exploration.

Browser Support
Unsurprisingly, given that TensorFlow.js is a Google project, this works best in Chrome. It worked fine in Firefox and Edge (Edgium) too. I could not get it to load in Safari without freezing.
Try it
It’s easy enough to try yourself at facetouchmonitor.com or watch a demo here:
All the code is available on GitHub at https://github.com/webrtchacks/facetouchmonitor.
It has been working well enough for me over the past couple of days.
Don’t touch your face!
There is a lot more tweaking that can be done here, but it has worked pretty well in most of the tests I and others have done. I have a long list of improvements and additional optimizations I hope to get to if you don’t beat me to it.
I hope this helps keep you healthy by encouraging you to not touch your face so often if you really can’t stop touching your face then consider wearing a helmet.

{“author”: “chad hart“}


Leave a Reply