Now that it is getting relatively easy to setup video calls (most of the time), we can move on to doing fun things with the video stream. With new advancements in Machine Learning (ML) and a growing number of API’s and libraries out there, computer vision is also getting easier to do. Google’s ML Kit is a recent example of a new machine learning based library that makes gives quick access to computer vision outputs.
To show how to use Google’s new ML Kit to detect user smiles on a live WebRTC stream, I would like to welcome back past webrtcHacks author and WebRTC video master Gustavo Garcia Bernardo of Houseparty. Joining him I would like to also welcome mobile WebRTC expert, Roberto Perez of TokBox. They give some background on doing facial detection, show some code samples, but more importantly share their learnings for optimum configuration of smile detection inside a Real Time Communications (RTC) app.
PS – Tsahi and I are running a short survey on AI in RTC. If you are doing any kind of Machine Learning in the context of RTC or thinking about it, please take a minute to answer a few questions there.
{“editor”, “chad hart“}
Introduction
As Chad covered in a previous webrtcHacks post one use case for of the most common examples of Machine Learning (ML) in the context of Real Time Communications (RTC) is computer vision. However, apart from using face detection for identification, tracking and enhancing we haven’t seen many real applications of these algorithms. Fortunately two weeks ago a comment from Houseparty’s CEO Ben Rubin gave us the opportunity to explore artificial vision use case:
Can someone do a side project to detect smiles so we can start measuring smiles and slap it on our dashboards. I think it’s important on many different levels.
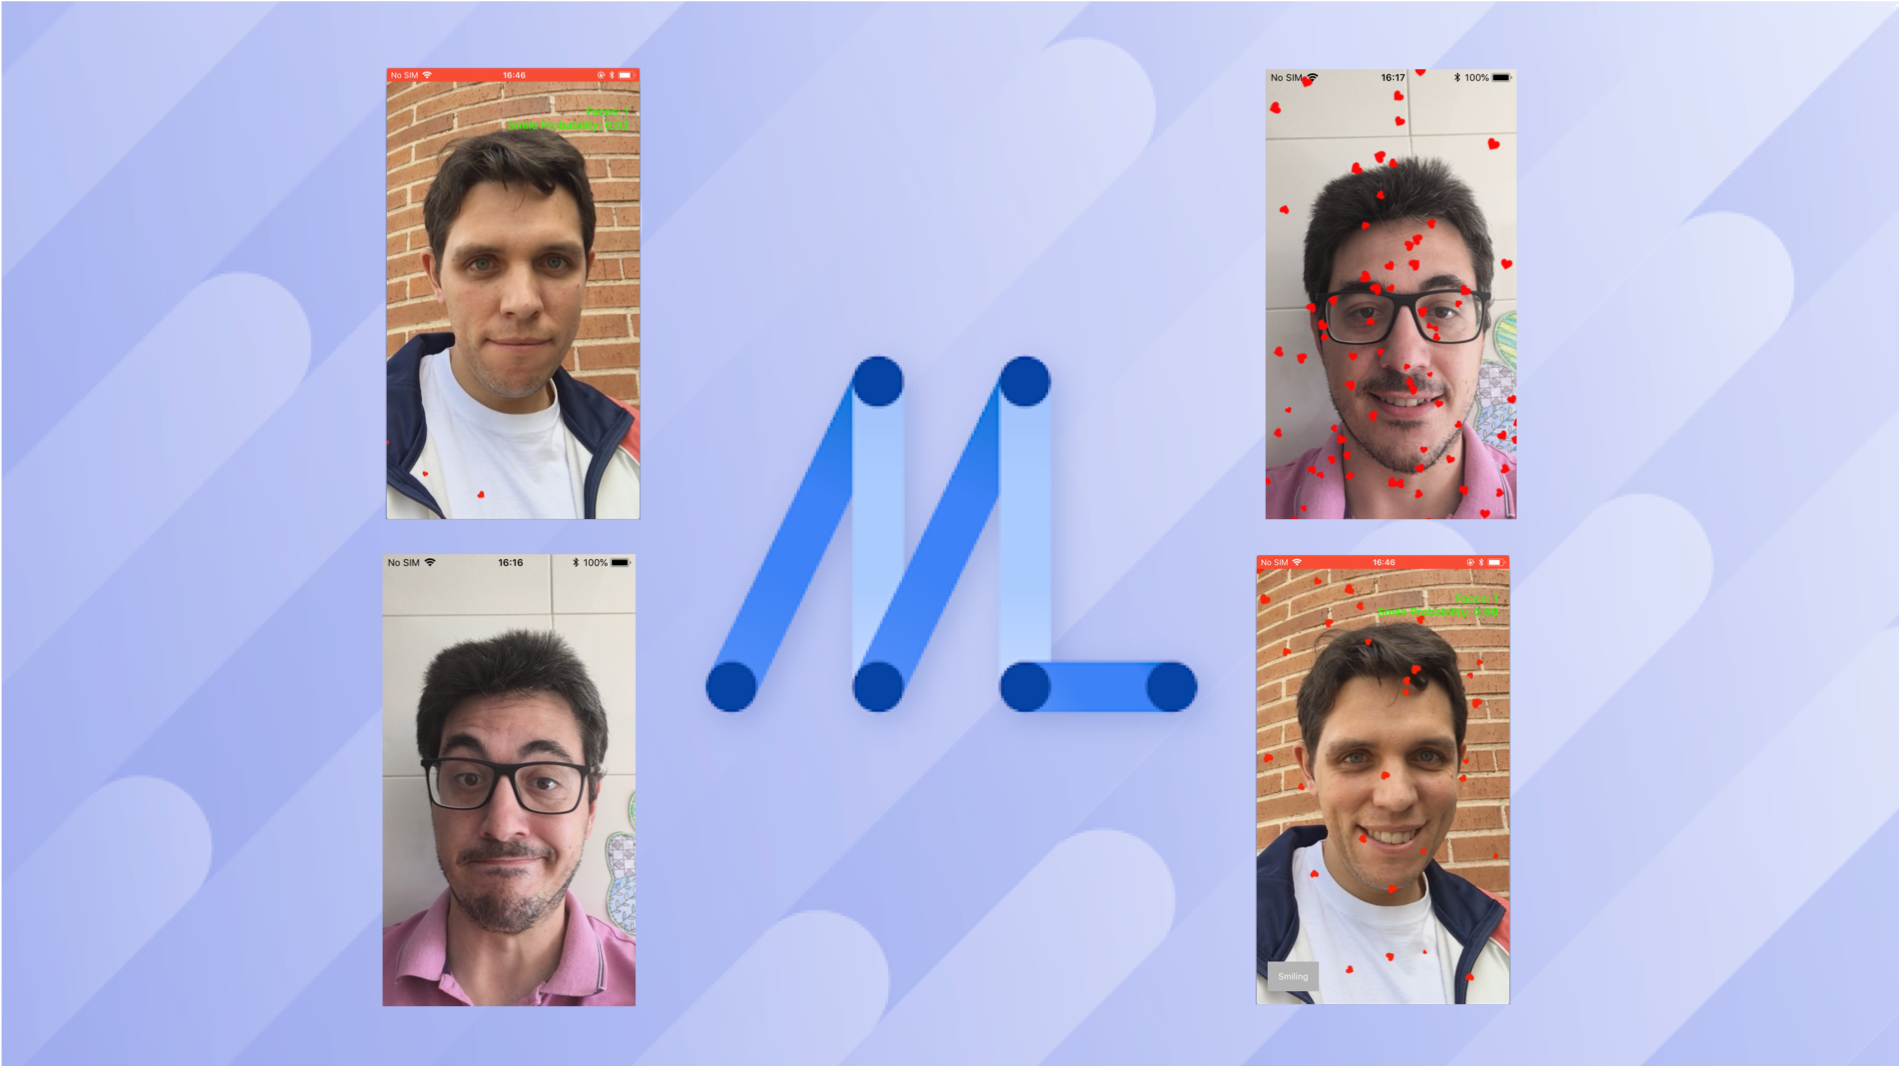
At pretty much the same time, Google announced their new cross-platform mobile SDK for machine learning called ML Kit. We immediately wanted to test this. Fortunately all the planets aligned to allow us to give this a try on a real application – detecting smiles with ML on locally on an iPhone while in a WebRTC conversation.
Framework Options
There are several on-device Machine Learning frameworks and libraries one could start with for this task. Probably the best-known library for this type of use case is OpenCV. OpenCV is a very mature, multi-platform solution with a wide set of features based mostly based on traditional image processing techniques. For iOS specifically, Apple started adding new some APIs in this area last year. Now they have the high level Vision framework and the lower level but more flexible CoreML too. On the Android side the ML support was mostly provided by Tensorflow Lite. However, as mentioned above, Google recently added the new ML Kit framework.
Google’s ML Kit
ML Kit offers a few advantages. First, it is multi-platform, supporting both Android and iOS. It also has a couple different levels of abstraction (high and low level APIs). In addition, it provides different deployment and execution models, allowing processing on-device and in the cloud. Finally, it also gives the ability to optimize and update the on-device models on the fly.
Implementation
Extracting Images from the Stream
The first thing we need to do to integrate ML Kit with our WebRTC application is to get access to the the images. We need to grab the local or remote frames (depending on our use case) and convert them to the right format supported by MLKit.
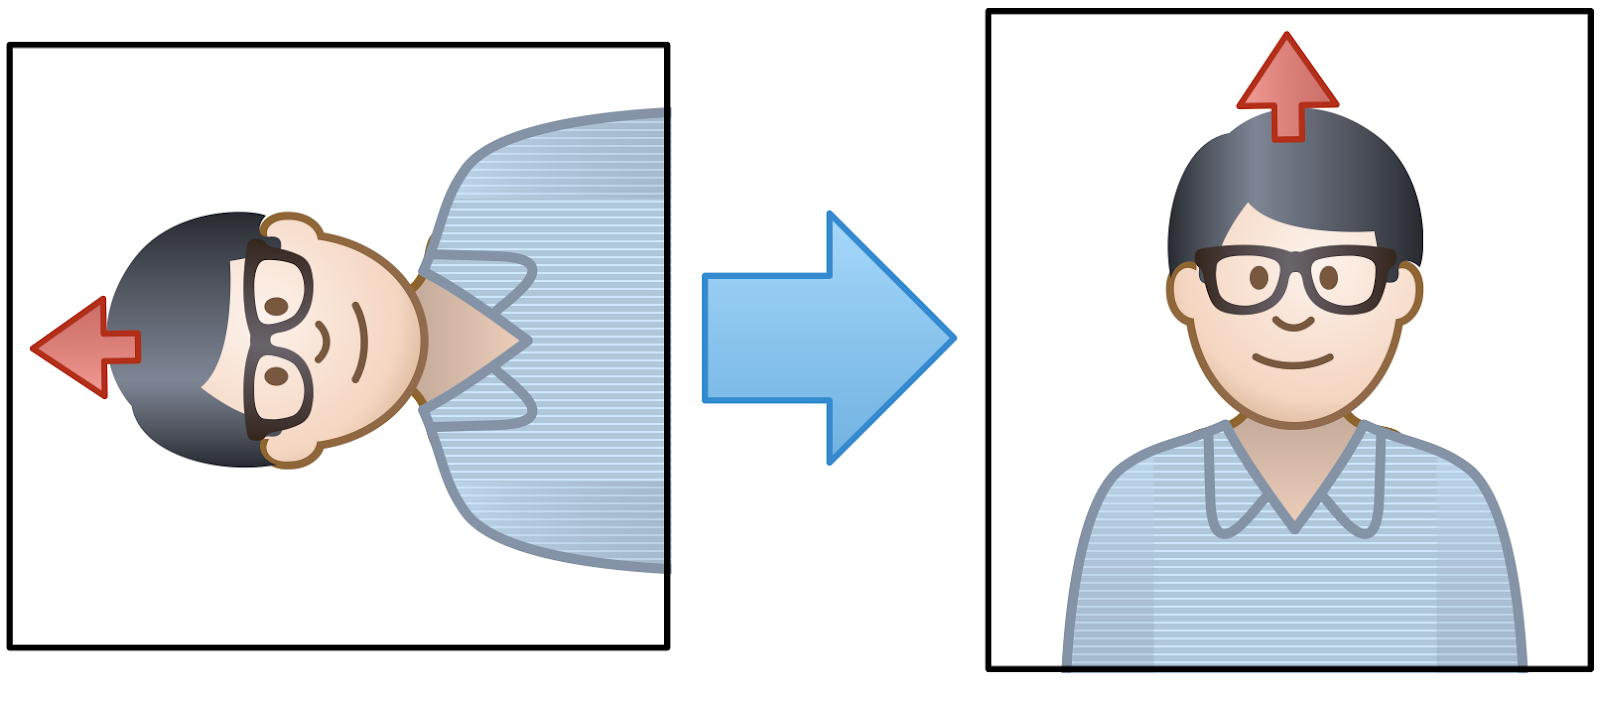
In iOS, ML Kit supports frames passed as UIImage or CMSampleBufferRef format. Note – make sure you rotate the image to ensure the frame is “facing up”.
There are a few different ways to get the image depending on the WebRTC API you are using. If you use the official WebRTC iOS Framework you can connect a new Renderer to a local or remote RTCVideoTrack to receive the video frames as instances of RTCVideoFrame . This provides access to YUV buffers that you can easily convert to an UIImage .
If you are using an API from a platform like TokBox you will use a custom driver to get access to the raw local frames before they are passed to WebRTC and/or the remote frames after they are received in the subscriber side. Those frames will be received as CVPixelBuffer or YUV buffers that again are very easy to convert to an UIImage .
Face Detection API
Once you have the UIImage with the frame you can pass it to the ML Kit face detector. As we will see later in most of the cases you will pass only a percentage of the frames you have to reduce the impact on CPU usage. This is a snippet showing how easy it is to access the ML Kit API:
|
1 2 3 4 5 6 7 8 9 10 11 12 13 14 15 16 17 18 |
let options = VisionFaceDetectorOptions() let faceDetector = vision.faceDetector(options: options) let visionImage = VisionImage(image: image) faceDetector.detect(in: visionImage) { (faces, error) in guard error == nil, let faces = faces, !faces.isEmpty else { return } for face in faces { if face.hasSmilingProbability { let smileProb = face.smilingProbability if (smileProb > 0.5) { Log.info("Smiling!", error: nil) } } } } |
Probability Threshold
We found that using 0.5 as the smile probability threshold provided good results for our needs. You can take a look at the complete code in this sample app we built using OpenTok to capture the video and the code from above to detect the smiling probability.
Performance evaluation
RTC applications are often resource intensive. Adding Machine Learning adds to this, so resource consumption is a major concern. With ML, often times there is a tradeoff between accuracy and resource usage. In this section we evaluate those implications from different angles to provide some expectations and guidelines for deciding how to introduce these features into applications.
Note: All the results in the following tests are done using a low end iPhone 5 SE device.
Latency
The first important parameter to consider is how long it takes to perform detection.
ML Kit has a series of settings:
- Detection mode: ML Kit gives two options here – Fast vs. Accurate.
- Landmarks – identify eyes, mouth, nose, and ears. Enabling this slows detection but the results we get are much better.
- Classification – we need this on for the smile detection
- Face tracking – tracks the same faces across frames. Enabling this makes detection much faster
You can see our test results here:
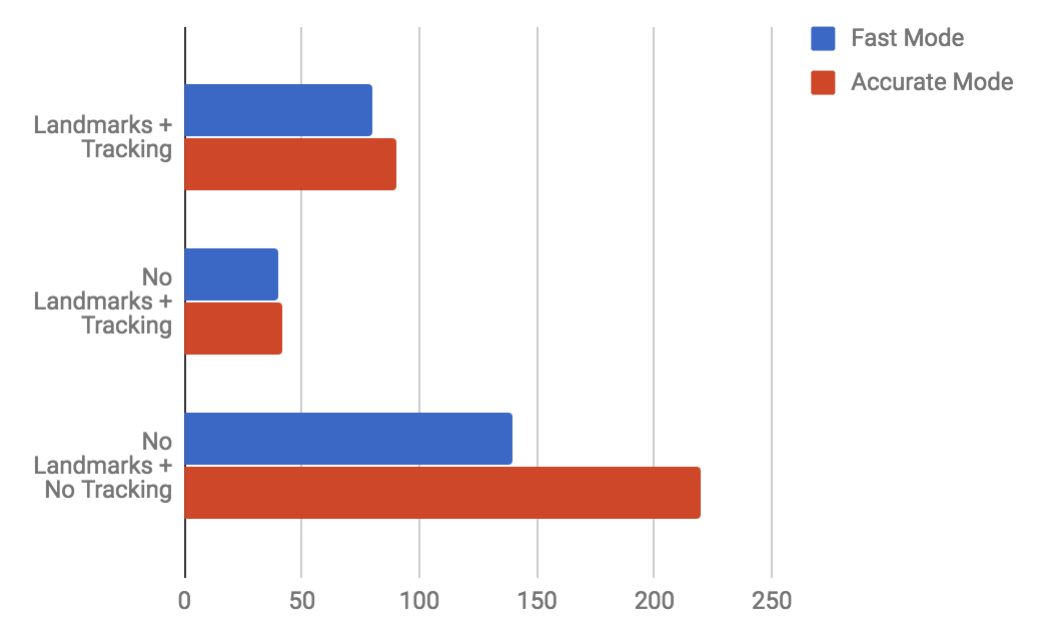
The difference between Accurate and Fast Mode was not large (unless Tracking is disabled). The accuracy we got with Fast Mode was so good that we decided to go with the following combination: Fast Mode + Landmarks + Tracking.
CPU Usage
Next we will evaluate CPU usage. We have 25-ish frames per second to deal with. In our use case (and in many others) we don’t necessarily need to process every single frame. CPU/battery savings are more important to us than detecting every single smile, so we ran some tests modifying the amount of frames per second that we pass to ML Kit for recognition.
As you can see in the next figure, the extra CPU usage above the Default baseline (just capturing from the camera without any ML processing) grows almost linearly with the amount of frames per second that are passed to ML Kit’s face and smile detection API.
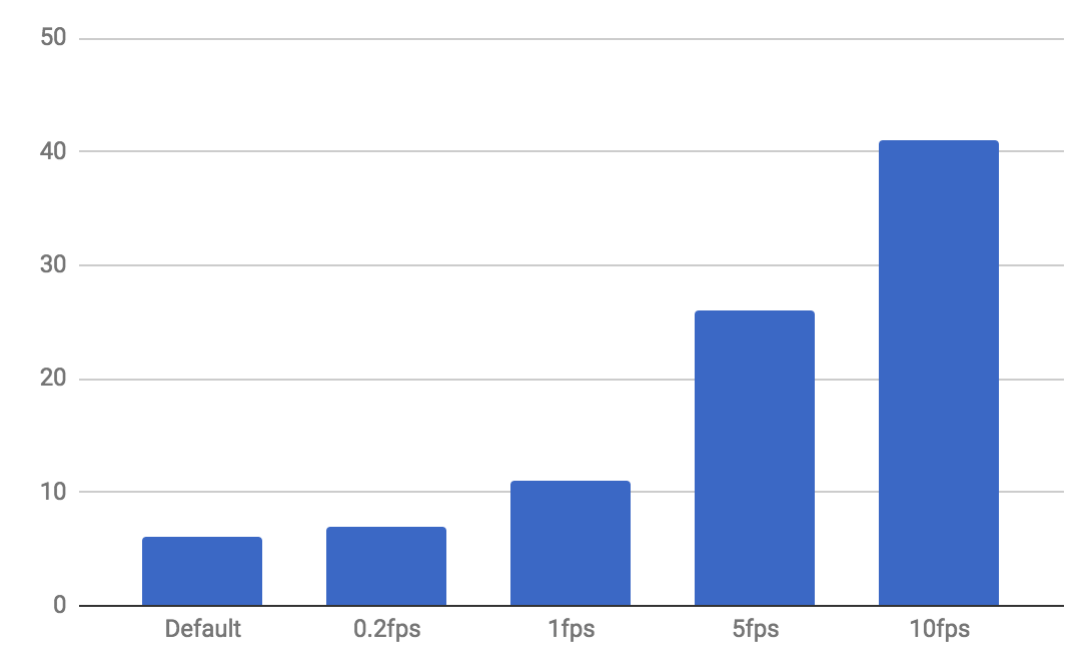
The CPU usage required to process one frame every 1 or 2 seconds was reasonable for our use case.
Application Size
Now, let’s consider application size. Our app, like any app, needs to be downloaded and loaded. Smaller is always better. With ML Kit the size of the application “just” grows around 15Mb. The sample app size went from 46.8Mb when using just OpenTok to 61.5Mb when ML Kit was added to the party.
Accuracy
Lastly we come to accuracy. One of the first things we noticed is how accurate the face detection is even when configuring ML Kit in fast mode. Our tests were done in a typical mobile/desktop video conferencing setup with the person looking at the camera and without any object obstructing it. In other conditions the detection was much more unreliable and not very useful. Detecting multiple faces in the image is also supported by ML Kit, but we didn’t test this much because it is not something common in our app’s usage.
During our tests the decisions from the algorithm were always very close to what a human would probably had said (in our opinion at least). You can see a video below for reference or just run the sample app yourself and see the results.
Conclusions
Even if this use case was very simple, it gave us the opportunity to evaluate the new and promising ML Kit framework. It let us see the value and ease of adding new computer vision features to our applications. From our point of view the two most interesting outcomes of this evaluation are the:
- Surprisingly high accuracy of these models and
- Inability to run these algorithms at full frame rate in typical mobile devices today (which was expected)
It is also important to note that some of these face detection use cases can be solved with simpler image processing algorithms instead of applying ML techniques. In this regard some APIs like Apple’s Core Image might provide a better resources vs accuracy tradeoff – at least for face detection in iOS platforms.
However, traditional image processing approaches are limited to a reduced set of scenarios that those algorithms were designed for. ML algorithms can be extended and retrained. For example, it might also be nice to use ML detect other characteristics of the perso like the gender, age, etc. This level of analysis goes beyond what traditional image analysis algorithms can provide.
Next Steps
From a technical point of view the next step in this evaluation will be to use custom models (probably with CoreML) for more sophisticated use case. One we have in mind is image reconstruction based on Generative Adversarial Networks for video transmission on non-ideal network conditions. This could be a whole new approach to improving video quality – stay tuned!
{“Authors”: [“Roberto Perez“,”Gustavo Garcia”]}



Leave a Reply