The vast majority of WebRTC streams include a camera. We have a lot of posts here about controlling those streams, but what about controlling the camera itself? I was working on a project where I was looking at lighting correction. Serendipitously, I noticed a new “control exposure” demo in the official WebRTC GitHub samples that Fippo just merged.
The author of that sample was Sebastian Schmid. Sebastian has been involved with WebRTC for more than 10 years. Today he is a founder & Solution Architect for app developer, App Manufacture GmbH.
Sebastian walks through how to use WebRTC constraints to control camera exposure, including how to check if exposure constraints are supported. He even shows what he did in uvc before those constraints worked. I really like how he also gives some intro to what exactly exposure is from the photography world with examples of where one could use it in WebRTC.
{“editor”, “chad hart“}
Motivation
I have been building WebRTC Apps for nearly 10 years. Typically, the goal is to quickly and reliably transmit media between peers – without losing quality in between. For a long time, I did not bother too much about the image quality of webcams. I accepted it as a “god-given” hardware limitation of the used device. But recently, it became crucial to change certain imaging parameters for a specific project. This is when I learned that it’s actually possible to improve image quality before the video stream enters our browser.
What is exposure?
Spoiler: It is NOT the same as brightness.
Exposure is fundamental for photography, and that’s why it is important for video communication too. Basically, exposure is the amount of light that reaches your camera’s sensor, creating visual data over a period of time. Without light, there is no visual data, just a black image. Overexposing will also lead to a loss of information and result in white areas.
Well, how can we create perfectly exposed images then? In photography, this is a complex topic, because there is no single camera setting for exposure. Instead, exposure is made up of three different settings known as the “exposure triangle”:
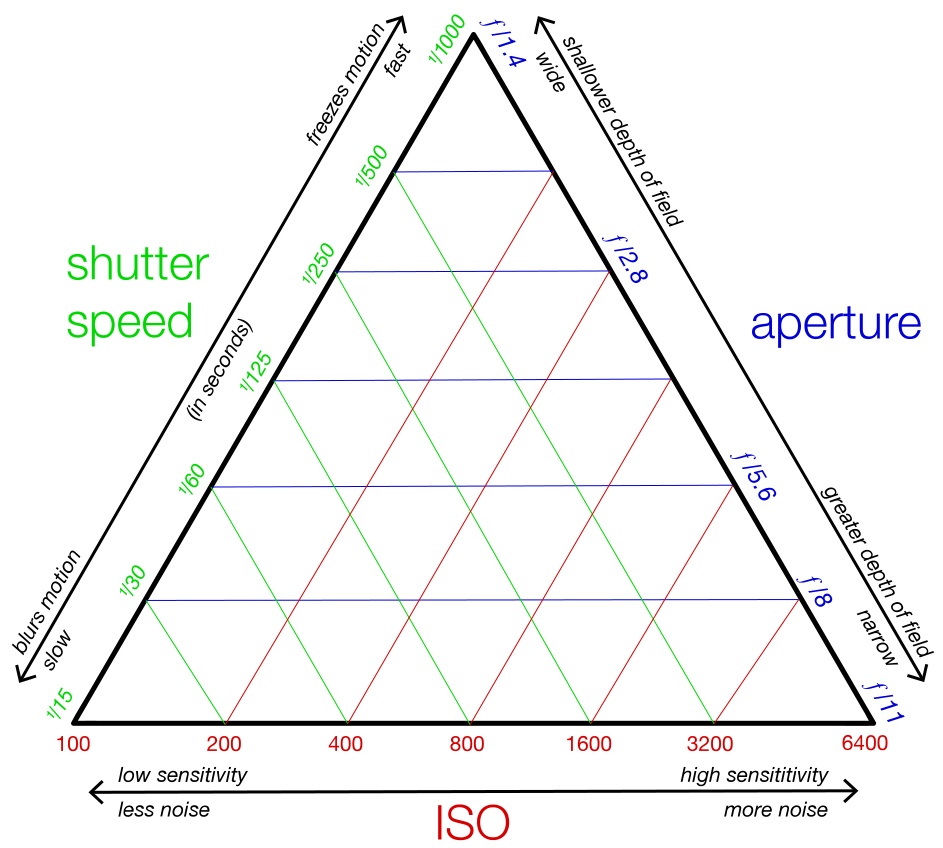
Those settings are shutter speed, aperture, and ISO*. Luckily for us, not all of them are as important when it comes to video communication:
| Setting | Description and Effect | Relevance for Webcams |
|---|---|---|
| Shutter Speed | The amount of time your camera’s shutter is open. This can also be referred to as “Exposure Time”.
The target amount depends on lighting conditions. Long exposure times lead to motion blur. |
The most important setting for WebRTC.
Typically, the only setting we can control anyway. |
| Aperture | Defines how wide the lens is opened.
This can be used for background blur effects and focus points. |
This setting is not specified in the Media Streams API. However, since we usually only want background blur because of privacy reasons, there are alternative solutions like virtual backgrounds. |
| ISO* | Represents the sensitivity of the light sensor.
A high ISO setting can result in pictures filled with digital noise that look grainy. |
This setting is meant to be supported by chrome (via MediaDevices.getSupportedConstraints), but I did not yet see any webcam or native webcam app that allows setting ISO manually.
Further, webcam manufacturers typically do not inform about the ISO ranges of their cameras in technical datasheets. Let’s assume there is not much we can do here for now. |
*ISO refers to the International Standards Organization, the body that specifies this setting.
Why can we do better than the camera’s default (Auto-Exposure)?
Each webcam implements its own specific auto-exposure algorithm. The implementation details and meter mode is up to the webcam manufacturer. Mostly, the built-in auto-exposure works fine as long as you have balanced lighting conditions. But as soon as certain areas of your room (or scene) are significantly brighter than others, things become difficult for the camera. Parts of the scene will be under or overexposed. Someone or something has to make a decision on which area of the scene is important and which can be neglected. This becomes even more important when you realize that webcams cannot capture a range of brightness as high as the human eye can perceive.
In a typical video conference, the focus area will be static, because it’s the speaker sitting in front of their monitor. That means adjusting the exposure will be relatively easy for the user.
Real-world use cases
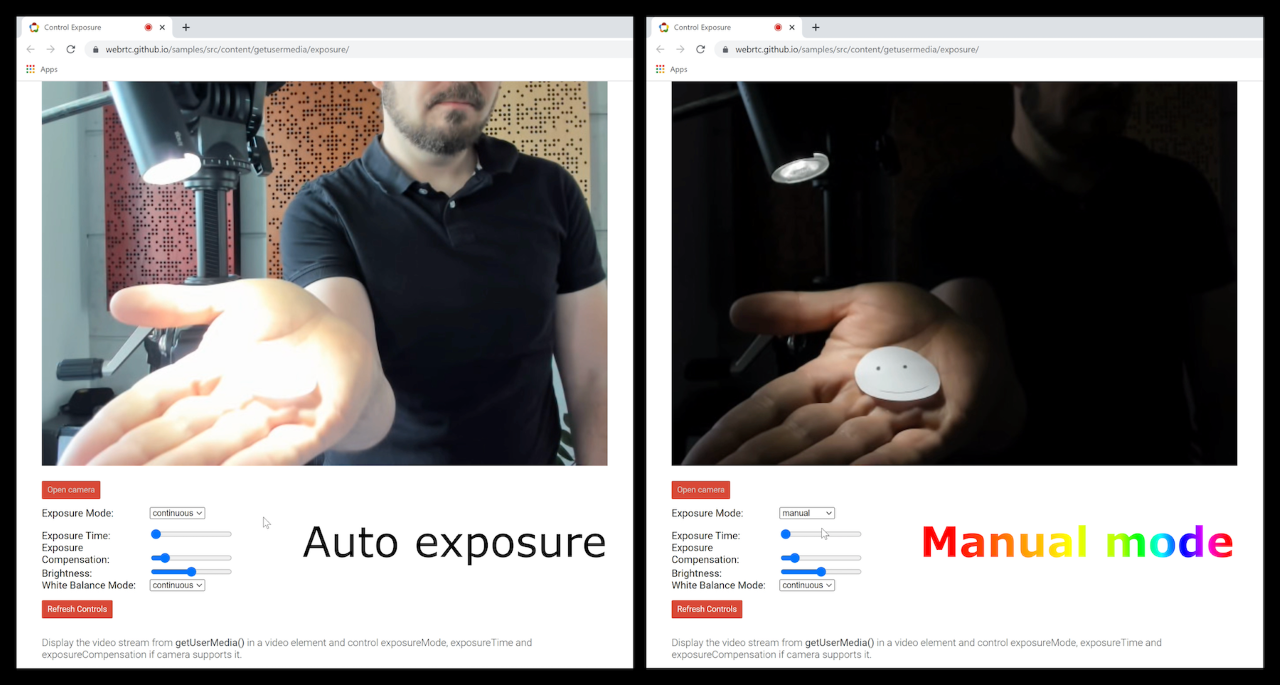
The main motivation for delving deeper into the exposure topic was real-world situations like sunlight and spotlights (also, see high-key, low-key, and contre-jour)
Sunlight
We probably all know these situations where it’s hard to see participants because they have a window or a bright light behind them. Unfortunately, not everyone can control the lighting conditions in their environment. There are hotel rooms, fixed office setups, and so on…
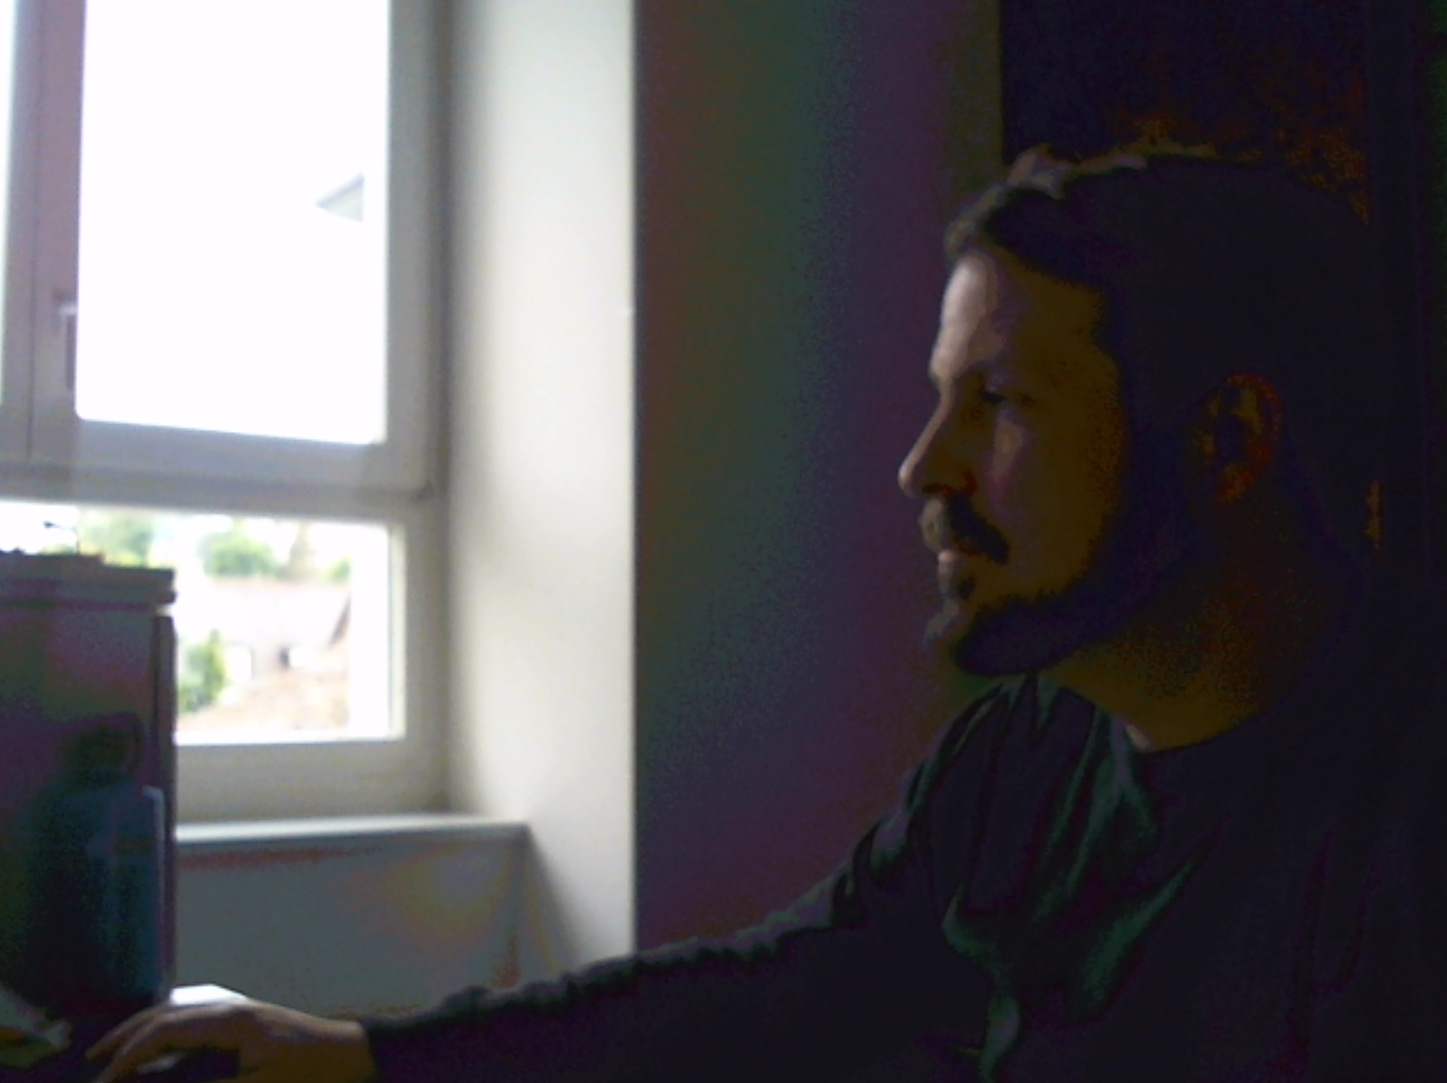
Auto-Exposure |
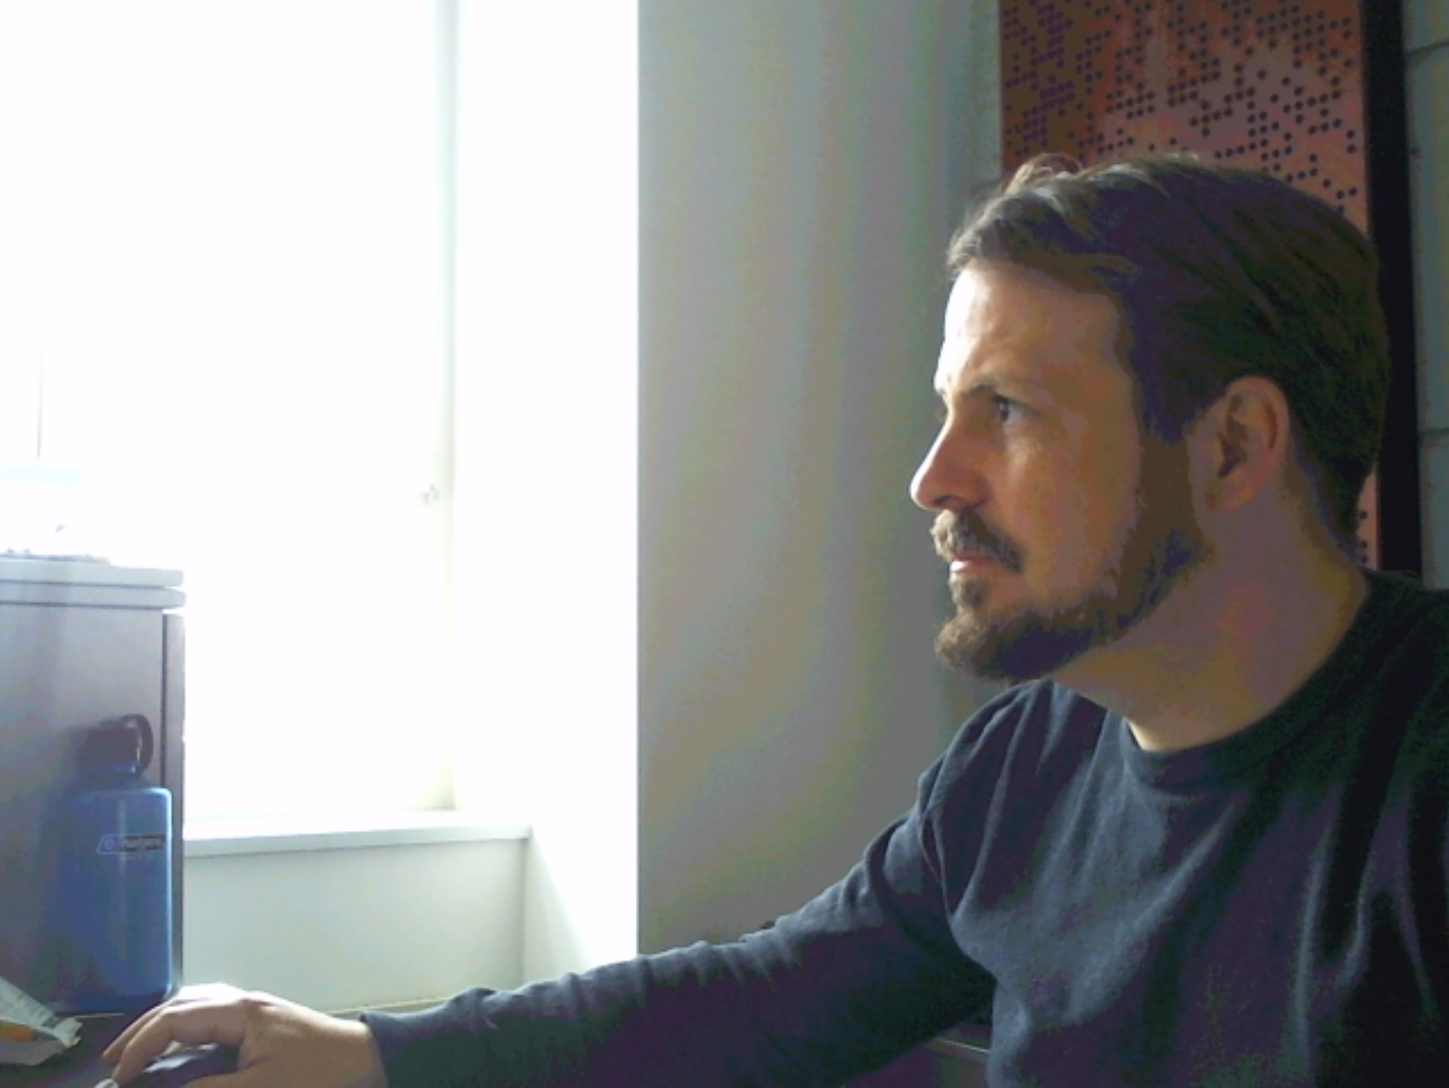
Manual Exposure |
|---|
Spotlight
Sometimes you want to broadcast with bright lighting on a focus point, like a performance, a live conference on a big stage, or an Operating Room. To prevent overexposure, a manual adjustment is required.
What about post-processing?
Instead of exposure control, you might consider post-processing the image. Even though poorly exposed images often lack important information, the color space could be shifted to make it easier to see for the human eye. Google Meet calls that feature “Adjust video for low light”. Just be aware, that while there might be some potential for under-exposed images, fixing overexposed areas (like the above example) is nearly impossible as contour information is often lost. Whenever possible, adjust exposure!
More user control! But how?
As we have learned now, it is desirable to have more user control for certain imaging parameters like exposure time.
How do you do this? The WebRTC way to do that is by applying advanced constraints to the MediaStreamTrack (see W3C JavaScript Approach below). However, when I first tried this in March 2022, this did not work as expected. I submitted a bug report and went on to an alternative non-WebRTC approach using USB Video Class (UVC), an almost 20-year-old standard. Both approaches have their pros and cons.
Luckily, Chrome version 101 fixed my original problem, which allowed me to come back to my first approach (except for macOS – see the UVC approach for that).
W3C JavaScript Approach: MediaStreamTrack Device Capabilities
TL;DR – see this in the official WebRTC samples
My live demo is available at WebRTC samples with user controls like buttons, sliders and so on (thanks Fippo for merging). Feel free to play around. As I explain below, this may not work on your browser or OS just yet.
Controlling Exposure with JavaScript
To get started, we first need to access the MediaStreamTrack via getUserMedia:
|
1 2 3 4 |
navigator.mediaDevices.getUserMedia({ video: true }) .then(mediaStream => { const track = mediaStream.getVideoTracks()[0]; }); |
Then, you might want to call track.getCapabilities() to see what values are actually accepted by the current device. This includes min and max values for exposureTime.
To switch your device into manual exposure mode, you can call track.applyConstraints():
|
1 2 3 4 |
track.applyConstraints({ advanced: [ {exposureMode: 'manual'} ]}) |
If you are feeling lucky, you can also set a custom exposureTime now:
|
1 2 3 4 |
track.applyConstraints({ advanced: [ {exposureTime: 3} ]}) |
Note #1: In a real-world app, you would need to take the results of getCapabilities into account. You don’t know which values are valid for the user’s current device otherwise.
Note #2: Make sure to set exposureMode and exposureTime in two separate calls. The switch to manual mode needs to finish first, otherwise, the browser will ignore your exposureTime.
Putting it all together:
|
1 2 3 4 5 6 7 8 9 10 11 12 13 14 15 16 17 18 19 20 21 22 23 24 25 26 27 28 29 |
navigator.mediaDevices.getUserMedia({ video: true }) .then(mediaStream => { const track = mediaStream.getVideoTracks()[0]; console.log('The device supports the following capabilities: ', track.getCapabilities()); // set manual exposure mode track.applyConstraints({ advanced: [ {exposureMode: 'manual'} ]}) .then(() => { // set target value for exposure time track.applyConstraints({ advanced: [ {exposureTime: 3} ]}) .then(() => { // success console.log('The new device settings are: ', track.getSettings()); }) .catch(e => { console.error('Failed to set exposure time', e); }); }) .catch(e => { console.error('Failed to set manual exposure mode', e); }); }); |
How to Check for Browser Support
Manual exposure control with MediaStreamTrack is still limited. It depends on your OS, browser, camera, and driver.
Right now (May 2022), it works on:
- Chrome on Windows
- Chrome on Linux
- Chrome on Android
Finding if your browser supports exposure control is easy. Just use navigator.mediaDevices.getSupportedConstraints() to find which capabilities each device supports on your favorite browser. If you are lucky, the browser will indicate it supports exposure control by returning:
|
1 2 3 4 5 6 |
{ exposureMode: true exposureTime: true exposureCompensation: true ... } |
If your desired constraints (e.g. exposureMode and exposureTime) are not listed here, the browser has not yet implemented it at all. If it is listed, you still need to call track.getCapabilites() to see which capabilities are supported by your actual device.
Chrome
Pretty good support in version 101 or later.
Note: Chrome uses platform-specific APIs to implement media device capabilities, like the IAMCameraControl on Windows, V4L2 on Linux and IOUSBHost on macOS. This explains why the supported capabilities vary between platforms.
Safari
No exposure capabilities are listed in navigator.mediaDevices.getSupportedConstraints().
Firefox
Does not even implement MediaStreamTrack.getCapabilities yet. See current status.
Native Approach: USB Video Class (UVC)
This is a fallback if the W3C JavaScript approach did not work for you, e.g. because you need to support macOS.
UVC is more than 20 years old and therefore pretty stable. However, you cannot access the UVC API directly within the browser.
Note: This approach only works if you have your own executable running on the device
For simplicity, I will assume that you are using an electron app.
If you search for “uvc” on npm you will get several hits. One of them is uvcc which has an easy CLI to play around with:
|
1 2 3 4 5 6 7 8 9 10 11 12 13 14 15 16 17 |
# install npm install --global uvcc # set to manual exposure mode uvcc set auto_exposure_mode 1 # list supported exposure time range uvcc range absolute_exposure_time # example output #{ # "min": 3, # "max": 2047 #} # set exposure time uvcc set absolute_exposure_time 3 |
This will also affect your WebRTC media track in any browser 🥳
Notes regarding libusb
- It seems like most (all?) UVC helper libraries out there are based on libusb.
- libusb requires a WinUSB driver on Windows.
- Installing a WinUSB driver for a webcam will remove its video capabilities and make it a generic USB device.
UVC Conclusion
The UVC approach is fine for macOS and Linux, but troublesome on Windows.
What about native mobile?
As we have learned in the W3C JavaScript approach, Chrome did already implement some media device capabilities for Android. Be aware that this is implemented in Chromium core and not the WebRTC stack itself. Therefore, the native camera API is the weapon of choice to control camera output in mobile apps. This means that you will have to write your own native camera configuration code. An opportunity here is to benefit from powerful native features like face detection on Android. But I have not tested that yet.
Outlook: What about AI?
Wouldn’t it be great if the exposure setting would adapt automatically and give the best possible result even on old/low-budget devices and difficult lighting conditions? To overcome a webcam’s hardware limitation and improve its built-in auto-exposure mode, an app could use a Machine Learning framework to identify points of interest (e.g. by using face recognition) and apply an ML-based or mathematical exposure metering algorithm to that area to see if they are over or underexposed. Then you could use this data to automatically control exposure for better results. However, digging deeper into that is out of scope for this blog post.
Your Input?
Did you find a bug or some other magical approach that enables us to control exposure in any browser on any platform? I look forward to finding out in the comments 😉
{“author”: “Sebastian Schmid“}





An interesting comment came in from OrphisFlo on Twitter:
Fippo’s recommendation is to make sure you reset to defaults in a
beforeunloadhandler.That is an interesting comment indeed but
beforeunloadit’s not a reliable event yet, according to the mozilla docs at least.Pretty interesting article too btw to the author, pretty progressive too. Nice research.
Mac should work as well as of
https://chromiumdash.appspot.com/commit/dfbffb185da65a3fab8a11f2f1ee2485dcd98063
in Chrome M112
Good to see people are using this is real life 🙂
I was going to say MacOS is also supported now, but Phillipp beat me to it.
You can also experiment with Ambient Light (https://bugs.chromium.org/p/chromium/issues/detail?id=606766 behind a flag) along with manual camera control, like https://www.w3.org/TR/ambient-light/#examples
If there’s request for new features apart from https://w3c.github.io/mediacapture-image/#mediatracksupportedconstraints-section , do reach out.
🙌
I think the feature was rolled back as I cannot see all the properties on MacOS anymore. (Using Chromium v116)
A really useful piece of knowledge I gained from this excellent tutorial is the ‘advanced’ option in the applyConstraints call. How much time it saved me!
Thanks