If you’re new to WebRTC, Jitsi was the first open source Selective Forwarding Unit (SFU) and continues to be one of the most popular WebRTC platforms. They were in the news last week because their parent group inside Atlassian was sold off to Slack but the team clarified this does not have any impact on the Jitsi team. Helping to show they are still chugging along, they released a new feature they wanted to talk about – off-stage layer suspension. This is a technique for minimizing bandwidth and CPU consumption when using simulcast. Simulcast is a common technique used in multi-party video scenarios. See Oscar Divorra’s post on this topic and that Fippo post just last week for more on that. Even if you are not implementing a simulcast, this is a good post for understanding how to control bandwidth and to see some follow-along reverse-engineering on how Google does things in its Hangouts upgrade called Meet.
The post below is written by Brian Baldino, one of the back-end developers working on the Jitsi Videobridge SFU. He has lots of experience with video conferencing with past jobs at Cisco and Highfive. See below for Brian’s great walkthrough.
{“editor”: “chad hart“}

Most of you are probably familiar with the typical SFU-style user interface that was first popularized in the consumer market with Google Hangouts and is used by Jitsi Meet and other Services. Front and center with the vast majority of screen real estate is the video of whoever is the current active speaker. All the other participants are seen in their own thumbnail, usually on the right or across the bottom. We want the active speaker’s video in the middle to look great so that is high resolution. The thumbnails on the bottom/right are small, so high resolution there would be a waste of bandwidth. To optimize for these different modes we need each sender’s video in multiple resolutions. Thankfully this is already a solved problem with simulcast!
With simulcast, all senders encode 3 different resolutions and send them to the SFU. The SFU decides which streams to forward to each receiver. If a participant is the active speaker, we try and forward the highest quality stream they’re sending to others to see on their main stage. If a participant is going to be seen in the thumbnails on the right, then we forward their lowest quality stream.
Simulcast Trade-offs
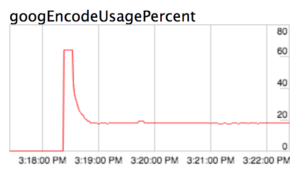
Simulcast is a great mechanism for optimizing download bandwidth. However, like most things in life, simulcast involves trade offs – encoding 3 streams is more CPU-intensive than encoding a single stream. You can see this in the chrome://webrtc-internals stats below where the CPU usage is a few percentage points higher using simulcast:
 |
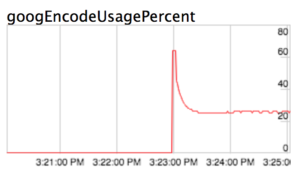 |
| CPU usage without simulcast | CPU usage with simulcast |
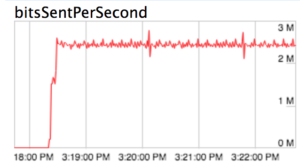
It also involves sending more bits:
 |
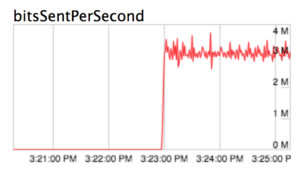 |
| Send bitrate without simulcast (~2,5M bits/sec) | Send bitrate with simulcast ~ (3M bits/sec) |
*These graphs are auto-scaled by chrome://webrtc-internals, so please note the y-axis scales may be different. Please look at the actual y-axis values.
Stream Suspension
So does this mean simulcast is less efficient for the user? On the contrary, since we can control the simulcast streams individually, simulcast gives us the opportunity to actually save both CPU and bits by turning off the layers aren’t in use. If you’re not the active speaker, then 2 of your 3 layers aren’t needed at all!
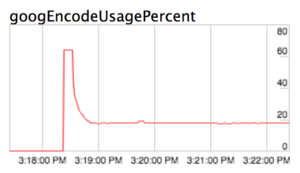
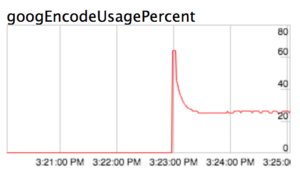
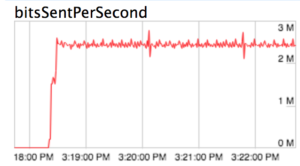
Let’s see what the usage looks like when we turn off the top 2 layers:
CPU Usage
 |
 |
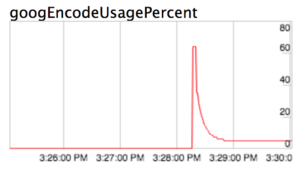 |
| Baseline CPU usage without simulcast | CPU usage with 3 simulcast streams | CPU usage with top two simulcast layers disabled |
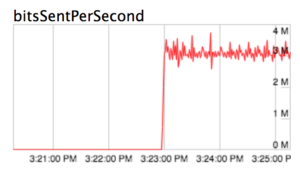
Bits per second
 |
 |
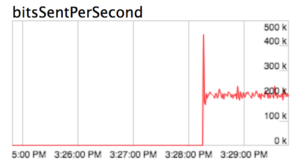 |
| Baseline send bitrate without simulcast | Bitrate with 3 simulcast streams | Bitrate with top two simulcast layers disabled |
That’s a huge win for both the client and the load on the SFU!
Implementing Suspension
Now let’s see if we can integrate this into the actual code. There are 2 problems to solve here:
- On the SFU – figure out when streams aren’t being used and let clients know
- On the client – shut off streams when they aren’t being used and start them back up when they’re needed again
The SFU
The first problem was straightforward to solve – the clients already explicitly request high quality streams from participants when they become the active speaker so we can tell senders when their high quality streams are being used and when they are not via data channel messages.
The Client
First Attempt
We had an idea for the second problem as well. We know Chrome will suspend transmission of simulcast streams when the available bandwidth drops, so what if we just capped the available bandwidth? We can do this by putting a bandwidth limit in the remote SDP:

The b=AS line will cap the available bandwidth to 200kbps.
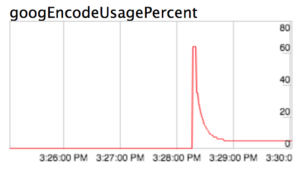
Let’s give that a try and see how it looks:
 |
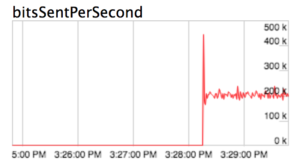 |
| CPU usage after SDP bandwidth restriction | Send bitrate after SDP bandwidth restriction |
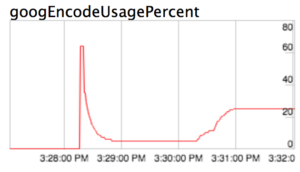
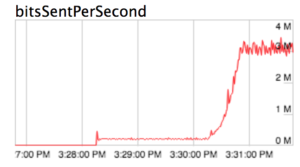
Great! This is exactly what we were hoping for: it matches the test results we had from earlier! Now let’s remove the cap to simulate when someone becomes the active speaker and we want their high quality streams:
 |
 |
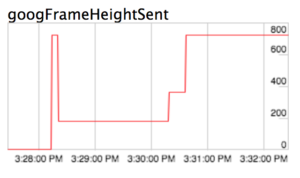 |
| CPU usage when the cap is removed | Send bitrate when the cap is removed | Send frame height when the cap is removed |
Great, it comes back! But there’s a problem…it takes over 30 seconds to get back to high quality. This means when someone becomes the active speaker, their video quality on the main stage will be poor for at least 30 seconds. This won’t work. Why is it so slow?
If you’ve ever done network impairment testing with Chrome, you know that it applies lots of logic to prevent oversending. It is very cautious to ramp up the send bitrate for fear of losing packets. What we’ve basically done via our SDP parameter is make Chrome think the network’s capacity for packets is very low (200 kbps) so when we remove it, Chrome cautiously increases the bitrate while it figures out how much it can actually send. This makes a lot of sense when the network is having issues, but for our use case it’s a dealbreaker.
Google Meet Examination
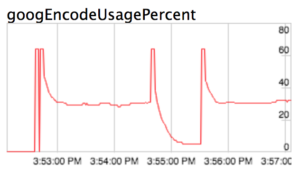
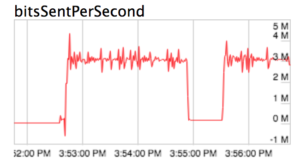
We first started discussing simulcast stream suspension when we noticed Google Meet doing it. Let’s look at the graphs for a Google Meet call:
 |
 |
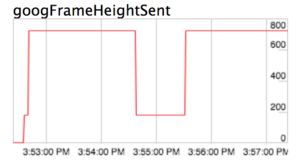 |
| CPU usage ramp up on Google Meet | Send bitrate ramp up on Google Meet | Send frame height ramp up on Google Meet |
Wow! They drop way down AND ramp up really quickly. How do they do it? We took a look at their SDP and they are using the b=AS cap. We know that won’t get us the quick ramp up (as we saw in our first attempt), so they must be doing something else as well.
We took a look at chrome://webrtc-internals and noticed this:

That addStream may look innocent, but this isn’t at the beginning of the call, it’s in the middle when we want the stream to ramp back up. So what’s going on here? Another video stream is being added, but there isn’t one being removed, how does that work? And is it related to the quick bitrate ramp up?
So we took a closer look and found some more details. Here’s where the participant first adds their media streams to the peerConnection :
|
1 2 3 4 5 |
7/19/2018, 3:52:30 PM setRemoteDescriptionOnSuccess 7/19/2018, 3:52:34 PM addStream id: 2c9498d2-a0ce-4754-a78a-215fb7ec0e28, video: [f490dc4d30230e11a20f1746927e82372b104c5f4f0c15964a3f1db057cbf92b] 7/19/2018, 3:52:34 PM addStream id: 4fd852ff-9405-4c9d-9d07-4e1fde15bbca, audio: [default] |
And here’s the addStream later on when we want to ramp up the bitrate:
|
1 2 3 |
7/19/2018, 3:52:35 PM addStream id: 267a5b2d-c6b1-44dc-9b82-1b8a7de7ccdf, video: [f490dc4d30230e11a20f1746927e82372b104c5f4f0c15964a3f1db057cbf92b] |
So we can see here the track ID is the same but the stream ID is different. This reminded us of how Chrome gives newly-created streams a free period where their bitrate can ramp up really quickly; that way when you join a call you can start sending HD video fast. We suspected that the new stream free ramp up period is what was being leveraged here, by making the stream look new when that participant became the active speaker.
Attempt 2
Based on the Meet investigation, we started playing with a standalone WebRTC demo app to try to reproduce the behavior there. We were able to reproduce the same behavior in our test environment by doing this:
-
- Clone the media stream
- Add the cloned media stream to the peer connection
- Munge the SDP to remove the new ssrcs/stream information from the new stream and replace them with the originals.
But we had yet to try it out in an actual Jitsi call – the test environment was peer-to-peer and didn’t use simulcast, so we weren’t sure it would port to Jitsi and work. Once we tried, we found that we didn’t get the fast ramp up. It was slow, like before with just the bandwidth cap. We began debugging this and believe it may have been related to something in our rate control on the SFU which was inhibiting the bitrate from ramping up quickly.
Before we made it any further a new possibility emerged.
Attempt 3
The WebRTC team recently put out a PSA about RTCRtpSender. Support for modifying encoding parameters landing in Chrome 69. This has an API that gives us control over individual simulcast encodings, including whether or not they are enabled! So, when we find out we’re not going to be on the main stage, the client can do:
|
1 2 3 4 5 |
const videoSender = peerconnection.getSenders().find(sender => sender.track.kind === 'video'); const parameters = videoSender.getParameters(); parameters.encodings[1].active = false; parameters.encodings[2].active = false; videoSender.setParameters(parameters); |
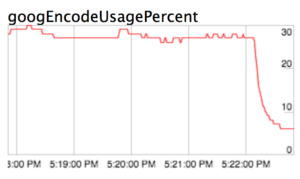
And the top 2 layers should be disabled, let’s see how that looks:
 |
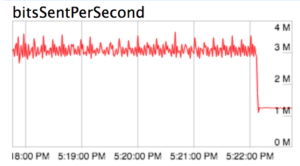 |
| CPU drop disabling layers via RtpSender params | Send bitrate drop disabling layer via RtpSender params |
We don’t get quite the same drop as before, but it’s still a great improvement! But let’s see how the ramp up goes when we turn them back on:
 |
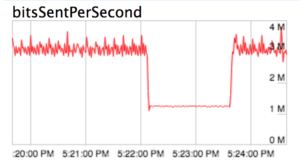 |
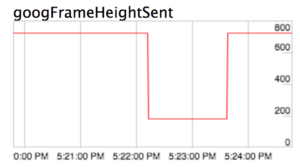 |
| CPU usage ramp up | Send bitrate ramp up | Send frame height ramp up |
Wow! The bitrate jumps up immediately! This will totally work for active speaker switching. We won’t get this feature until Chrome 69 but it is a clean solution and gives us what we want: quick drops in bitrate when streams aren’t in use and quick recovery when we need them again.
Give this a try on Jitsi Meet today by adding #config.enableLayerSuspension=true to your call URL (as long as you’re using Chrome v69+) or check out the code on the Jitsi Github repo .
{“author”, “Brian Baldino”}


Wow, that’s cool!