WebRTC has made getting and sending real time video streams (mostly) easy. The next step is doing something with them, and machine learning lets us have some fun with those streams. Last month I showed how to run Computer Vision (CV) locally in the browser. As I mentioned there, local is nice, but sometimes more performance is needed so you need to run your Machine Learning inference on a remote server. In this post I’ll review how to run OpenCV models server-side with hardware acceleration on Intel chipsets using Intel’s open source Open WebRTC Toolkit (OWT).
Note: Intel sponsored this post. I have been wanting to play around with the OWT server since they demoed some of its CV capabilities at Kranky Geek and this gave me a chance to work with their development team to explore its capabilities. Below I share some background on OWT, how to install it locally for quick testing, and show some of the models.

Open WebRTC Toolkit (OWT)
Intel launched its Intel® Collaboration Suite for WebRTC back around 2014. This suite was comprised of a server and client SDKs designed to make use of Intel hardware. Intel continued to expand on this softwar set, adding features and improving its capabilities. Later, in 2018, Intel open sourced the whole project under the Open WebRTC Toolkit (OWT) brand. Intel still offers the Collaborate Suite for WebRTC. They say the only difference is packaging with additional Intel QA (which isn’t so uncommon for commercialy backed open source projects). For purposes of this post, we will focus on the open source OWT.
You can find the main OWT page under https://01.org/open-webrtc-toolkit
What it does
That media server can act as a Multipoint Control Unit (MCU) where media is decoded, processed, and re-encoded before it is sent back out to clients in addition to a the more typical Selective Forwarding Unit (SFU) model. Intel’s OWT really differentiates itself as a real time media processor with capabilities for the following applcations:
- Multiparty conferencing – SFU’s have proven to be the predominant architecture for WebRTC conferencing, but MCU’s are still needed in scenarios where client-side processing is limited (like on an IoT device) or when combined with one of the bullets below
- Transcoding – MCU’s are helpful for transcoding between different codecs, especially processing intensive video codecs
- Live streaming – sending video feeds out ot non-WebRTC clients using streaming protocols like RTSP, RTMP, HLS, MPEG-DASH
- Recording – storing streams to disk in formats that are needed
- SIP-gateway – for converting WebRTC streams and signaling to formats that can be used by more traditional VoIP networks
- Analytics – running Machine Learning loads on the media, like Computer Vision
The server is based on node.js, with MongoDB for the database, and RabbitMQ as the message broker. The functional listed in the bullets above and others are implemented as various different Agents that plug into the OWT architecture.
OWT also includes a client SDK for interacting with the Media Server. That can also be used in P2P mode.
Acceleration
The architecture was made to leverage Intel hardware. That includes most modern Intel CPUs and even faster acceleration for CPU’s with integrated graphics, FPGA’s, and Intel’s specialized computer vision Vision Processing Units (VPUs). (See here for a project I did leveraging one of their Movidius chips with Google’s Vision Kit).

Analytics & Computer Vision (CV)
Anyone who has done serious work with Computer Vision has come across OpenCV. OpenCV was originally an Intel project and still is. Intel has a toolkit they call OpenVINO (Open Visual Inference and Neural network Optimization) for optimizing Deep Learning models on their hardware. This toolkit is part of the OpenCV repo. OpenCV includes dozens of pre-trained models for everything from basic text recognition to self-driving car applications.
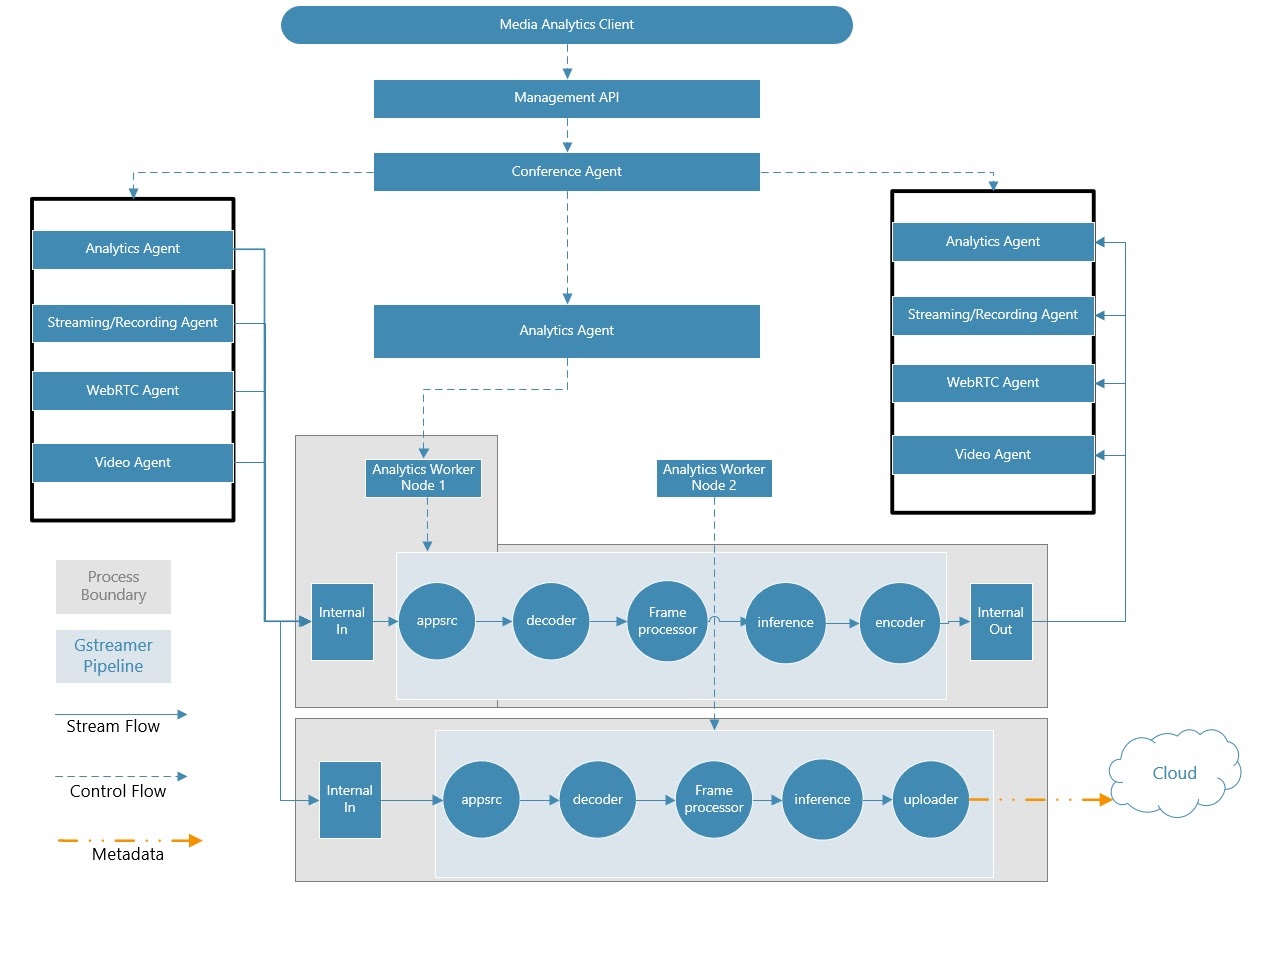
The OWT Analytics Agent is a module for running inference in real time on OpenVINO models. The Analystics Agent can then send the inference metadata out to a cloud destination, or you can route it back to the media server for things like real time video annoation (I’ll show that in a bit). The widely used GStreamer library is used to control the media pipeline.
Architecture
The diagram above is from the Analytics Server Guide readme. It looks complicated, but just remember the Analytics Agent acts like another participant in a conference that can subscribe to a video feed in that conference. Once the Analytics Agent has that video stream you can direct processing of that stream through various stages using a GStreamer pipeline. In most cases you’ll want to run inference and classification before returning the video feed back into the MCU, but you can also send the stream and/or inference data elsewhere.
Setup with Docker
Setup will take a little time, as you will need to install the OWT server and Analytics Agent. Fortunately they have Docker build instructions to simplify the install. You can run the OWT + Analytics Agent as 4 separate containers if you like for distributed environments. I chose to keep all mine local in a single container to simplify my evaluation.
Actually, Intel originally gave me the gst-owt-all:run image to work from since they were in the middle of updating their Analytics Agent install documentation at the time of my review. The new set is much more clear. I still recommend familiarizing yourself with the standard OWT install first so you understand the components and options.
Also, there is a lot of compiling with gcc. Make sure you have the latest version with:
brew install gcc
My install would initially fail in compiling, but it was fine after I did the above.
I did end up building everything myself. To build the single OWT server with Analytics, run the following:
|
1 2 3 4 5 6 7 8 9 10 11 |
git clone https://github.com/open-webrtc-toolkit/owt-server.git cd owt-server git branch gst-analytics cd /owt-server/docker/gst curl -o l_openvino_toolkit_p_2019.3.334.tgz http://registrationcenter-download.intel.com/akdlm/irc_nas/15944/l_openvino_toolkit_p_2019.3.334.tgz http://registrationcenter-download.intel.com/akdlm/irc_nas/15944/l_openvino_toolkit_p_2019.3.334.tgz docker build --target owt-run-all -t gst-owt-all:run \ --build-arg http_proxy=${HTTP_PROXY} \ --build-arg https_proxy=${HTTPS_PROXY} \ . |
After the core OWT server and Analytics service is set up, you will need to download your desired models from the OpenCV Open Model Zoo and build an analytics pipeline to use them. For the included samples, that simply involves running a builder command in bash and copying some files.
Verifying it works on macOS
Configure docker ports
The docker --net=host option does not work on macOS, so to run locally, you’ll need to make sure you open the appropriate ports:
| Port | Service |
| 8080 | Web socket signaling port for WebRTC |
| 3004 | Web Server to load the demo page |
| 30000-30050 | UDP ports for WebRTC |
Start docker
I setup my container with:
|
1 |
docker run -p 8080:8080 -p 3004:3004 -p 30000-30050:30000-30050/udp --name owtwebrtchacks --privileged -tid gst-owt-all:run bash |
Edit default OWT configs to run locally on macOS
From there you will need to edit the webrtc_agent/agent.toml file to recognize these ports.
|
1 2 3 |
docker start owtwebrtchacks docker exec -it owtwebrtchacks bash vi /home/owt/webrtc_agent/agent.toml |
Replace 0acf7c0560d8 with the container name or id. Then change the following:

Then you’ll need to tell web portal to show your browser “localhost” instead of the internal Docker IP bridge (which is 172.17.0.2):
|
1 |
vi /home/owt/portal/portal.toml |

Again, on other platforms you should be able to use the default configuration if you start your container with --net=host.
Run the server
Now you can start the server
|
1 |
./home/start.sh |
You might see some errors like:
|
1 2 3 4 |
2020-03-31T01:47:20.814+0000 E QUERY [thread1] Error: couldn't connect to server 127.0.0.1:27017, connection attempt failed : connect@src/mongo/shell/mongo.js:251:13 @(connect):1:21 exception: connect failed |
That should be ok as long as it connects eventually. You know it’s running if you see something like:
|
1 2 3 4 |
starting app, stdout -> /home/owt/logs/app.stdout 0 rooms in this service. Created room: 5e82a13b402df00313685e3a sampleRoom Id: 5e82a13b402df00313685e3a |
Test in the browser
From there you can load https://localhost:3004/ in a browser on your local machine. Your browser shouldn’t like the certificate, so you’ll need to allow that.

And you’ll need to allow the websocket server on localhost:8080 too. You can do that by clicking the “Click this for testing certificate and refresh” link. Alternatively, you could also set #allow-insecure-localhost in chrome://flags to avoid the flag issues on Chrome.

Once you have done that, go back to https://localhost:3004/, accept the camera permission. From there, select your video feed ID from the “video from” drop down and click “startAnalytics”.

Lastly, go to the “subscribe video” drop down, select the long pipeline + video ID string, and click subscribe:

You should see facial detection on your face, rendered from the server.

Incorporating OpenCV Models
The Analytics Agent incorporates the OpenCV GStreamer Video Analytics (GVA) plugin architecture. GVA includes various modules that allow for different inference schemes like detection, classification, and identification, as well as input and output modules for sending video to users (back to OWT in this case) providing image overlays, or streaming the data out over mqtt.
Pipelining
In practice, these pipelines are implemented by modifying some C++ code. For example, if we examine /home/owt/analytics_agent/plugins/samples/cpu_pipeline/mypipeline.cc we can see the the various pipeline elements:
|
1 2 3 4 5 6 7 8 9 10 |
source = gst_element_factory_make("appsrc", "appsource"); h264parse = gst_element_factory_make("h264parse","parse"); decodebin = gst_element_factory_make("avdec_h264","decode"); postproc = gst_element_factory_make("videoconvert","postproc"); detect = gst_element_factory_make("gvadetect","detect"); classify = gst_element_factory_make("gvaclassify","classify"); watermark = gst_element_factory_make("gvawatermark","rate"); converter = gst_element_factory_make("videoconvert","convert"); encoder = gst_element_factory_make("x264enc","encoder"); outsink = gst_element_factory_make("appsink","appsink");x |
And these pipelines are placed in a sequence:
|
1 |
gst_bin_add_many(GST_BIN (pipeline), source,decodebin,watermark,postproc,h264parse,detect,classify,converter, encoder,outsink, NULL); |
If you want to change any of these elements, you will need to recompile the pipeline using:
|
1 |
./home/owt/analytics_agent/plugins/samples/build_samples.sh |
Then just copy the compiled libraries over the current one used in /home/owt/analytics_agent/lib/
Obtaining other models
There is a huge set of models housed under the OpenCV Open Model Zoo on GitHub. In addition to all the popular public CV models like mobilenet, resnet, squeezenet, vgg, and many more. Intel also maintains a set – this includes a wide variety of models useful for object detection, autonomous vehicles, and processing human actions:
| action-recognition | head-pose-estimation | person-detection-action-recognition-teacher | semantic-segmentation |
| age-gender-recognition | human-pose-estimation | person-detection-asl | single-image-super-resolution |
| asl-recognition | image-retrieval | person-detection-raisinghand-recognition | text-detection |
| driver-action-recognition | instance-segmentation-security | person-detection | text-image-super-resolution |
| emotions-recognition | landmarks-regression | person-reidentification | text-recognition |
| face-detection | license-plate-recognition-barrier | person-vehicle-bike-detection-crossroad | text-spotting |
| face-reidentification | pedestrian-and-vehicle-detector | product-detection | vehicle-attributes-recognition-barrier |
| facial-landmarks-35 | pedestrian-detection | resnet18-xnor-binary-onnx | vehicle-detection |
| gaze-estimation | person-attributes-recognition-crossroad | resnet50-binary | vehicle-detection-binary |
| handwritten-score-recognition | person-detection-action-recognition | road-segmentation | vehicle-license-plate-detection-barrier |
Intel has more information on these here.
Added models to the OWT Analytics Agent
Adding these involves cloning the repo then grabbing the appropriate models with the Open Model Zoo Downloader tool. Then you’ll need to make sure your pipeline includes the appropriate elements (classification, detection, identification) and adjust the /home/owt/analytics_agent/plugin.cfg file with the appropriate parameters.
Plugin Testing
I played around with the facial landmarks and emotion detection models.
Facial Landmarks
Since I have been playing around with facial touch detection, I decided to check out the facial-landmarks-35-adas-0002 model. This model detects 35 facial landmarks.
To use them for my face touch monitor application I could add MQTT streaming to the pipeline using the gstreamer generic metadata publisher to capture and process the landmark points. For example, I could look to see if the points around the eyes, nose, and mouth are obscured or even combine it with the human pose estimation model.
Emotion recognition
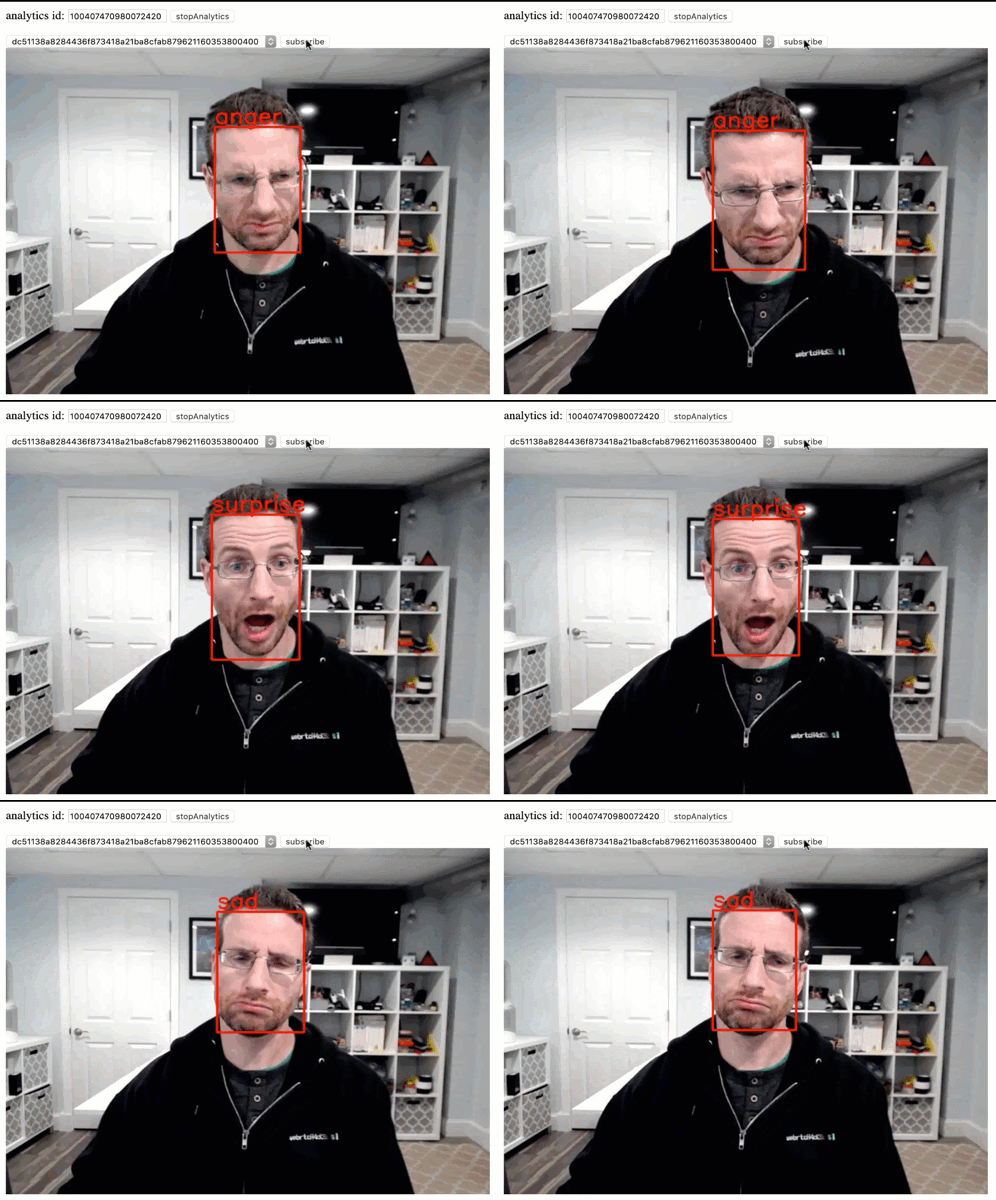
This is another fun one. emotions-recognition-retail-0003 employs a convolutional network for recognizing neutral, happy, sad, surprise, anger.
It seems to pick me up as sad instead of neutral – perhaps staying isolated indoors so much is starting to get to me 😟
Optimizing Acceleration
To take advantage of OWT’s hardware acceleration capabilities, make sure you set the appropriate device in /home/owt/analytics_agent/plugin.cfg – i.e.:
|
1 |
device = "MULTI:HDDL,GPU,CPU" |
Unfortuantely I ran out of time to test this, but in addition to CPU and GPU acceleration, you can also take advantage of Intel’s various Vision Processing Unit (VPU) hardware. These are specialized chips for running neural networks efficiently. I bought an Intel Neural Compute Stick (NCS) a couple years ago to run higher-end CV models on a Raspberry Pi 3.
Of course you can always trade-off frame rate and resolution for processing capacity too.
Recommendations
OpenCV has a long history with a huge development community, ranking 4th among all Machine Learning open source projects when I did a popularity analysis in mid-2018. Similarly, gstreamer is another project that has been around forever. The Intel OWT Analytics Agent is ideally suited to helping these communities add real time stream analysis via WebRTC to their projects. They should be able to take existing GST models and run them on real time streams with OWT.
If you are just starting to experiment with computer vision and want to run them on the OWT server, then I recommend starting with some of the many more basic OpenCV tutorials. Then work your way into the GVA plugins. These precursors will require many days of effort if you are just starting with OpenCV, but from there modifying the Analytics Agent to run these should be easy for you. From there you can optimize the stack to work with your target platform and leverage Intel’s various hardware acceleration options to improve performance.
{“author”: “chad hart“}


Hi
some of the steps seem to be missing. As a newbie, not able to follow and see some action.
Intel has updated their repo, so there may be some changes. I see they have an updated set of docker install instructions here: https://github.com/open-webrtc-toolkit/owt-server/tree/master/docker
Intel has updated its repo – I have updated some of the links to the new OWT Analytics Server guide: https://github.com/open-webrtc-toolkit/owt-server/blob/master/doc/servermd/AnalyticsGuide.md
The setup instructions look like they have changed a bit, so please keep that in mind when following this post.