WebRTC isn’t the only cool media API on the Web Platform. The Web Virtual Reality (WebVR) spec was introduced a few years ago to bring support for virtual reality devices in a web browser. It has since been migrated to the newer WebXR Device API Specification.
I was at ClueCon earlier this summer where Dan Jenkins gave a talk showing that it is relatively easy to add a WebRTC video conference streams into a virtual reality environment using WebVR using FreeSWITCH. FreeSWITCH is one of the more popular open source telephony platforms and has had WebRTC for a few years. WebRTC; WebVR; Open Source – obviously this was good webrtcHacks material.
Dan is a Google Developer Expert with a penchant for hacking together the latest Web API’s with RTC apps. He also runs his own consulting and development firm over at Nimble Ape. In the post below he gives a code walkthrough of how he converted FreeSWITCH Verto WebRTC video conference to a virtual reality conference using WebVR.
{“editor”: “chad hart“}

A few weeks ago, I presented a talk at the ClueCon developers conference about WebRTC and WebVR – a new medium available to Web Developers. Bringing VR content to your browser and your mobile phone has huge potential for applications with new demographics. VR has absolutely become affordable and broadly usable in the past 2 or 3 years with Google’s Cardboard for most recent phones and now Daydream for some higher-end ones. There is also the Oculus Go which doesn’t require a mobile device at all. I wanted to explore how we could use this new affordable medium for applications with WebRTC media.
To be perfectly honest, I didn’t have a clue about WebVR when I submitted my talk into the Call for Papers but knew I could probably get something working after seeing what other demos were able to achieve. The only way I seem to get any time to work on new and exciting things nowadays is to go head on and put a crazy talk into a Call For Papers and see who says yes.
Note: technically it is now “WebXR” but I’ll stick with the more common “VR” for this post.
A-Frame Framework
There’s quite a few ways to get started with WebVR but the route I went down was using a framework called A-Frame which allows you to write some HTML and bring in a JavaScript library and start building VR experiences straight away. And although the demo didn’t quite work out as I’d hoped, it did prove that you can build amazing VR experiences with very little code.
If you’re comfortable with Web Components you’ll recognise what A-Frame does straight away. Now, you might ask why did I go down the A-Frame route rather than using WebGL directly, using the WebVR polyfill and Three.js to create WebGL objects or one of numerous other frameworks out there. To put it simply – I love writing as little code as possible and A-Frame seemed to do that for me.
If you don’t like A-Frame, check out a list other available options like React 360 at webvr.info.
Building a WebVR experience with WebRTC (and Freeswitch)
There’s a couple of WebRTC VR experiences available using A-Frame today. The Mozilla team made one where users could see each other represented as dots in a VR scene and could hear one another. They were able to do this using WebRTC Data Channels and WebRTC Audio, but I couldn’t really find any that utilised WebRTC video and so the challenge of how to use real time video inside a 3D environment began.
The base of the demo for my talk was the open source FreeSWITCH Verto Communicator. Verto uses WebRTC and I already knew how to talk to the Verto module in FreeSWITCH using the Verto client library so half the battle was already fought. The Verto client library is the signalling portion – replacing SIP over Websocket in the more usual experience of connecting a SIP PBX to a WebRTC endpoint.
HTML
Take a look at the A-Frame code I ended up adding to Verto Communicator. It’s 8 lines of HTML all in all:
|
1 2 3 4 5 6 7 8 |
<a-scene> <a-assets> </a-assets> <a-entity environment="preset: forest" class="video-holder"> <a-entity camera="active: true" look-controls wasd-controls position="0 0 0" data-aframe-default-camera></a-entity> <a-entity daydream-controls></a-entity> <a-entity> </a-scene> |
First we have an a-scene element that creates a scene that contains everything to do with your VR experience. The empty a-assets tag is where we’ll place our WebRTC video tag later on.
The next a-entity line is the most important for an “easy” experience that gets users immersed. It’s an a-frame entity with an environment preset of forest – essentially bootstrapping our entire experience.
The remaining entities are for our camera and for our daydream controls. Go check out the available components that come with a-frame as well as the primitives you can play around with to create 3D shapes and objects.
This all just puts together our scene. Next we will setup our control logic code with some JavaScript.
JavaScript
Verto Communicator is an angular based application, so elements get added and removed from the main application space. We’ll need some logic to link Verto to our A-Frame setup. Most of this logic is less than 40 lines of JavaScript:
|
1 2 3 4 5 6 7 8 9 10 11 12 13 14 15 16 17 18 19 20 21 22 23 24 25 26 27 28 29 30 31 32 33 |
function link(scope, element, attrs) { var newVideo = document.createElement('a-video'); newVideo.setAttribute('height', '9'); newVideo.setAttribute('width', '16'); newVideo.setAttribute('position', '0 5 -15'); console.log('ATTACH NOW'); var newParent = document.getElementsByClassName('video-holder'); newParent[0].appendChild(newVideo); window.attachNow = function(stream) { var video = document.createElement('video'); var assets = document.querySelector('a-assets'); assets.addEventListener('loadeddata', () => { console.log('loaded asset data'); }) video.setAttribute('id', 'newStream'); video.setAttribute('autoplay', true); video.setAttribute('src', ''); assets.appendChild(video); video.addEventListener('loadeddata', () => { video.play(); // Pointing this aframe entity to that video as its source newVideo.setAttribute('src', `#newStream`); }); video.srcObject = stream; } |
The link function above is launched when you travel to the conference page within the Verto Communicator app.
Modifying Verto
You can see, when the link gets called, it would create a new a-video element and give it some properties for width and height and where to place it within our 3D environment.
The attachNow function was where the real magic happens – I altered the Verto library to call a function on window called attachNow when a session got initiated. By default, the Verto library takes a jQuery style tag in its initialisation and adds/removes media to that tag for you. That wasn’t going to cut it for me – I needed to be given a stream and to be able to do that manipulation myself so I could add the video tag to needed empty assets component I showed above. This lets A-Frame can do its magic – taking the data from the asset and loading it onto a canvas within the a-video tag that is shown within the 3D environment.
I have one other function I moved into vertoServices.js:
|
1 2 3 4 5 |
function updateVideoRes() { data.conf.modCommand('vid-res', (unmutedMembers * 1280) + 'x720'); attachNow(); document.getElementsByTagName('a-video')[0].setAttribute('width', unmutedMembers*16); } |
updateVideoRes is designed to go and alter the output resolution from FreeSWITCH’s Verto conference. As users join the conference, we want to create a longer and longer video display within the 3D env – essentially, every time we get a new member, we made the output longer and longer so users appeared side by side.
Visualization
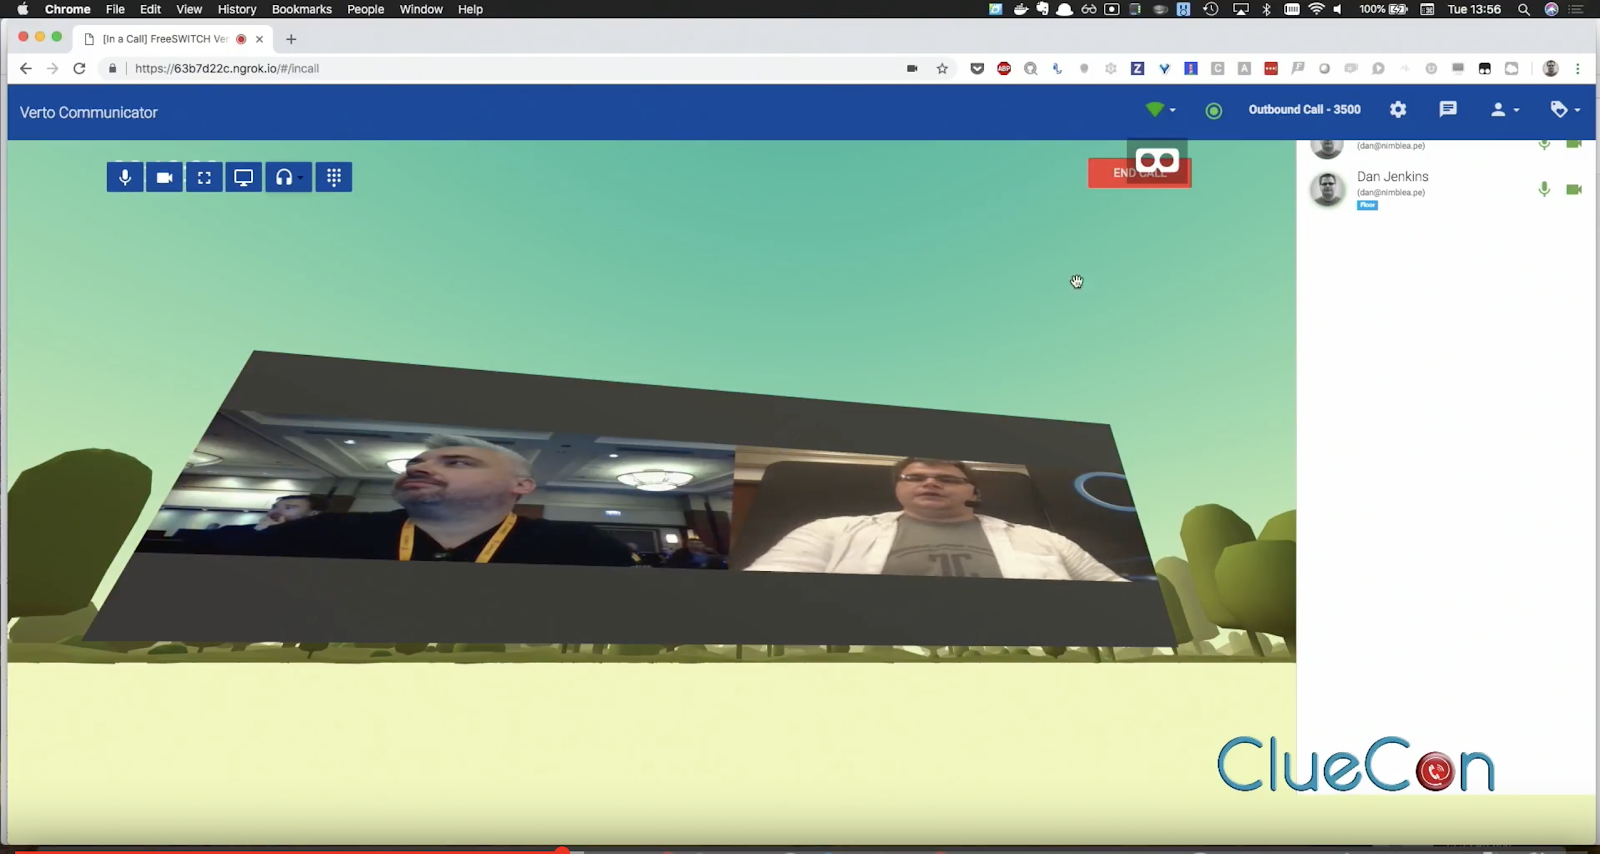
And this was the end result, a VR environment with Simon Woodhead and myself on a “cinema projection” together in this 3D environment.

The really great thing about WebVR is that you don’t need to have a VR headset in order to make it all work, you can click on the cardboard button and your VR experience goes full screen, as though you’re wearing a headset. You can go watch the video from ClueCon on YouTube:
What have we learned?
The demo half worked and half didn’t. The greatest learning was that even though this might be brilliant way to watch a videoconference; it is not really feasible for VR viewers to be included in the stream while they’re watching it with a headset on. Maybe this is where Microsoft’s HoloLens will make things better with mixed reality but that’s a far out dream until those come down in price.
All the code
The code can be found at my bitbucket until we can figure out how to resolve the issue of FreeSWITCH’s git history being corrupt meaning you can’t host the code anywhere else (such as my preferred git store, github) – let the FreeSWITCH team know if you’re facing the same issue with that link.
{“author”, “Dan Jenkins”}


Hey there, I”m doing something similar (primary use case isn’t video conferencing, but immersive diagramming)…have you moved the ball forward on this at all?